Q2 Plans Chapter 8 Page 8-04


- Details
- Category: Q-2/Q-200 Plans
- Published: Tuesday, 23 May 2006 09:05
- Written by Quickie Aircraft Corporation
- Hits: 5112
|
JOINING THE FUSELAGE SHELLS
..... This step is very exiting; you are going to actually complete your first major structure - the fuselage. .....In this section, you will join the top forward fuselage shell to the lower forward fuselage shell ,and the top aft fuselage shell to the lower aft fuselage shell. Do not join the four shells at the fuselage cut line. .....Also, each bulkhead must be joined to the shells with the same number of tapes used previously to attach the bulkheads to the lower fuselage shells. .....This section will require many cure cycles due to problems in accessing all areas at one time. .....Begin by joining the rear fuselage shells together. 2 'BID tapes of at least 4 inches wide are used along the joints inside and out. 1 BID tape fore and aft is used to join the FS120 and FS175 bulkheads to the top aft fuselage shell. You will have difficulty reaching back into the rear fuselage to laminate the tapes. You may. elect to skip ahead to Chapter 14 and cut out the aft top fuselage where the vertical fin assembly is inserted so that you can reach the aft face of the FS175 bulkhead and the inside of the seam. If you elect to do that later, don't forget about it. Of course, micro slurry is used between the parts. .....Joining the forward fuselage shells is somewhat more difficult because of the access to the forward. fuselage area. Whatever area you cannot reach at this time, can be accomplished after you cut out the canopy frame and thus reestablish access to the forward cockpit area. .....The forward fuselage shells also receive 2 BID tapes at least 4 inches wide along the joints on both the inside and outside. 2 BID tapes fore and aft are used to attach the FS94 and Seatback Bulkheads to the top forward fuselage shell. 2 BID tapes, inside, and 3 BID tapes outside, are used to attach the firewall to the top forward fuselage shell. These last tapas should be at least 4 inches wide, and don't forget to round the outside edge of the firewall/shell j_nction prior to glassing. These firewall tapes are very important to keeping the engine attached to the rest of the aircraft, so do a careful job of laminating them. (Unlike the rest of the joints, the firewallshell junction should be painted with epoxy, not micro-slurry). .....This entire section will consume many hours of work and become very frustrating. Take pride in the fact that you will soon be able to sit in a completed fuselage! 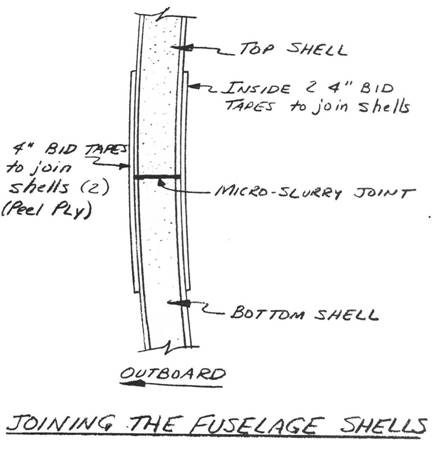 CUTTING THE CANOPY FRAME
..... In this section, you regain access to the cockpit area and obtain your canopy frame at the same time. The sketches show the suggested cut line for the canopy frame. This line is somewhat arbitrary on our part, but the rest of the cockpit area is designed around it so be carefull of deviations. Mark the line with a felt tipped marker on the shells and check for symmetry. Use a fine tooth hacksaw blade to carefully cut through the sandwich. Put the canopy frame/canopy assembly aside where it won't be broken accidentally. .....Don't be surprised if the task takes several hours to accomplish. Also, don't forget the remaining tapes to join the shells and bulkheads together. 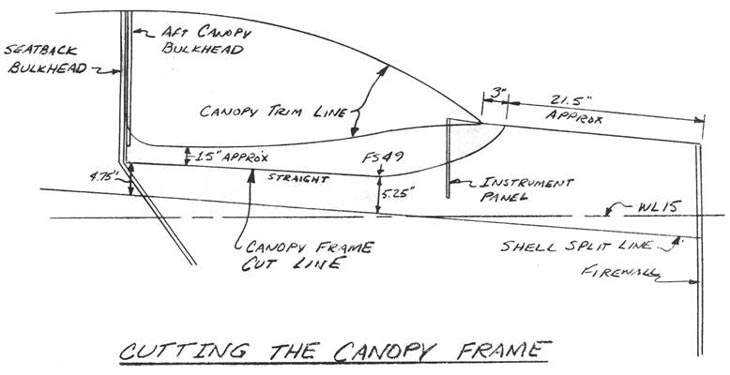 |
||||
|
||||
PAGE 8-4 |
||||