Q2 Plans Chapter 4 Page 4-01


- Details
- Category: Q-2/Q-200 Plans
- Published: Saturday, 27 May 2006 12:05
- Written by Quickie Aircraft Corporation
- Hits: 8379
|
INDIVIDUAL PART CONSTRUCTION INTRODUCTION
..... The first task in the construction of your Q2 is to make many of the small, individual parts required for assembly later. Quickie Aircraft Corporation has found that making these parts at one time is most efficient and will also give the builder a chance to gain experience working with his hands on small pieces that can be easily remade. .....The parts include templates that are used for jigging and rigging various portions of your aircraft. Drawings are provided within this chapter, but primarily the templates are provided in a series of large Appendix drawings included with these plans. All templates are printed full size. .....Jigging and rigging templates should be constructed from material such as hardboard, plywood, or masonite of 1/4" thickness. Aircraft qual ity materials are not required. The hot-wiring templates for the main wing, canard, and vertical fin, as well as the control sur¬faces, should be made out of thin aluminum, masonite, or aircraft quality plywood. These templates must be smooth and wave free, so spend considerable time on each one and sight frequently along the line to check for waves or notches. Any wave or notch will be reflected directly in the shape of your wing, etc. and will be difficult and heavy to correct later on; so do a good job in the beginning. .....Template drawings provided for parts made as a sandwich composite (glass-foam-glass) should still be made on the hardboard, plywood, or masonite of 1/4" thickness. It will be much easier to transfer the complicated curves and lines to the actual part if you have a material more durable than heavy paper. .....The phonolic bearing block comes delivered to you with all of the important precision holes already drilled and reamed to the proper size. The remaining holes are for bonding strength and are non-critical on a precise diameter and position. .....Be sure to identify and number each template and part so that it can be identified easily later when it is needed. Further, group all parts of the same family (e.g. Control System (CS), fuselage female jigging templates, etc.) together. .....The drawings may be glued directly onto the material with Contact Cement. Be careful, however, that you do not paste up the drawings crooked. Smooth out all ripples before the glue sets. Do not use a glue that will cause excessive shrinkish. .....The drawings are reproduced to within 1% accuracy; in most cases, the accuracy is closer to 0.1%. However, in the final analysis, you must build your aircraft and allow for tolerances and errors during construction. Therefore, you may expect not all templates to fit exactly as the drawings indicate. Large differences, however, are reason to check thoroughly on your previous work to see if you have followed the plans exactly. .....One last comment; we have replacement copies of all of the template drawings in case you destroy one accidentally. Don't be bashful about spending a few bucks for a replacement rather than to soldier on incorrectly trying to piece together a drawing that looks like your dog ate it. MAIN FUEL TANK CONSTRUCTION ..... The main fuel tank is a sandwich composite structure that attaches to the bottom of the fuselage for installation in Chapter 14. In this section, you will make the basic main fuel tank, and then set it aside until later. .....Find the Fuel Tank Profile Template on Appendix Sheet 2. Basically, to create the main fuel tank shape, you will heat form two pieces of the 1/4" thick white foam around the templates, glass the top main fuel tank surface, and finally glass the inside main fuel tank surface after the first lamination has cured. .....The main fuel tank is 44 inches wide, so begin by placing the two Fuel Tank Profile Templates that distance apart on a table. Take an appropriate size piece of the white foam, begin at the trailing edge of the templates, and bend it around the forms until you reach the forward edge of the templates. Carefully heat the foam with a hair-dryer or heat gun until it will hold the shape reasonably well, and then use some 5-MIN to attach the foam to the templates at a few locations. Try to keep the foam from becoming too wavy as you form it. 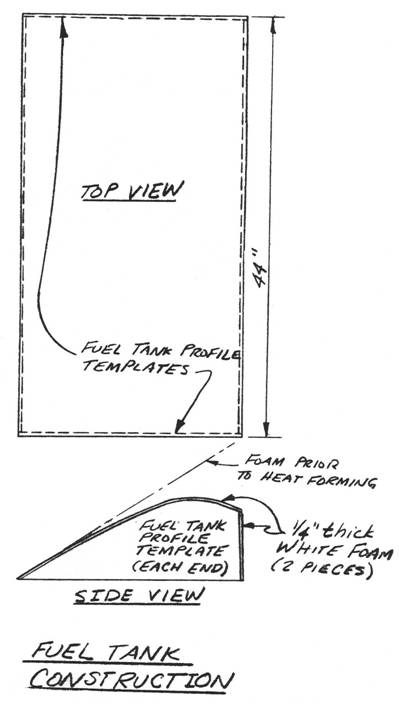
.....
At the leading edge of the templates, another piece of 1/4" thick white foam is fitted vertically until it meets the first piece of white foam; it too is attached with 5-MIN dabs.
Round the joint slightly where the two pieces of foam meet. Next, laminate 2 BID on the outside of the foam oriented 45 degrees to the trailing edge of the white foam.
After allowing the lamination to cure, the next step is to remove the Fuel Tank Profile Templates, turn the foam over, and glass 1 BID at 45 degrees on the inside foam surface. Be careful that the main
fuel tank doesn't warp and change shape during this process.
If you have trouble with waves in the center of the tank, additional Fuel Tank Profile Templates may be
used; if the hot forming operation does not go well, you may cut-and-join several straight line segments.
Of course, the easiest way to build the Q2 main fuel tank is to buy it prefabricated from Quickie
Aircraft Corporation or one of its dealers.
COCKPIT CONSOLE PIECE CONSTRUCTION
..... Many pieces go into assembling the center and side consoles on your Q2. You will make the individual pieces now, and then assemble them to the fuselage in Chapter 14. Full-size templates are provided on Appendix Sheets 1,2,& 5 for the center and side console vertical pieces, as will as for the top side console pieces. Make 2 of each from the'3/8" thick white foam and number them left, right, and center, to identify where they are assembled in the aircraft. (In airplane talk, left is the pilot's left as he sets in the cockpit.) Fiberglass 1 BID on the inside face of each piece. The inside face is the side that does not show after the consoles are assembled. Do not glass the other side. |
||||
CONTINUED ON NEXT PAGE |
||||
PAGE
4-1 |
||||