Q2 Plans Chapter 3 Page 3-7
- Details
- Category: Q-2/Q-200 Plans
- Published: Sunday, 28 May 2006 03:05
- Written by Quickie Aircraft Corporation
- Hits: 6077
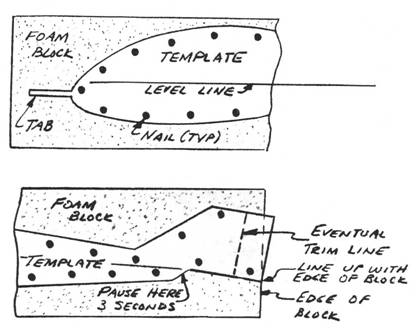
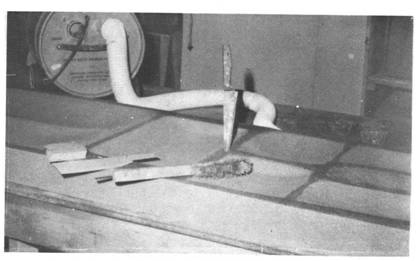
..... The use of the hot wire saw is a simple thing if your equipment is set up properly. Proper wire tension and wire temperature should be maintained for good cutting. The wire tension should be tightened after the wire is hot by twisting one tube with a pair of pliers. The wire should be as tight as possible. The wire should be hot enough to cut one inch of foam in four to six seconds without having to force the wire. A wire that is too hot will burn the foam away excessively. To cool an over-heated wire, simply turn your voltage control to a lower voltage setting. If you use a battery charger, you will have to add length to the wire. To warm up a cool wire, just increase the voltage setting or, with the charger, shorten the wire. Although the foam offers only mild resistance to the hot wire, a long cut will cause the middle of your wire to lag behind the ends. Wire lag can cause problems in tight curves like the leading edge of an airfoil. To reduce lag there, the cutting speed is reduced to about one inch in 8 to 10 seconds. The airfoil templates have notations in the areas where reduced speed cutting is necessary and pause marks where it is necessary to allow the lag to catch up completely. .....The most common hot wire error is wire lag which causes a bow in the leading edge. The following method solves this problem and thus we recommend you use it for cutting the canard and wing. Use the tabs on the templates at the waterline at the leading edge by cutting the core in two passes: one from the leading edge up over the top to the trailing edge, the other from the leading edge (under the tab) down under to bottom to the trailing edge. The thin IIflashli of foam left on the leading edge due to the thickness of the tab is easily removed with your butcher knife. The result is a perfectly straight leading edge. Care must be taken to assure that both ends simultaneously approach the template at the leading edge. Use the following vocal commands "wire is moving toward the tab, now resting on the tab 1/2 inch from the template (confirm both ends in that position), moving toward template 1/4 inch away, 1/8" away, on the template, moving up (talking number), Y (talking number) . . .11. When approaching the trailing edge overlap notch (see sketch) slow down and pause 3 seconds in the notch to assure a full, sharp, accurate surface for the skin overlap.  ..... The hot wire should be guided around the templates with light pressures. Pushing too hard against the template may move them or flex the foam block which results in an under cut foam core. .....The correct set-up is just as important as using the correct tools and materials. Foam is a fairly flexible material and an improper set-up can cause deflection. The foam block should be well supported at each end, so that it doesn't sag and doesn't move around while being cut. .....You need clearance for the hot wire cutter to pass by the table and the weights used to hold the foam steady. .....Foam is manufactured in sizes that are often too small to get a complete core from a single block. it is necessary to use two foam blocks to get the size required for the wing cores. These blocks have to be joined using an epoxy/microsphere mixture. The hot wire won't cut through the micro joint, so all of the hot wire cutting is done with the blocks temporarily joined. Nails or blobs of 5-min epoxy are used for temporary foam joints, but the hot wire won't cut through these. Thus, they have to be placed carefully so that the wire doesn't have to pass through them. .....Don't be overly concerned if you don't make perfect foam cuts: ridges on the foam core from inadvertently lifting the hot wire off the templates are easily faired in with a sanding block. A less-than-perfect leading edge can be blended in by sanding after the foam core is assembled. Gouges in the foam can be smoothed and filled with dry micro to contour after applying the glass skins. The foam is too expensive to throwaway because of a minor gouge. .....A finished foam core may warp out of shape after it is removed from the original rectangular block. This is due to internal stresses in the foam from the manufacturing process, and is no cause for concern. .....A warped core is simply weighted into the jig blocks and shimmed straight prior to glassing. Once the skin has been installed, the foam is held firmly in position by the sandwich structure. URETHANE FOAM SHAPING ..... One of the real treats in the construction will be shaping and contouring urethane foam. Urethane is a delightful material that shapes with ease using only simple tools. A butcher knife, old wire brush, sandpaper, and scraps of the foam itself are the basic urethane working tools. A vacuum cleaner is convenient to have handy since working urethane produces a large quantity of foam dust. .....The knife is used to rough cut the foam to size. The knife needs to be kept reasonably sharp; a sander or file is an adequate knife sharpener since it's a frequent task and a razor edge isn't necessary. Coarse grit sandpaper (36 grit) glued to a board is used for rough shaping. .....Inside contours or "dishing" is done by using a ragged old wire brush to rough out the bulk of the foam and following up with a scrap foam piece to smooth the surface. The foam scrap conforms to the shape of the surface resulting in a very smooth contour.  ..... Outside contours are roughed out with a sanding block and finished using a foam scrap. Dry micro and flox are used to fill voids and pot fasteners in a number of places. All foam shaping should be finished before any micro filling is done, because the filler is much harder than the foam and this makes smooth contouring very difficult. Your best carving template is your eyeball; an occasional check on the depth of a contour is about the only measurement necessary. .....Keep your shop swept reasonably well. The foam dust can contaminate your glass cloth and your lungs. Use a dust respirator mask while carving urethane. Try not to aggravate the better half by leaving a green foam dust trail into the house. | ||||
| ||||
PAGE 3-7 | ||||


