Q2 Plans Chapter 3 Page 3-8


- Details
- Category: Q-2/Q-200 Plans
- Published: Sunday, 28 May 2006 03:05
- Written by Quickie Aircraft Corporation
- Hits: 6105
GLASS LAYUP ..... The glass layup techniques used in your Q2 have been specifically developed to minimize the difficulty that glass workers have traditionally endured. The layups that you will do will be on a flat horizontal surface without the molds, vacuum bags, and other special equipment that are common in glass work. The layups that you do will all cure at room temperature; no ovens or special heating is required. If you have suffered through a project that requires you to build more molds and tools than airplane components, then you are in for a real treat. .....The techniques that you will use are quick but they still need to be done correctly. 90% of the work that you will do is covered in the next few paragraphs so make sure that you read and understand this section very well. If you learn these basics, your airplane will be easy. If you skip over this information, you will probably end up frustrated. STEP 1: PERSONAL PREPARATION ..... Before you get started with a layup, plan ahead. Some major layups take several hours and before getting your hands in the epoxy, it's a good idea to make a pit stop at the restroom. .....Do not start a large layup if tired; get some rest and do it when fresh. It's best to have three people for any large layup; two laminators and one person to mix epoxy. Be sure that the shop is clean before you start. .....Take the recommended health precautions (discussed later in detail) using gloves or barrier skin cream. Get your grubby, old clothes on or at least a shop apron. Make sure that your tools are clean from the last layup and ready to use. Your working area should be between 7O°F and 90°. Best results are obtained at 75 to 8O°F. Below 7O°F the epoxy is thicker making it more difficult to wet the cloth. Above 90°F, the possibility of an exotherm is greater. STEP 2: CUT FIBERGLASS CLOTH ..... The fine points of glass cutting have been covered earlier. Remember that there isn't any requirement to cut accurate dimensions. Cloth dimensions are given well oversize. You scissor trim them as you go, while laying the cloth up. It is a good idea to keep two pair of scissors: one clean and in the glass storage area, and one in the shop that gets epoxy on it. After cutting, roll or fold the material; keep it clean and handy for the layup. STEP 3: PREPARE SURFACE ..... The only difference between layups over different materials is in surface preparation. The layup over foam will be covered here since you will be doing more of it, and other surface preparations will be covered separately. .....The foam surface is prepared by leveling uneven areas with a sanding block and brushing or blowing any dust off the surface. Use compressed air or vacuum to remove dust. .....Now is the time to accurately check that the foam core is the correct size, shape and contour. Refer to the section views of the part - be sure your core looks exactly like that on the section view. Lay a 12 inch straightedge spanwise on all critical areas of the flying surfaces and be sure you don't have any high or low places or joggles. Measure any areas that involve fiberglass buildups to check for correct depth. Build up is 0.009 inch per ply for UNI and 0.013 inch per ply for BID. STEP 4: MIX EPOXY ..... Mix epoxy when you need it, not before. Micro, dry micro, and flox may be required at various stages of the layup. Mixing and composition details were covered earlier. Apply a coat of micro slurry to the foam surface before the first glass ply is laid over it. The slurry can be poured on the foam and spread thin with a squeegee. Fill any dings or gouges in the foam core with dry micro prior to applying the slurry. STEP 5: LAY ON THE CLOTH ..... Lay on the cloth in the specified orientation. Pull the edges to straighten the cloth out and to remove wrinkles. Maximum strength and stiffness is obtained if the fibers are not wavy or wrinkled. If the cloth is to be applied around and/or into a sharp corner, you will find the job easier to do if the fiber orientation is at 45° to the corner. Don't get depressed if the layup looks like a hopeless mess at this point. Press on with patience and things will work out fine. To remove wrinkles, study the direction of fibers, follow the fibers to the outer edge of the cloth and pull on the outside edge. Pushing a wrinkle off the part is incorrect. Once the part is free of wrinkles use a squeegee and make light passes from the center outwards to smooth the cloth. 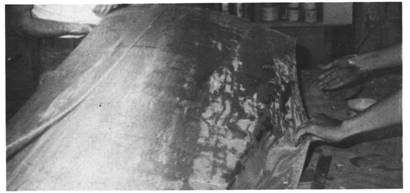 STEP 6: WET OUT THE CLOTH ..... Do not use micro between plies of cloth. Wet out the cloth by pouring on a thin coat of epoxy. This may not be necessary if there is enough epoxy under the cloth to be brought to the surface. This is done by "squeegeeing", which involves drawing the squeegee over the cloth. This brings excess epoxy up from below to wet out the cloth, resulting in a weight savings as compared to adding more epoxy on top. REMEMBER, epoxy adds no strength beyond what is needed to wet out the white color of the cloth and fill air voids; any further addition of epoxy is only dead weight. .....Where multiple plies are required, the first plies may be laid up wet and the excess resin brought up by squeegeeing to help wet out the middle plies. To do this, pour epoxy onto the part and move it around the surface with a squeegee. Your work will go much faster if you make the layup too wet, then remove excess epoxy with many light passes with the squeegee. Do not squeegee too hard, as this can starve the surface of micro and introduce air. Continue to inspect for air (tiny white flecks or bubbles) and stipple (a vertical stabbing motion with a paintbrush) or squeegee in more epoxy to remove the air. A handy squeegee can be cut from the flexible plastic found on a coffee can lid. You may also find a paint roller handy for spreading around the epoxy. The final plies are ambitiously stippled and additional epoxy is applied sparingly. When in doubt - squeegee it out. .....As you wet out each ply, scissor trim to within 1/2" of any overhang (trailing edge, etc.). This 1/2" will be knife trimmed after the layup cures. If an overhanging ply isn't trimmed, it lifts the edge up and makes a bubble. .....After scissor trimming, restipple the edges to be sure there are no voids. Wet the cloth beyond the trim line at least 1/4" to allow easy knife trimming later. 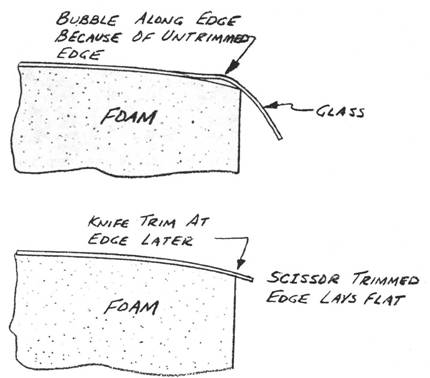 | ||||
CONTINUED ON NEXT PAGE | ||||
PAGE 3-8 | ||||