Q2 Plans Chapter 3 Page 3-10


- Details
- Category: Q-2/Q-200 Plans
- Published: Sunday, 28 May 2006 03:05
- Written by Quickie Aircraft Corporation
- Hits: 5792
metal surfaces should be free of oil and grease and, except for bolts, nuts, and other fasteners, metal surfaces should be dulled by sanding with 220-grit sandpaper, and coated with epoxy before setting in place. Cured micro surfaces should be sanded dull but be careful not to obliterate surrounding foam surfaces while doing it. In practice you may be glassing over several types of material in the same layup and you will be using most of these surface preparation techniques together. ATMOSPHERIC CONDITIONS ..... Temperature has the greatest effect on the working properties of your epoxies. 75 degrees farenheit is an ideal temperature. The range from 60 to 90 is acceptable with the precautions mentioned in the section on EPOXY. Humidity has a lesser effect on these materials than it does on aircraft dopes and some paints. Humidity will only create problems if it is over 75%. Don't undertake a layup if it is pouring down rain outside or, if you notice a cloudy "blush" on the wet epoxy surface, or any evidence of whiteness in the epoxy due to moisture. RECOGNITION OF A DRY LAYUP ..... One of the most important things you must know is how to inspect for the presence of air within a layup. Air leaves somewhat crystal-like flecks of white areas, noticeably different than the white color of the microballoons. The presence of air is shown in the adjacent sketches in 3 forms: (1) A bubble or large void at the foam surface or within the laminate, (2) small bubbles of air scattered throughout an area, or (3) inadequate filling of the outer ply. Make a layup of 3 ply BID in a 6-inch square over a scrap piece of foam, trying to achieve these 3 types of dryness. Let it cure with the defects. This will be a handy sample to use to instruct others who will help you inspect.  DRILLING, GRINDING, & SAWING ..... Drilling through cured glass tends to tear the surface plies on the back side. Backup a glass layup with a wood block for drilling as shown and drill at medium speed.  .....Using a small hone, grind the cutting edges of your drill bit flat as shown (not undercut). This will keep the drill from grabbing into the glass. Don't over-do it, just make a couple of light passes with the hone. 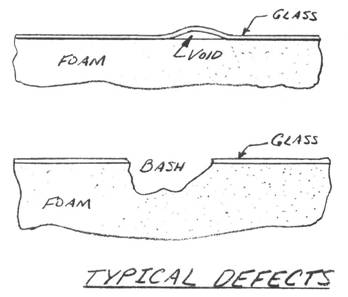 .....In several places rough, cured glass surfaces occur where overlaps or thick buildups are done. These rough edges should be smoothed as shown using a grinder or sanding block.  .....The Dremel (Moto Tool) or Home Shop (Weller) is a very versatile tool with many uses in the construction of your Q2. The kits usually have a nice selection of bits, cutters, grinders, stones, and mandrels for every concievable use. The three types of bits shown here are the most useful for your project. Don't throw the others out, as your next door neighbor might be able to use them on his supersonic ornithoper project. 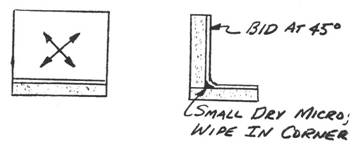 RIVETING ..... A pneumatic riveter is not required. The few hard rivets used can be set with a hammer, using your vise as backup. The 'pop-type' rivets are pulled with a low-cost hand puller available at any hardware store. | ||||
| ||||
PAGE 3-10 | ||||