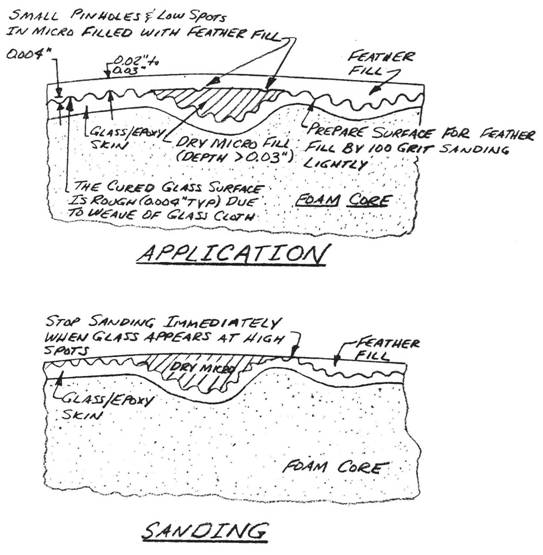
.....Paint a thin coat of epoxy over the area to be filled. Dry micro is then lumped over the area. The fill must be high, such that material is sanded away to bring the area into contour. The micro should be
mixed very dry (lots of microspheres) to save weight.
Let the micro cure at least 24 hours.
Sand the micro overfill into contour using a
hard sanding block, or spline with coarse (36 to 60-grit) sandpaper. Exercise extreme caution while sanding. A few careless strokes with coarse paper can ruin your structure!

STEP THREE: FEATHER FILL
.....
Sand the surfaces lightly by hand or with a soft foam sanding block in preparation for feather fill. A spray or brush coat of feather fill will build up .02" to .03" thick, fill the glass weave and any medium sized out-of-contour spots. Feather fill will require several hours curing time before it can be sanded. The cured feather fill is sanded to contour using a spline or soft block and 100-grit sandpaper. Again, extreme caution must be exercised not to damage the glass structure in pursuit of a good finish. The contouring must stop immediately when the highest glass peaks begin to be visible as the feather fill is sanded away.
.....If you find that you have underestimated the fill required or just have
a
thin coat, don't hesitate to use a second coat of feather fill. A well prepared
surface
generally won't need more than one coat. When you have finished contouring the
feather fill, the sur¬face should be basically smooth and fair. The primer
to follow is not intended to be contoured heavily, just smoothed with finer sandpaper
for a smooth finish while leaving a substantial ultra violet barrier.
.....After you have filled and contoured, reinspect
for sanding damage; it is an easy thing to do!
Remember, you are only allowed to sand into the first skin ply in local areas
no greater than 2 inches in diameter and all of these areas must total less than
10% of the surface area. Wherever there is only one
ply, or where the UNI cloth is crossed for strength
(e.g. the canard and wing skins), no sanding of the
ply is allowed, except for "scuffing Upll the surface.
Be Careful!
STEP FOUR: PRIMER
..... The
ultra violet radiation barrier is provided by the heavy carbon
black content of the dried primer (Dupont 70S). The primer
gives the whole surface a flat black color and the sanding should never remove
it completely, exposing the light gray feather fill below. The primer is sprayed
on, allowed to dry, and sanded lightly to achieve a smooth surface. The first
primer coat is sanded using 220-grit and the second
coat very lightly wet sanded with 320-grit. When complete, the primer is very
smooth, dark, and ready for finish paint.
STEP FIVE: FINISH PAINT
.....Follow the manufacturer's directions for the
type of finish paint that you have chosen.
COCKPIT INTERIOR
.....It is not necessary to fill the glass
weave, although some very light sanding may be done to smooth the surfaces.
Apply one coat of the Dupont 70S primer
to the interior glass ,surfaces for ultra violet protection
prior to painting the
interior.
.....A light color (light grey, green, or blue, etc.)
is recommended on the cockpit interior to avoid high heat buildup when
the aircraft is parked in the summer sun with the canopy locked.
Automotive trunk paint may
also be used. Its IIspeckled" appearance will hide the weave of the glass
cloth.
|

