Q1 Plans Chapter 6 Page 6-2
- Details
- Category: Quickie Plans
- Published: Wednesday, 22 October 2008 01:00
- Written by Dan Yager
- Hits: 3796
BASIC ELEVATOR CONSTRUCTION
The basic elevator construction is very similar to the basic aileron construction that you have already accomplished. Reread the “Basic Aileron Construction” section before proceeding further.
These instructions only cover the construction of the left elevator, but the right one is a mirror image.
Begin by rounding up CS16, which is a 6 ft. length of 1” O.D. x .035” wall 2024T3 aluminum tubing. You have already hot wired the inboard and outboard elevator cores, so gather these together also. When the cores are joined they should total 6 ft. in length.
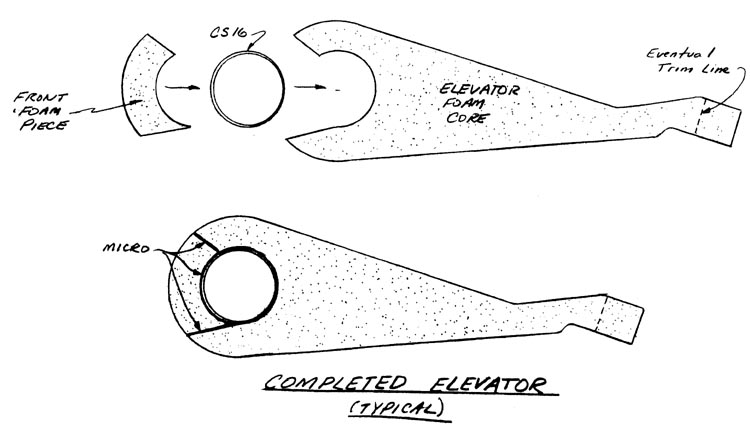
Basically, you will join the inboard and outboard core together, insert CS16, replace the front foam pieces, sand the combination after curing to remove bumps and joggles, layup the bottom skin, layup the top skin, and final trim the trailing edge after installation.
First, check to make sure that the cutout for CS16 that you hot wired in the foam cores is large enough by putting the cores, CS16, and the front piece together dry. If the front piece won’t clamp up against the core, carefully enlarge the cutout for CS16 until it will.
Sand CS16. Mix up micro, paint it on both CS16 and wherever CS16 comes in contact with foam. Join the inboard and outboard foam cores together; then insert CS16; then insert the front foam piece. Do not telescope CS16 into the core by pushing it from one end; this will cause voids in the bond. Instead, it should be inserted all along the span at one time. Use nails to hold everything in place while it cures(see aileron section).
The elevator receives one BID at 45 deg. to the trailing edge. Lay up this one ply exactly like you did with the ailerons.


