Q-talk 18 - LETTERS - Q-TIPS


- Details
- Category: Q-Talk Articles
- Published: Tuesday, 31 October 1989 06:11
- Written by Jim Masal
- Hits: 2926
Dear Mr. Masal
I would like to receive Q-TALK. I have been interested in building one of these airplanes myself ever since one went cruising quietly over my head near the town of Palmer in the Matinuska valley of Alaska. I felt like a small boy peering through the store's window pane.
Joe Johnson, Springer, OK
ED. NOTE: We know the feeling, you're welcome here.
Dear Jim,
I have accumulated over 200 hours on N45BT, my Konig powered Quickie. It is over 9 years old now, but before flying again I plan to make some changes:
1. A "trickle" charger/generator to keep the battery up. I am experimenting with an inductive coil on (or near) the rotating magnet for the CDI unit - if anyone has tried this I would appreciate hearing from them.
2. The vortex generators are too fragile. I am going to fabricate some thin metal ones in groups of two.
3. I have places to repair where the paint turns loose between the Feather Fill and the black U.V. barrier. This has been an on-going thing. Anyone at this point in construction would be wise to consider another approach. I used Dupont 20S and an acrylic enamel.
Bill Thurman, Hixson, TN
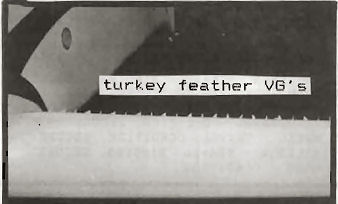
ED. NOTE: Regarding VG's. Charlie Lipke had an innovation at OSH. His turkey feather VGs made from arrow shaft feathers reportedly worked well. Interestingly, when he cleans his wing, if he wipes it in the right direction he can wipe right over the feathers and they will spring right back up. No more fussily cleaning around each VG.
Dear Jim,
Our Q-1 is moving along slowly.
One change I made was to an aluminum fuel tank made just like the plans specify. It took a great deal of extra time, but I won't be worrying about the fuel softening the epoxy.
I used Harold Little's idea when building the wing spar (the "C" section) only I took the idea one step further. Instead of glassing the spar in two pieces and joining the foam. I joined the foam cores together and then glassed the spar in one piece. Worked well for me but would never have thought of it if it weren't for Q-TALK. Thanks, Harold. What the plans call for is a joke.
Another idea for mounting the wing and canard. When leveling the fuselage, use the firewall and level line on the fuselage since it is perpendicular to the firewall. Why not use it instead of the fuselage line which might be a couple of degrees off?
Robert Bone, Ft. Wayne, IN
ED. NOTE: The fuselage level line disappears just when you need it the most, doesn't it? I had thought of embedding a couple short sections of small-bore copper tubing in two spots along the level line so that on the finished airplane I would have 2 small holes that I could put small nails into and lay a level across. But since I didn't, I always use the trick you suggest of jacking up the tail until a level on the firewall indicates it is perpendicular to the earth.
CUSTOM COMPOSITE COMPONENTS
RD 3, Box 107 B
SOMERSET, PA 15501
(814) 445-8506 or (814) 445-8608
Quickie/Q-2/200/Tri-Q plans -complete kits - builder technical support - all metal fabricated parts - Tri-Q conversion kits and sparless canards - component fabrication service. Call or visit our facility. We're here to help you get your Q-bird into the air!
Custom Composites, in business since 1981, has built over a dozen Q-2's and other composite aircraft parts.
* * * * * * * * * * * * * * * * * * * * * * * * * *
WANTED: We are in need of Q-200 carbon tube spars to fill present orders. Call or write with details.
Dear Jim,
I have written a little weight and balance program for the IBM compatible PC's. It seems to work real neat. I am sending you a copy for your evaluation. If you think it's worth the effort, I will gladly furnish a copy to anyone for $5 to cover the cost of the disk and mailing (seems to be simple and working for me too. ED.) This one is for the 2 place Q's but I also have one that will work on most any airplane for the same deal.
Here in Springfield, Ron has his yellow bird flying now. His Revmaster cooling system is working great...almost too cool. He will send you info on it later.
James Langley, 245 E. Kimberly St., Republic, MO 65738
Dear Jim,
I am beginning to see why people who are not even Q builders will tell you that, "Jim has the best newsletter in the business." As of now I am not letting myself work on the project I bought from another builder until I learn more about it. Case in point: I started as soon as I got it and made about 3-4 screw-ups that I should have read more about before I started. I have a good background in building things from hot rods to drag boats but I have read enough to form one opinion, that is...THIS IS NOT A PLANE FOR SISSIES, ARE YOU MAN ENOUGH TO BUILD AND FLY THIS THING? If you don't go at it with this type of approach it will scare you to death! Well, put me in the game, Coach...
Dale Warnix, Camden, AR
Dear Jim,
First, I have moved to Albany, NY from Poughkeepsie. The Tri-Q200 moved with me, for the second time. You could say it has two cross countries already without ever being in the air.
On a trip to Dallas, I got together with Bob Malechek. What a guy and what a plane. He must have read my mind, though when he asked if I was ready to try a roll!
Rick Lavigne, Albany, NY
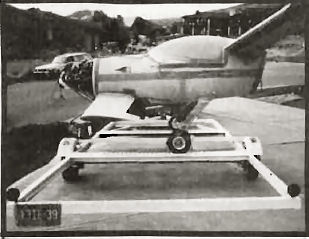
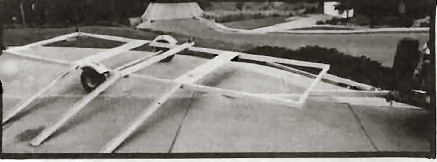
ED. NOTE: You Nomads are really putting some ground miles on these birds...and SAFELY, too. John Derr moved not long ago from CO to NM with his Tri-Q in tow. He searched around for a suitable trailer, but when he had no success, he whomped up a simple looking one himself and had NO problem hauling it the distance.
Jim:
Not long ago I bought a Quickie from a man in Texas and had it shipped to the Philippines where I am working as an A&P for an aerospace company. I've been having real good luck with my project and am making steady progress. I've finished the wing and fuselage already. I've found it to be a nice kit that's fairly easy to understand, barring a few small things. This is probably the first Quickie built in the Philippines, and builder support is kind of slim on this side of the world.
Steve Nelson, Philippines
Dear Jim,
Just a word of warning for those who convert their Q's to Rotax power...it's possible to get carried away with the lead in the tail routine when you convert. Remember, a half pound at that moment arm can make a tremendous difference in the stability characteristics of your particular airplane.
Last spring I noticed that my plane was tail heavy on takeoff and found that one "stall" pitch bucking would diverge in amplitude if held for a prolonged time. I had removed the choke and pull starter from the engine and this is more than likely the cause. I plan to remove some lead from the tail. I currently have 5 pounds on station 147 and without the pull starter 3 pounds is probably more appropriate.
Norm Howell, Spangdahlem, West Germany
Jim,
My Quickie, Ser. #20 has forty hours on it and then developed an oil leak in the rear case. Hope to have it back in the air along with the Tailwind W-8. Any Quickies passing through Midland, MI are welcome to call 517-832-8115 from Barstow Airport.
Dale Johnston, Midland, MI
Dear Jim,
Well, after 6.5 years of building I'm finally flying my Q2. The first flight was quite an enjoyable experience, one which I'll never forget.
I have about five hours and seven landings under my belt now and thought some of my experiences may be of some value to other builders. My plane has the modified canard with tailwheel and a Revmaster engine. I imagine, like many others, my major fear was my ability to safely land the plane. In second place was concern about the reliability of the engine.
Here is what I'd recommend to anyone prior to first flight:
- Get enough taildragger time to feel comfortable.
- Do enough high-speed taxi tests to feel comfortable. I found that controlling the plane in a taxi test to about 50 mph is about as difficult as during takeoff and landing.
- Rely on aileron steering to control your takeoff and landing - the tailwheel does not provide enough control above about 30 mph. Practice using aileron steering in high speed taxis until it becomes second nature.
- Build in an aileron reflexor; it will ensure your ability to touch down in a 3 point attitude.
As for the engine, I only have about 15 hours on it (including taxi time), but so far it's running very smoothly. I paid careful attention to it's baffling and so it runs in the green, CHT and OT, during climb out. A major cause of VW engine problems is overheating, so some of the Revmaster problems can be traced to that.
A couple of specs on my plane: E.W. 575 lbs. and top speed so far is about 150 mph. I don't have an accurate calibrated number yet.
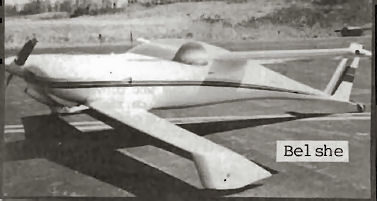
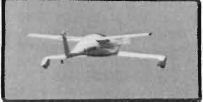
A final word - I couldn't have gotten through this successfully without the help of a lot of local friends and also fellow Q2 builders Mitch Strong and Charlie Belshe who gave me a lot of good advice and invaluable rides in their Q2's.
Manny Lewis, Scotia, NY
From Tom Gordy
ELEVATOR CAUTION
My elevators each have two CSM2 assemblies in them -- the first was inserted backwards despite the fact I thought I knew what I was doing. The second time, I got it right. Not only is this error frustrating, but also it causes a delay in your building while you wait for parts from QAC. Be careful not to make my mistake.
Your life will be easier if you mount your elevators' hinges on the canard before you mate the canard and fuselage, and while you have the canard jigged vertically. Do the CS17 hinge last. Fill the area where it will go with plenty of flox, mount the CS17 on the CSM2 assembly in the elevator, tape Peel-Ply around the elevator in the CS17 area, and install the elevator on the canard. Make sure the CS17 is embedded in the flox and CS18s as called out in the plans and that it is still on the CSM2. Set the elevator to slot gap by using mixing sticks firm, but not yet completely set, carefully remove the elevator (just to be sure you CAN remove it). If you can't remove it, pull the CS17 out of the almost cured flox, correct whatever caused the problem, and try again. You should get it right the first time with no trouble. After the flox cures, use your Dremel to get rid of the excess flox (there should be plenty) in the elevator slot. Be careful not to weaken the support for the CS17 as you do this.
From Sam Hoskins
Dear Jim,
I was really pleased to read about Rusty Cowles award at Oshkosh, he sure has a beautiful airplane. If Bob Malechek had his buggy at OSH this year, they probably would have had to split the trophy!
Sorry I didn't make the forum, I had to get back to summer school. Just about got my A&P now. N202SH is flying well these days; I'm up to 380 hrs now. I've had my second round of sticking valves. Maybe I'll try the Marvel Mystery Oil trick that Rusty is using.
In the last newsletter I saw that some guys were still having problems with oil cooling. My Q-200 had the same trouble and I solved it, while at the same time making my aircraft more serviceable at oil changes. At the Springfield Flocking last spring I stole an idea from Bob Malechek and since he hasn't written it up, I will.
Bob installed a remote oil filter on his Q-200. I did the same and here's information how you can also, but I'd like to add a little background information. The Continental 0-200 normally uses an oil screen to filter the big pieces of stuff out of the oil. It takes care of large particles, but not the small stuff that paper filters will remove. This screen is theoretically designed in such a way that even if it were to clog up with debris, the engine will still be able to receive enough oil to get you home. When adding oil coolers or filters, you should keep this same reasoning in mind. If your device were to clog, you still want oil to keep flowing through a bypass valve. Now, how can you accomplish this?
Easy! First, call J. C. Whitney automotive supply in Chicago and send for their catalog. They sell a real nice remote mount oil filter bracket for about $8.00. This mount will accept aircraft type filters and seems to be of good quality.
Next, find your bypass valve. Continental used to have a heavy, inefficient oil cooler that bolts onto the left side of the engine. (I don't recommend these; I've had 2 blow open on me!) As an interface between the oil cooler and the crankcase, there was a mounting bracket with a bypass valve in it. The idea was, if the oil cooler were to plug up (cold weather) the ball in the valve would unseat and the oil would bypass the cooler. This can act as a safety for your remote oil filter. If the filter clogs for whatever reason, the valve will still pass oil to the engine. This bracket is the part that you need to get hold of. You can get them new ($250.00 Ouch!) or if you scrounge around you should be able to find one at the Fly-market or Aircraft junk yard. The oil cooler would probably still be attached. Check an 0-200 parts catalog for part numbers and illustrations.
Now all you have to do is make up an adapter plate out of 1/2" aluminum, cut 2 pipe thread holes in it, mount it on the bracket, have your local FBO make 2 short hoses for you and you're in business. LEAVE THE ORIGINAL OIL SCREEN IN PLACE! Please, try and use aircraft hoses and hardware wherever possible. Off field landings in Q's are the pits.
Direct an air-blast tube at the oil filter for cooling. This has lowered my temps about 25 degrees. For those really hot times of the year, a guy could make a shroud (like your gascolator shroud) which would provide even better cooling.
LEAVE THE ORIGINAL SCREEN INTACT AND IN PLACE! Keep in mind that this filter is only filtering 1/2 of the oil. The port that you are mounting this on supplies oil to the left galleries only. I'm not sure what my oil change intervals should be with this setup, but I'm shooting for every 100 hrs. with filter changes at every 50 hrs. With the screen doing all of the filtering, I was changing oil at 40 hrs. and always pulled the engine to check the screen. Now I plan to check the screen only at annual inspection time but will have oil analysis at oil changes. Any comments on the wisdom of all of this would be welcome.
The second idea I stole from Bob was his method of mounting his carb heat box. I take the heat directly off of the exhaust pipes ABOVE the carb heat box. This did away with the monkey business of the Aeroduct hose. In addition I was able to mount the carb heat box directly to the crankcase via a bracket and have a good, solid installation.
Dear Jim,
I have completed construction of a hand-laid SL-1 canard, which I will be mounting soon. Then I'll begin mounting my 115 hp Lycoming 0-235. I hope to be flying by fall '90.
Kimbull McAndrew, Calgary, Alberta, CANADA
ED. NOTE: Several of you guys are working on 0-235 installations and several more want to. Keep us informed of those trails/tribulations so that each one of us won't be re-inventing the same wheel over and over, please.
Dear Jim,
Just a note to let you know that the lady Quickie Builders Association, of which I seem to be one of the few members, has not given up the ghost. C-GTDV was finally given its flight permit and I have been doing some high and sort-of high speed taxi tests. The plane seems to be reasonably good so far; too bad the pilot is such a chicken. Perhaps it's better to be a bit chicken at first.
Fellow Q-builders out there should beware of the pressure to make you fly before you are ready. Even the tower gets into the act with the occasional remark. I am very stubborn and will fly when I'm darned good and ready. I'll bet there are a lot of people who wished they went a bit slower at first. My first taxi test was actually really funny. Since I'm female and I don't have to be BRAVE (or pretend to be), I can admit that my first taxi test was PURE TERROR. I was so scared that I fogged up the inside of the canopy and had to delay my run until it cleared. The run was one of the most exhilarating things I have ever experienced in my life. If the plane self-destructed in the hangar right at this moment, I would have had no regrets about the project. I have learned so much from building this plane and it's been FUN.
If some of the other members are feeling like giving up, can I send a message? Get on with it, finish it and at least taxi the darn thing. You will feel so good. (My, aren't we UP today!).
On my second taxi, I just went out intending to taxi around. Honestly, I did not feel too much like a high speed, but the controller asked me if I'd like to have a quick run on one of the inactive runways. Well heck, what could I say but SURE, so I lined up and poured on the power. Everything was great until the tail got a bit light and we suddenly shot off at a right angle to the runway. Fortunately for me, I took some time a few years ago with the world's rottenest Citabria. That miserable taildragger taught me a lot about dancing on the rudder pedals. It was a wild ride before I managed to bleed off enough power to stop the Q from taking a dive into the weeds. How could I be so dumb as to accept a high speed on a runway with a 80 degree, 8 kt. crosswind?
Let's face it; the Q is a very sensitive little bird. Crosswinds are not sensible on your second high-speed run. My favorite old, wise flying instructor remarked to me after my runway aerobatics to remember this: calm winds, quiet traffic, no crosswind, preparation and don't do anything you hadn't planned. He also told me when setting up to land, not to overshoot and to try again rather than try to savage a bad approach. WOW, all this good advice! I should like a Mother-In-Law!
Some people have kids, but my husband, Gord, and I are expecting a new arrival in the family of a different sort...A KIT CAR. I do love that fiberglass. Besides, can you ever have enough toys???
Fran Benton, Victoria, B.C., CANADA
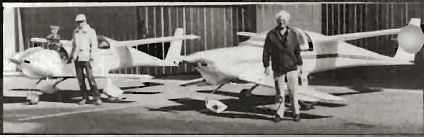
Hi Jim,
The enclosed photos show the culmination of my efforts to find a simplified engine mount and magneto box that would support the engine in a much stiffer structure than perpendicularly to the 1/4" laminated plywood firewall. I thought the original firewall would be very efficient in distributing the engine loads to the surrounding structure, but not for receiving concentrated loads from the engine attach bolts.
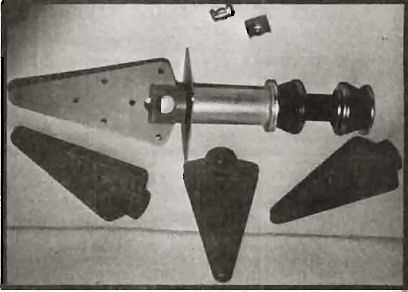
The first photo shows the 4 engine mounts, each consisting of a 1 1/2" diameter slug of 4130 steel that is attached to two .080 thick 4130 flanges welded to the slug. The slug has a hole drilled perpendicular to the axis of the engine attach bolt to allow the insertion of a 3/8" dia. barrel nut and its retainer. The barrel nut has a self-locking insert in it (I'm still going to safety wire the heads of the bolts) and also provides a small amount of radial flotation to accommodate slight amounts of misalignment. I could have threaded the slug and eliminated the barrel nuts, but if in the future I should ever cross-thread one of these fittings I'd have a tough time replacing the fitting. Seven pairs of 3/16" dia. in-line holes are drilled through the flanges.
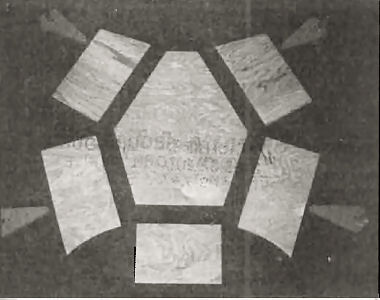
The second photo shows the box taped together and the engine fittings partially inserted into the magneto box. The walls of the box will be notched to allow the slug of the engine mount to be recessed just enough so that the face of the slug will be flush with the front of the firewall.
The entire box will be laminated with two BID all over with additional plies inside and out at each fitting location. Once the fitting attach holes are located in the laminated wall of the box, 1/2" OD bushings will be floxed to the walls.
The large flange on the large engine mount spool will be modified to encircle the face of the engine mount and extend outboard of each mount so attach bolts can be installed through the firewall in a similar manner as outlined in the Q-2 plans.
This mount is infinitely stiffer. It should eliminate any kick-loads without dumping any loads directly into the firewall. The firewall, mag box walls and aft cover act as a monocoque structure and distribute all the engine loads over the entire perimeter of the mag box and then into the firewall for uniform distribution into the fuselage shell.
The 0-200 engine I purchased is of the -42 accessory configuration. One of its characteristics is that it utilizes the Delco Pull Starter. Upon observation of the alignment of the T-Handle cable to the starter lever-arm, it appears as though the cable will interfere with the upper R.H. engine mount. I contacted Teledyne-Continental and inquired if the pull-starter could be readily exchanged with the non-pull-starter type. I was told that the engine block would have to be separated and some accessory section gear parts replaced, etc., etc., -- in other words -- lots of bucks.
The pull starter is a single lever, two-stage operation - the first motion actuates the sprag that engages the starter pinion gear with the flywheel and the subsequent action electrically energizes the starter motor, providing the starter switch is initially turned to the BOTH position. It therefore seemed to me that if I supported the pivot shoulder bolt of the lever pivot on an angle bracket beneath the starter, I could reposition the actuating cable beneath the starter and out of the way of the engine attachment. Now the lever's only function is to actuate the sprag that engages the pinion as mentioned earlier. The initial Cessna OFF-L-R-BOTH ignition switch would also have to be replaced with an OFF-L-R-BOTH-START switch and a starter solenoid. The new starting procedure would not be: 1) manually actuate lever arm to engage starter sprag, 2) turn ignition switch to START then, 3) after engine starts move ignition switch to BOTH and finally, 4) manually disengage starter sprag by releasing starter lever. Is the relocation of the starter level really this simple or am I overlooking something???
Dick Barbour, Rogers, AR
Dear Jim,
I recently wrote about installing a remote oil filter to double as an oil cooler. Well, right after I sent that letter off, I spied in Trade-A-Plane, a store-bought filter setup for the small Continental engines! El Reno Aviation in Oklahoma sells 'em for $189.00, including all hardware and filter. They are designed to bolt right on to the Continental 0-200, (or C-85) oil cooler port, with no further modification or hoses. The picture in Trade-A-Plane looks like it will even fit a Q-200 installation. Could probably install it in less than an hour. Build a cooling shroud around this, and you'd have a pretty good set up to filter and cool (I think).
Rudder Flutter: I apparently have experienced it. On 4 separate occasions, when I pushed the airspeed over 195 mph, the whole airframe started vibrating something fierce! The first time it happened I thought I had a serious engine problem, or lost a part of the prop. It was scary!
Not knowing when to quit, I investigated the situation a little further and found that the vibration would start when my airspeed reached about 190 mph. Backing off on the throttle gave no relief. The vibration would continue until I slowed down to 160 mph (by pulling back on the stick, then suddenly, everything would be fine again.
The first thing I suspected was my Quicktalk (May/June '83) reflexor and/or ailerons. I tightened everything down and flew again. Same thing. Then I remembered something about this problem in Q-Talk. Bob Malechek mentioned problems with loose rudder cables, and when I saw his mention of it, I checked mine. The cables from the rudder to the tailwheel did seem to have a lot of slack. After making an adjustment, I flew this afternoon, got it over 200 mph on three separate occasions. No more bad vibes.
WANT AD
FOR SALE: Comprehensive inspection/annual checklists. Make sure you've checked everything before you fly. 3 pages long, over 100 individual items. Send $1.00 and a legal sized SASE.
Sam Hoskins, Rt 2, Box 515, Murphysboro, IL 62966
(618) 549-3023
Paul Hamilton #2232, 10950 Silver Knolls Blvd, Reno/Stead, Nevada 89506
(702) 972-3518
I was lucky enough to work on the Lear Fan project for 5 years and even got to fly it. Those were the good old days, getting paid to have fun. I am a Professional Engineer currently working with the electric utility in the Marketing Department.
I have been flying Hang Gliders now for 10 years. We now commonly thermal up to 14,000 feet MSL over the Sierras near Lake Tahoe. This fun air time gives me the required patience to slowly but surely finish the Tri-Q200.
This is my first article in this newsletter. I have not been getting the newsletter for the last two years, but have been hard at work making my Tri-Q200 just how I want it.
I have just finished flattening the canard and smoothing it. The zero time 0200 is mounted, and I am starting to go forward fitting the cowl.
I have installed the T-tail before I decided to opt for the Tri-Q option. I will probably leave it since it is done, unless someone does not recommend it.
The main changes I made in the airplane are the dual sticks on each side with the center open. This makes the cockpit a lot roomier and gets the heads more in the center. I will write a more detailed description and include some pictures of this dual stick modification in a later article after I get some pictures together.
DID YOU KNOW?
At my last EAA Chapter meeting I learned a thing or two from our local FAA-FSDO inspectors who were on the program. For one, we got their side of the increased frequency of ramp inspections nationwide. Get your paperwork up to snuff gents.
Did you know that an experimental does NOT get an annual inspection? Our airplanes must have a CONDITION INSPECTION every 12 calendar months. This condition inspection may be done by the ORIGINAL builder of the specific aircraft if he has done 51% of the work AND has a special repairman certificate issued by the FAA. You are in violation unless BOTH of these requirements are met. If you bought your plane from another builder, you are not authorized to do condition inspection signoff. Any experimental, amateur-built aircraft may be condition inspected by a certificated mechanic BUT...he MUST NOT enter the inspection in the logbook as an annual inspection. That is NOT correct. It must be logged as a CONDITION INSPECTION. Our Feds said that some of the new A&P's don't realize they are logging inspections improperly.
And did you know that this Condition Inspection must employ an inspection checklist that covers the scope and detail of FAR 43, Appendix "D"? News to you, eh? Maybe you better take another look at QUICKTALK #16, page 4 and consider getting Sam Hoskins 3 page inspection checklist.
Say you don't much care for government rules, Bunkie? Before you swell up with bullheaded self-importance, let me suggest that a thorough 12 month check of your experimental is sensible, reasonable and in the direct interest of your life and limb. And wives, suppose some alert insurance company decided to contest a benefit claim on the basis of negligent maintenance...? Do it. Do it right the first time...and make sure you log it.
Dear Jim,
Our goal was to make Oshkosh this past August. We had completed the Tri-gear conversion and had flown it enough to be reasonably confident we had done a good job.
We received our disappointment three weeks prior to the convention when doing the mag check (CDI check in our case - dual electronic ignition). The left switch indicated a drop of 400 rpm. Checking this out, we discovered that there was no spark for the 2 rear cylinders. We called Revmaster. They said ship it down. As of this date (9/3/89) we still have not received the ignition back.
I simply have lost patience. Those folks sure are nice to visit with, but I couldn't see continuing to experiment with that engine and ignition combo.
So, I have purchased a rebuilt, zero time C-90 and have begun that conversion. I propose that this engine will have several advantages: 1. Reliability. 2. Enough power to get my son and I safely airborne. And 3. Shift CG forward enough to allow some baggage.
I especially value Q-TALK at this point because of all the tips I've uncovered. To start the conversion, I reviewed all past issues for any comments on the 0-200 engine. As a result, I have made several phone calls and gleaned many helpful hints.
Other changes I've incorporated are the Waddelow sparless canard, forward tilt canopy (Jim Langley, QT #10, pg. 9) and aileron trim (Sam Hoskins, QT #12, pg. 8). The latter works very well. Thank you, Sam.
Empty weight with radios, IFR panel and full upholstery is only 613 lbs after the Tri-Q conversion.
Dan Judge, Cut Bank, MT
Dear Jim,
I am rebuilding to a TriQ-200. Have put the drag flap in the conventional direction. This, I believe, will reduce the drag somewhat, but should reduce the exhaust fumes from cockpit and reduce forces to retract flaps for a go-around. I have managed to get 50 degree flap extension.
George E. Wills, N.S.W. Australia
ED. NOTE: There was always a particularly good piece of advice that used to come out of QAC: Build it and fly it per plans FIRST before you change things around. That way you can: A) Know if the change is necessary and B) Know how great an effect, if any, the change made. We do know that the belly flap will let exhaust fumes in, but are retraction forces excessive? Is 50-degree extension really going to gain a substantial improvement? Is 40 just as good or 60 even better? I'll be anxious to hear as you flight test, George.
Dear Jim,
My current endeavor over the last few weeks has been the leveling of the forward fuselage in preparation for fitting of the tailcone. During the leveling process I attached angle finders to the WL15 mark (which incidentally is a bitch to locate). I also determined that one of the angle finders (of 7 I have) was as much as 4 degrees in error. This was marketed as an Angle Finder Plus Level manufactured by DASCO. My other angle finders are by MAYES and I have nothing bad to say about them. NOTE: verify the accuracy of all your precision measuring devices.
In the process of talking to a few of the experienced Q-200 builders out here I have been hearing quotations in the tenths and hundredths of degrees for wing and canard incidences. It never occurred to me in the discussions to ask how an incidence could be accurately set in the first place. Never, at least, until the prospects of accomplishing the feat were looking me in the face. I have determined that my angle finders are not good for more than half a degree.
While looking through an aerospace products newspaper, I discovered a digital protractor system for precise measurement call ANGLESTAR marketed by Schaevitz Sensing Systems, 21640 N. 14th, Phoenix, AZ 85027. The company was apparently a former part of Sperry Corp. The $190.00 system consists of an electronic clinometer connected by 4' of cable to an indicator box containing a LCD readout. The devices can be bought with accuracies to the nearest tenth or hundredth of a degree. The only thing, which does not come with the device, is a mounting plane with vertically aligned No. 6 screws and a 9 volt battery. Mounting on the plane will require calibration.
More expensive self-contained devices are also sold and are similar to a fat calculator with a stainless steel alignment surface built into the device. They cost about $300!!!! Some folks will think this is a lot of overkill and they will have a better/cheaper way, but this stuff makes me nervous and I can't afford to hire a theodolite crew to come and shoot my plane in.
On another subject, I have just spent the past day and a half fighting with and scratching my head over how to fit that damn tailcone to the forward fuselage. I have squeezed, prodded, trimmed, and sanded till I don't think I can shave any more off. At this point I am preparing to cut and sand off everything that's not matching around the junction perimeter and hard glass it to get a precision fit. Then I'll re-cut it for my mounting brackets. Let's face it, friend, it shouldn't be this hard. Maybe it's me.
Brian Martinez, Quartz Hill, CA
ED. NOTE: You should know better than to give me an opening like those last 2 sentences, Brian. This letter distresses me. I must be some sort of exceptionally lucky dumb ass because I put my Quickie together just as the plans describe and without even a drill press or micrometer. I suppose that only by dumb luck did I end up with a Quickie that performs better than average, is among the 10 lightest and is not an embarrassment to look at. Ignorance is bliss. It never occurred to me that I should have gotten blueprints instead of hand-drawn plans. In blissful ignorance I believed that Rutan, Jewett, Sheehan and LeGare were designing planes that an average craftsman could put together with average tools. Some people make this job into one that requires an aerospace engineering degree to understand and a Boeing production craftsman to assemble. If it makes them feel more important, I can dig it. Different strokes...but I'll kiss a hiney if their airplanes perform any better than that of a good average craftsman who only follows the plans. Non "precision" built planes are not falling out of the sky right and left. You don't need to make a mountain out of a molehill.
On another subject, tailcone fit reminded me of the guys who took a big piece of plywood, glued sandpaper on both sides then stuck it between fore and aft fuselage pieces and match sanded them to fit. But remember: as you sand the front section the hole gets bigger while on the aft section the holes get smaller. Don't get carried away.
Dear Jim,
So far my Lycoming 0-235 installation goes well. Gaping huge hole in the firewall to get the mill as far aft as reasonably possible. Eliminating the starter should save 40 lbs - starter ring gear cut down to alternator drive only, large battery, heavy cables all the way back, 17 pound starter/gearworks, etc. We'll see.
Following ancient QUICKTALK advice to mount ailerons prior to slot cores, main wing slot cores went in slicker'n snail snot.
If there is somebody who still hasn't mounted the tailcone, the obvious way to do this is to jig the front to the rear, stick them together with the required layers of BID, separate them with a hacksaw blade when you get around to it, and THEN install the connecting fittings. Some-o same-o as canopy installation.
Hardware store drip watering plumbing supplies seem to work fine for static lines - cheap and convenient. Consider stationery store "screw binder posts" for through-the-hull static fittings - $0.35/apir and they may actually work. Bondo can be thinned to bean soup texture with "styrene monomer" (TAP Plastics).
Anybody have decent plans for a strobe that is bright enough to make the FAA smile?
I'd be interested in hearing from others fussing with an 0-235 installation.
Quentin Durham, 17 Crescent Dr., Orinda, CA 94563
Dear Jim,
Attached is my Q-200 checklist. I believe our friend Bob McFarland and several others might still be around if they had not forgotten an item (e.g. parking brake, fuel shutoff valve). I have this checklist attached to my center console.
Dave Naumann, Enterprise, AL
PRE-TAKE-OFF CHECK:
Canopy locked
Speed brake - Stowed
Aileron reflexors - Take-off
Roll/pitch trim - Set for takeoff
Temperature/pressure - Green
Mags - Both
Carburetor heat - Off
Mixture - Rich
Fuel Transfer - Off
Controls - Free
PRE-LANDING CHECK:
Speed Brake - Extended
Parking Brake - Off
Aileron Reflexors - Landing
Temperature/Pressure - Green
Fuel Transfer - Off
Mixture - Rich
Mags - Both
Carburetor Heat - On (Off on Final)
PRE-FLIGHT CHECK:
Fuel Sample - Gascolator/Main Tank
(COCKPIT)
Fuel Shut-Off - Open
Fuel Transfer Pump - Fill Header Tank
Fuel Gauges - Operational
Aileron Reflexor - Check Operation
Speed Brake - Check Operation
Brake Fluid - Check Gauge
Mags - Off
Carburetor Heat - Operation
Electrical Switches - All Off
(EXTERIOR)
Left Elevator - Move While Holding Control Stick - Check For Play/Binding
Left Wheel - Inflation, Bearing Play, Brake
Left Canard - Condition
Cowling - Secure
Propeller - Condition
Oil Level - 5 Qts (Min)
Fuel Cap - Secure
Right Canard - Condition
Pitot/Fuel Pressure Tube - Clear
Right Wheel - Inflation, Bearing Play, Brake
Right Elevator - Move While Holding Control Stick - Check For Play/Binding
Right Wing - Condition
Right Aileron - Travel, Binding, Secure
Tail Boom - Secure, Condition
Static Source - Clear
Rudder - Travel, Condition, Secure
Tail Wheel - Travel, Condition, Secure
Left Aileron - Travel, Binding, Secure
Left Wing - Condition
You can order a PDF or printed copy of Q-talk #18 by using the Q-talk Back Issue Order Page.