QuickTalk 3 - BLACKBOARD


- Details
- Category: Q-Talk Articles
- Published: Friday, 30 April 1982 07:11
- Written by Jim Masal
- Hits: 2406
From S. W. Hanke, #2148
FRONT HINGED CANOPY FOR Q2
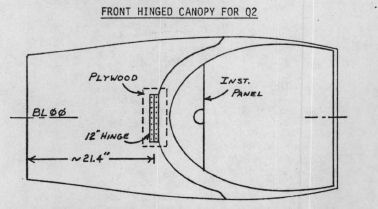
Make the canopy cut first. Then remove the top layer of glass and foam down to the bottom layer to fit both plywood pieces. (Fig.1) Apply two layers BID on the exposed bottom glass and flox plywood in. When cured, contour plywood ends to fuselage shape.
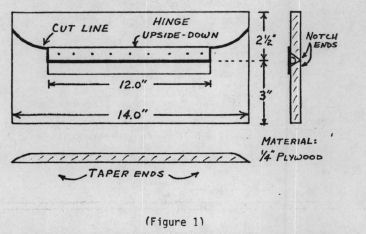
Allow room for glassing the plywood ends at the hinge and canopy cuts. The hinge can be slightly curved to assist in a rounded fuselage top. On the canopy, use two layers of BID to cover the end of the plywood. Use additional layers of BID as spacers to make a straight line between the plywood ends (where the hinge will fit). Also sand the bottom (inside canopy) and apply two layers of BID extending 1" wider than the plywood.
It is suggested that you substitute a 12" stainless hinge for the aluminum one in the kit. Mount the hinges on the canopy with nine 3/16" counter-sunk machine screws. There will be a screw 1/2" from both ends; a screw 1" from both ends and the rest (5) will be 1-3/8" apart. Apply one layer of BID on the top with a cut out for the hinge. Extend the glass at least 1" past the plywood. Mask the center of the hinge and apply two more layers BID lapping 1-1/2" past the plywood edge. Let cure.
The same procedure is used on the front of the fuselage hinge support except for not glassing over the screws, to permit canopy removal. The canopy lip in the 12" space where the front of the hinge will be mounted must be lowered or drooped about 1/4" to allow room for the nuts on the canopy hinge mount. The front nuts will be below the lip for removal.
Our canopy with hinge mounted but not painted weighed 15 pounds. Of course, all other tapes on the canopy are applied as per plans.
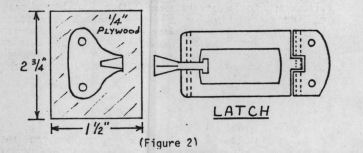
For canopy latches, we used NAPA Auto Store Balkamp 750-2011 over-counter latch (4" x 2") at $6.89 ea. The top part (largest) was fine, but we had to duplicate the small part in steel because the aluminum casting breaks easily. (Fig. 2) Mount the canopy latch approximately 4-1/2" forward of the canopy bulkhead. Close canopy and locate the proper position for the catch. Round the edges of a 1-1/2" x 2-3/4" piece of 1/4" plywood. Flox into position so the catch will be centered on it. Cover with four plies of BID lapping 1" onto the fuselage. Place catch in position and drill holes from inside. Open these holes on the outside of the fuselage larger than the nut (down to the inside glass). Tighten catch in place and fill outside hole with flox.
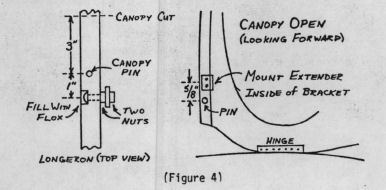
We tried many gas and spring gadgets to hold the canopy open, and finally spotted a dilapidated step ladder sitting in the corner. We cannibalized the metal extenders and they work fine. We cut them to the following size:
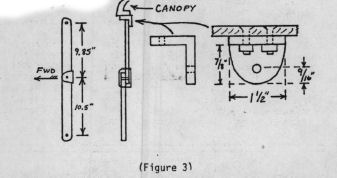
These may be bolted or screwed to the canopy stiffener. All bolts and/or screws are 3/16". Front canopy pins should be 3" back from the canopy cut. (Fig. 4) Drill a 3/16" hole through the longeron 4" back from the canopy cut. Imbed the head and fill with flox to mount the extender. The extender bracket is mounted on the bottom of the canopy stiffener 1-5/8" to the rear of the front pin. (Fig. 4) It would be best to mount the extender on the longeron bolt and sit inside to mark the location of the top extender bracket with the canopy closed.
We also installed (by drilling through the canopy lip below the hinge) two safety cables from the front outboard hinge bolts to the rear outboard hinge bolts.
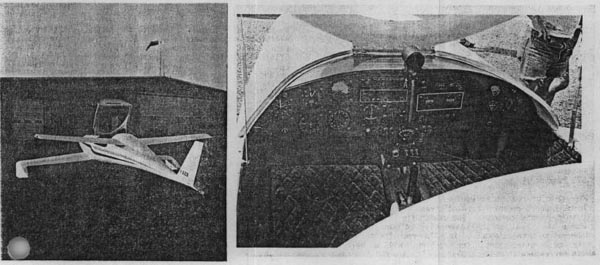
Two views of Mr. Hanke's Q2 canopy installation.
You can order a PDF or printed copy of QuickTalk #3 by using the Q-talk Back Issue Order Page.