Tri-Q Wheel Pant Construction
- Details
- Category: TriQ Plans
- Published: Monday, 27 December 2010 15:42
- Written by Scott Swing
- Hits: 5011
Now you have your main and nose landing gears on with their wheels, tires, and brakes (mains). You are ready to construct the wheel pants.
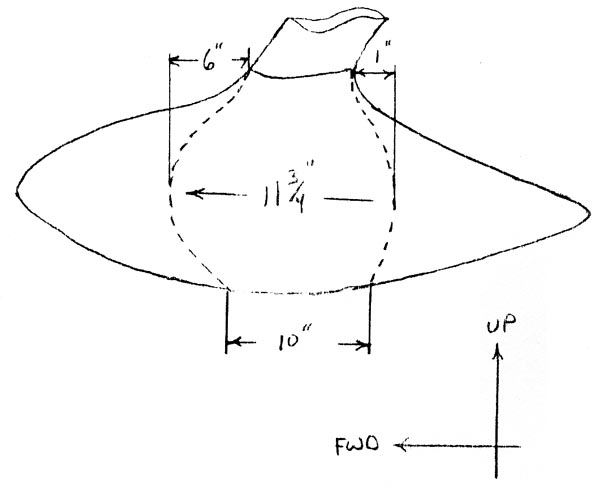
The main wheel pants come to you pre-molded in two halves. Basically, you must trim them to the lines, and put them around the tire at least over the tire. If you put a block on top of the tire, it will help you line everything up. Trim the neck that goes around the gear so that everything fits pretty good. When you are satisfied that both sides fit, take them to your work bench and five minute epoxy them together in spots as they would be on the airplane. Rough up the inside of the pant 1" each side of the seam. Now tape the seam closed on the outside of the pant with grey tape. Dry micro the slot on the inside and glass it with 2 BID strips 2" to 2 1/2" wide at a 45°. After this has cured you may remove the gray tape. You will now cut the wheel pant to allow it to install on the gear leg. Make a cut similar to the drawing. This cut is not critical it just must be big enough to slide over the gear leg and tire.

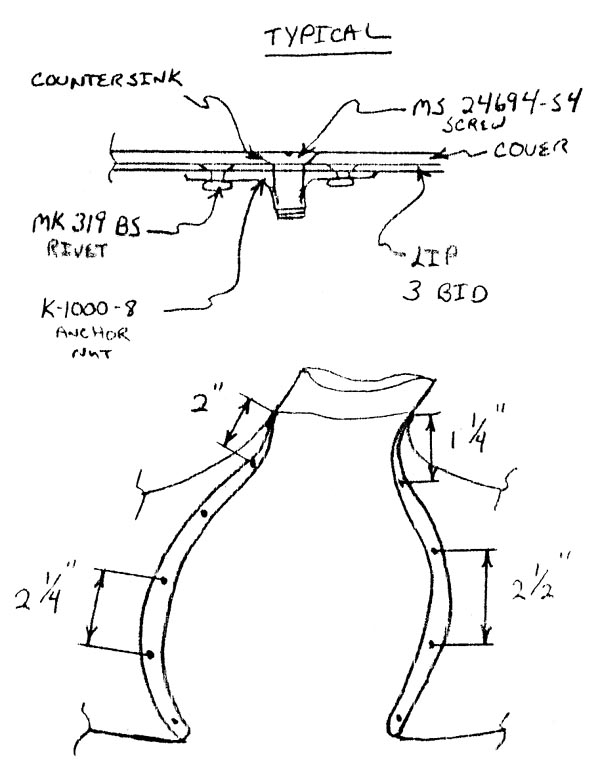
After this has been cut out, fit the pant back on the gear and check to make sure everything still fits right. Take your pant back over to the bench. Sand the wheel pant on the inside, just inside of the cut out you just made about. 1". Now take that piece you just cut out and tape the inside around the perimeter a couple of inches. Use a razor blade to trim the tape even with the edge. Fit the piece back in the pant and tape it on over the outside of the pant. Using 3 BID strips 2" wide at a 45°, glass the split on the pant from the inside. This lip you are making is what you will eventually put anchor nuts on. At the tpp around the neck, only use two layers, as this build up will effect it's attach to the gear leg. When cured remove the outer tape and pu~1 the cover off. Remove the tape from the inside of the cover. Trim the lip that has been left to about 5/8" from the cut. Taper the lip to nothing in the last inch or so ffirom the neck of it.

Now fit the piece back on and mark the 5 holes on the front part of the cover and the 4 holes on the back part. Try to center the holes in the lip. Drill the holes out to 1/8". Install the 9 K-1000-8 8-32 Anchor nuts with the MK 319 BS flat head pop rivets. Using a counter sink tool or large drill bit, counter sink the 9 holes so the MS 24694-S4 screws fit flush with the cover. This wheel pant is now ready to be installed.

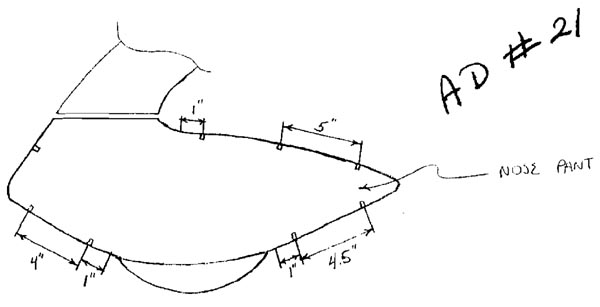
The nose pant also comes in two premolded halves but with the lip already as part of the pants. Trim the pant half with the lip so you have approx. 1/2"-5/8" of the lip remaining and trim the other one so that you leave approx. 1/4"-5/16" of glass past the center line mark that you see on that pant. At the nose and tail ends, narrow the lip portion of the pant to about 3/4". This allows the ends to fit together better. Now, snap the pants together and mark where you need to trim to allow the right and left side to fit together the way it is supposed to.

After you are satisfied with the fit, drill your holes in the pant in the approx. position shown in the diagram and install the K1000-06 6-32 anchor nuts with the MK 319 BS flat head pop rivets on the lip portion of the pant. Again you will counter sink the holes so that the MS 24693-S28 screws fit flush with the surface of the pant. The nose wheel pant is now ready to install.


