Tri-Q Positioning the Gear in the Fuselage
- Details
- Category: TriQ Plans
- Published: Thursday, 23 December 2010 12:17
- Written by Scott Swing
- Hits: 4602
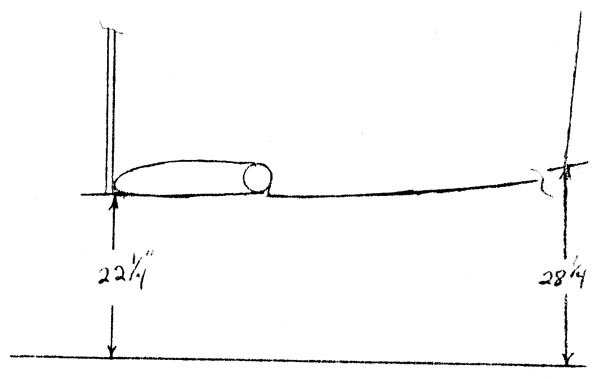
Go back to your fuselage and jig it so that the rear of the fuselage at the split line is 28-1/4" from the ground and the bottom of the canard at the firewall is 22-1/4" from the ground. You must also line it up and level it laterally, using the ball level in the plane or by leveling a string stretched across the main wing tips.

Check your floor to see how level it is around your airplane. Make adjustments by stretching a string across the floor and leveling it at the tires. You will mark on the floor the amount of correction required to keep the gear level. Do the same, fore and aft. The measurements given at the beginning of this section were taken from a relatively level floor. With the airplane in its jigged position, drop a plum bob down from the canard at the firewall and mark FS 14 on the floor on your existing line. Now go back from there to FS 50 and mark 50-60. Using a square, go out to your outer lines and mark FS 50-60. These marks are basically for lining your gear up so that both sides are at the same FS number, 56 to 57. It is not critical that you be exactly at a certain point, but just that you have both sides the same.
Now, slide the gear in place and roll it up to get a preliminary fit. Mark the approximate position of the mounting tabs on the gear. Pull it back out and sand about a 3" wide stripe around the gear with #40 or #50 sandpaper.
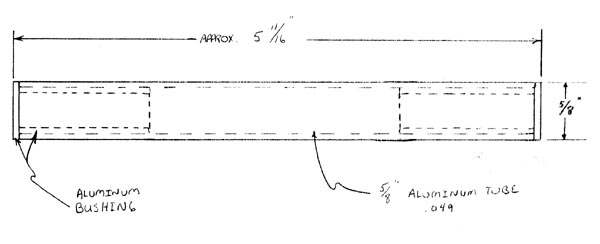
Now you will have to make your bushed aluminum tubes used in the gear attach assembly. Measure distance between the two attach points, it should be similar to the drawings at 5-11/16". This measurement would include the bushed ends in your tube assembly. You can afford to make it Slightly oversized and file the ends to fit. When you have the tubes sized smaller than your initial measurement, press fit the bushings into the ends of the tubes. If they seem too snug, you may have to sand or file them slightly. If they seem to slip in with no effort, you should rough the outer surface of the bushing and inner surface of the tube, and with some epoxy, glue them in. Since we cannot control the inner diameter of the tube, it may be slightly off in either direction. If there is any slop in them contact us and we will send you new tubing.

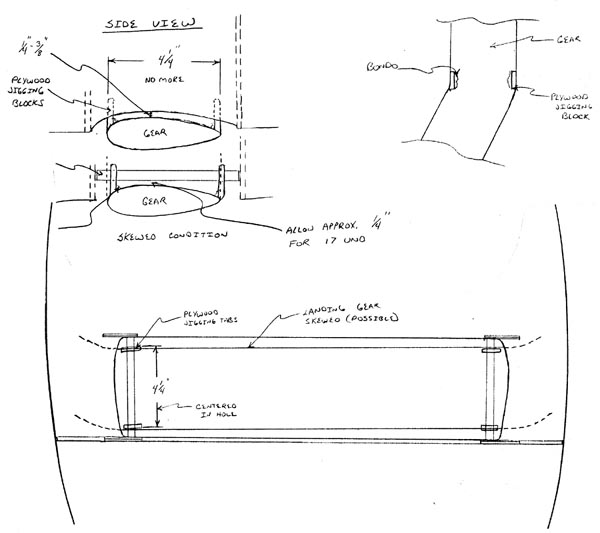
Now slide the 1/4" plywood gear jigging blocks over the 5/8" tubing and bushing. Slide the gear back up in place; check the side to side positioning as well as the fore aft positioning. Both gear legs (axles) should be close to FS 56.5. Of course, the tires should be evenly lined up on the 3.5' parallel lines, seven foot spread. The gear legs themselves should be centered between the 3' lines or 6' spread. In some cases you will find that in order to get your axles to line up at the same FS#, your gear looks skewed slightly in the hole. The seatback bulkhead, which was used for the front attach fitting, might have been put in slightly skewed which then makes the hole skewed. If this is the case, up to 3/16", you should keep your plywood tabs 4 1/4" apart but move them so they end up centered in the hole that should be approx. 5 3/4" wide after the lay-ups.
|
NOTE:
|
If you have more skew than 3/16" let me know. This just moves the tabs in and out on the gear to allow for the glass lay-ups and clearance for the 3/16" nuts that fit between the tabs and the attach points. Don't be too concerned about getting everything exactly right since this can't be done or if it could it would take you 3 days. The camber and toe-in will be adjusted later which will take care of any differences you might have in axle location. What I am saying is get it as close as you can get it and as close as your plane will allow you to get. | |
Once you have the gear where you want it, secure it so it won't move and secure the fuselage so it doesn't move either. Now slide the 5/8" bushed tubing assembly in place and slide the AN6 74A bolt through. You should have one plywood block in front of the gear and the other behind it. These plywood blocks will need to fit up against the edge on top of the gear. You will be removing and assembling this part quite a bit until the fit is right. There will probably be a slight angle to the plywood blocks. This is normal. Remember, outside to outside of the blocks should be 4 1/4".

When satisfied with the fit, bondo the blocks onto the gear. After it has cured, gently remove the bolts, remove the gear, and remove the 5/8" tubing. Take the gear to your work bench and jig the gear upside down with the tabs hanging down toward the floor. Smooth the transition from the tab onto the gear with a sanding block, file, etc. Apply gray tape or packaging tape to the outsides of the tabs for a good release.
ADDENDUM TO JIGGING GEAR IN FUSELAGE
Since all Q2's are slightly different, jigging the gear in the fuselage can be difficult. It is also the most difficult to explain.
After you have your plane jigged in the appropriate position, drop a plum bob down from the leading edge of the rear attach bUlkhead down to the ground and mark it. Now, draw a line perpendicular to the center line 16-7/8" in front of the mark you just made. When you slide your gear up in place and center the gear in the fuselage, the axles should line up with that line. The axles were mounted in the lowest position possible for the preliminary fit so that if you had to, you could move them up: 1/2" or less. If the landing gear won't go up or back far enough to get the axles to line up, you need to make some adjustments. Measure the distance from the axle to the ground. Now let air out of both tires until the gear will fit up in place. The 1/4" plywood tabs can also be trimmed up to 1/4" to allow the gear to get closer to the bushings. Remember to allow room for the 17 layers of uni. Once you have the gear jigged into position, measure the distance from your axles to the floor again. The difference will give you the change in axle position.
DO NOT move these axles, especially if you have the LS canard, until you have checked the nose gear positioning. You may find that the nose is higher, therefore allowing you to leave the axles at the original positiOn. I realize this is not easily understood so if you have a question, just call me .


