Tri-Q Fuselage Modification


- Details
- Category: TriQ Plans
- Published: Thursday, 23 December 2010 09:22
- Written by Scott Swing
- Hits: 5836
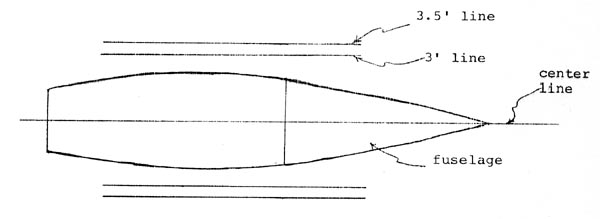
Draw a long line on the floor of your shop or garage with a marker. This line will be your centerline for lining the airplane up when installing the gear. You will also need two (2) lines parallel to that one at 3' & 3.5' on each side. Later you will mark FS 14 through 60 as well.
You can take the fuselage apart now and remove your interior where it will interfere with the modification.
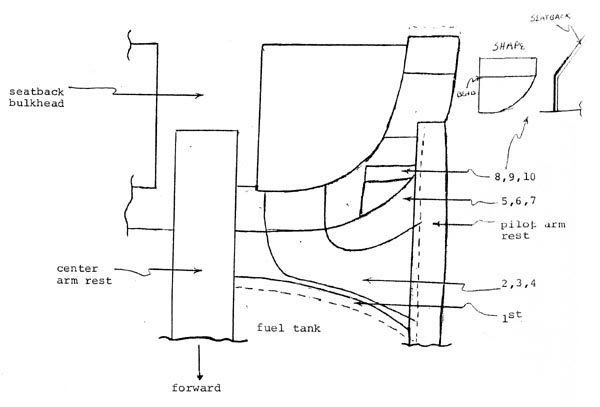
Start on sanding the inside of the fuselage where you sit, up 1" onto the fuel tank, side arm rest, and center arm rest. Sand the seatback bulkhead from the center console over and up the sides to the vertical seatback bulkhead. You should do this with 40-60 grit sandpaper. Always remember to sand over all areas that are to be glassed. From the template and drawings provided, cut out your two triangular shaped holes in the seatback bulkhead for your front attach inserts. The easiest way I found to do this is to drill a series of holes long enough to allow you to use a hacksaW blade for most of the cutting.
You will need to clean the hole up with a file or dremel tool to allow your plywood inserts to fit properly.
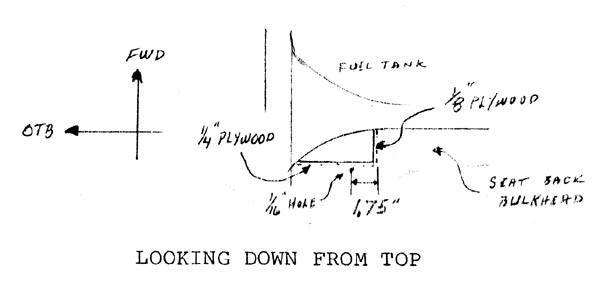
When you insert the 1/4" plywood mounting plate, it must be perpendicular to the fuselage bottom and perpendicular to the centerline of the airplane. (Get it as close as you can.) When satisfied with the fit, flox in place both the 1/8" and 1/4" pieces.
Once cured, round all corners at least 3/16" to !:i" to allow for the glass to lay into and over the hole without air bubbles being present.
Dry micro the inside corners to 1/8" radius and begin your fibre glass lay-ups as shown in the diagrams. Start with a 15" wide 45° bid and fit all of the large pieces in before actually epoxying them. Cut more as you need it. These are awkard layups and you are bound to waste some material. Save all large scraps for future use.
|
NOTE:
|
Typical bulkhead gear attach lay-up schedule: Involves 1st layer(s) covering the largest area, next layers covering a slightly smaller area but accumulating, and so on. | |
After these lay-ups have cured) you will cut the rectangular hole in the fuselage. Using a small drill bit, drill two holes (one on each side) through the fuselage laterally 1.75" from the inboard end of the vertical plywood inserts and against the back side of the plywood.
Now, get under the fuselage and, using a bendable straight edge and a fine line marker, connect the dots (holes). Measure back 6" from that line and draw a line parallel to the first one. Then, using a square, draw a line back from the holes to make a rectangle. Using the template provided, draw the curved line on the outsides of the rectangle where the gear will exit the fuselage. Now drill a few holes along the line so you can insert a sabre saw and cut out your hole.

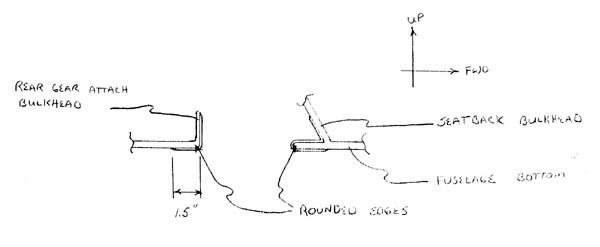
Now sand a strip from the cut out back 3" to 4" behind it on up to the seatback bulkhead, and forward to the front attach. Remember, wherever you are glassing, it needs to be sanded. Prepare the rear bulkheads by sanding them to fit better right along the edge of the hole and perpendicular to the fuselage. Before installing the plywood inserts, check their positioning so they match up with the front plywood inserts. Install them with micro. After that has cured round the top of the bulkhead, mix up some micro, and cover both sides of the bulkhead. This is done so you don I t have to do the microing after the bulkhe ad is in place a s this would be more difficult. After they have cured, sand them smooth. Now, put the bulkhead in place and use the square to line it up vertically and mark along the bulkhead on the fuselage so you can line it up again when you install it. Mix up some bondo and apply it to the bottom of the bulkhead and on the top where it will bond to the seatback bulkhead. Put it in place and hold onto it until it is cured. Apply the other side in the same fashion.
Now you will prepare the rectangular hole for glassing. Round the edges of the hole so the glass has a gentle radius to go around.
You will also need to sand the bottom of the fuselage 1.5" around the hole cut out. If this is a retrofit installation to a plane that has been flyinq, you will need to remove all of the finish in this area.
|
NOTE:
|
When you are doing the lay-ups on the bulkheads, it is easier to cut glass as you need it as there is less waste. The pieces are odd shapes which need to be cut out separately. | |
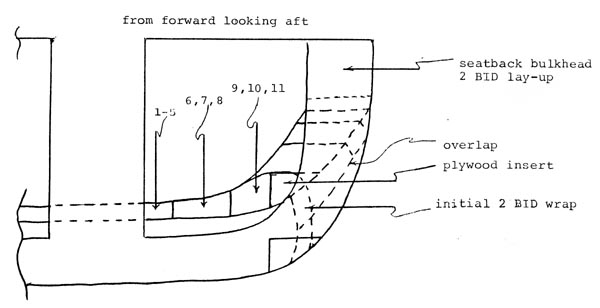
It should take about three (3) of the long bid 45° strips 4" wide to do the full radius of the hole. It is easier to do this step with four (4) pieces of bid so you don't have to work with real long strips. This is a two (2) bid lay-up and simply overlap the lay-ups in the center of the fuselage about two (2) inches. Around the four (4) corners you may have to , make cuts to allow them to lay down. Cut some small patches to fill these areas and overlap 1/4" or so. The lay-up schedule diagrams for the two (2) bulkheads show this two (2) bid lay-up. After this has cured, be sure to sand this lay-up to prepare it for the next lay-up.
From now on, all lay-ups on the inside of the two bulkheads will come down but will not wrap around onto the bottom of the fuselage.
|
NOTE:
|
When you proceed with the next lay-ups you may split up the job by glassing only half of the required layers then sanding and finishing the rest later. I found this to work well since it is somewhat tiring. | |
Your next lay-up will be the inside of your front gear attach bulkhead. This is the seatback bulkhead. Cut a few strips of bid at 45° about 6" wide. But remember, you can cut them as you need them. The diagram shows how these lay-ups are applied. Those first three (3) layers must extend up from the plywood on past the V shape created by the two bulkheads corning together and onto the rear gear attach bulkhead about 1". These layers also spread onto the fuselage above the hole where the gear will exit the fuselage and eventually tie into the lay-ups from the other bulkhead. These lay-ups also extend across toward the center of the bulkhead behind the armrest and terminate there. There is no need for them to tie across to the other side. Also, the last three (3); 7, 8, & 9, must extend at least three (3) inches to each side of the plywood inserts.
|
NOTE:
|
Be sure to study all of the drawings and full size diagrams in order to put the appropriate number of layers on the bulkheads. | |

Before glassing the rear gear attach bulkhead, you must sand some of the past lay-ups on the inside of the front gear attach where the neW layers will overlap, as well as, sanding the original 2 bid lay-up around the hole. Cut a couple of 10" wide bid at 45°, more will be needed later. You will stretch the bid through the center of the bulkhead where the width is not needed and widen it as you go up the sides to the seatback bUlkhead and onto that. It's important to note that the first five layers extend up onto the seatback bulkhead on both sides of the rear gear attach bulkhead about 1", but two of those five layers go on up onto the back side of the seatback bulkhead to the vertical seatback bulkhead. As before, the last three (3) layers must extend beyond the attach plywood inserts three (3) inches on either side.
It's easiest to do a right then left, right then left, etc., lay-up schedule for the first five layers/with overlaps in the cente~of an an inch or so. This sChedule can be continued on the rest of the lay-ups also.
|
NOTE:
|
Don't be too concerned if you feel the lay-ups are ending up sloppy on each side of the fuselage between the two bulkheads, especially up in the corner. These lay-ups are tough to get perfect and I have allowed for this. Do the best you can with a brush to wet it out as good as possible. | |
You have just completed the toughest part of the whole conversion. It's all downhill from here.
Use some sandpaper and remove all the splinters so you do not hurt yourself, otherwise you will be putting holes in your hands.