Q2 Plans Chapter 14 Page 14-07

- Details
- Category: Q-2/Q-200 Plans
- Published: Wednesday, 17 May 2006 15:05
- Written by Quickie Aircraft Corporation
- Hits: 2847
|
..... The side consoles can be completely assembled permanently at this time. Again, remember that the previously glassed faces go on the outboard and lower sides, so that they are not visible upon assembly. Laminate 1 BID tape at the joints wherever you can reach, and use flox at the joints also. Once each top and vertical piece has been joined, round the common corner and laminate 2 BID around the two faces, start¬ ing with a 1 inch minimum lapping onto the fuselage side, and finishing with a 1 inch minimum lapping onto the fuselage side,main fuel tank, or Seatback Bulkhead, depending on FS location. This will give each side console a lone piece' look and reduce fini_hing weight later. .....Both the side consoles and the center console should be assembled so that each top piece is level when in place. This will be useful later for leveling your aircraft for installation of the main wing and canard, as well as for weight and balance. 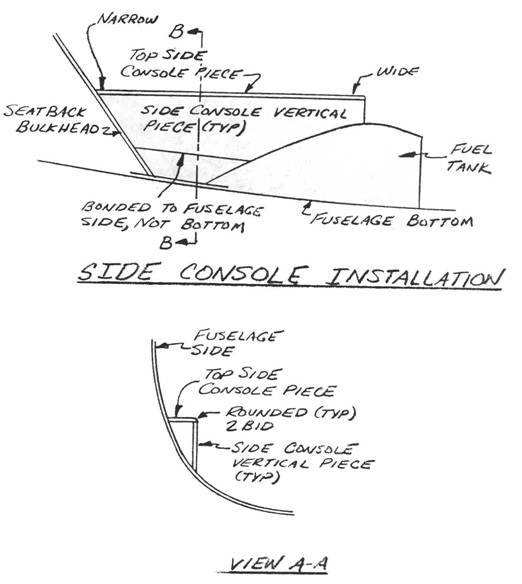 TOP CENTER CONSOLE ASSEMBLY
..... Once the control stick assembly is in place, and the CS13 push-pull rod to the elevators in place, you can permanently assemble the top center console piece. Some trimming will be necessary to clear the control stick and its associated hardware. The top piece is mounted with flox. .....Round the top corners and laminate 2 BID at 45 degrees to BLOO around the top piece all the way down to the bottom fuselage, using 1" minimum lapping onto the fuselage bottom, Seatback Bulkhead, and main fuel tank. .....To summarize, at this point in the construction, the center and side consoles are installed with 2 BID over the outside faces of each console, and 1" minimum lapping onto the rest of the fuselage structure. The consoles are now strong enough to put weight on. INSTRUMENT PANEL INSTALLATION
..... It is suggested that the Instrument Panel not be mounted in the fuselage permenently until all cutouts for instruments, radios, and equipment have been made. .....However, at this time, you may elect to make the small sub-panels that extend from the bottom of the instrument panel to the top of each side console and the center console. The width should be the same as the width of the console. For material, you may use the 1/8" plywood, 0.063" aluminum, or even 1/4" thick white foam with 1 BID on each side. .....These sub-panels are useful for switches, gauge5, and as mounts for controls.
|
||||||||||
CONTINUED ON NEXT PAGE |
||||||||||
PAGE
14-7 |
||||||||||