Q2 Plans Chapter 11 Page 11-02

- Details
- Category: Q-2/Q-200 Plans
- Published: Saturday, 20 May 2006 09:05
- Written by Quickie Aircraft Corporation
- Hits: 3421
|
..... The objective is to be able to sight through each wheel pant and see the other wheel pant axle hole lined up in the "sight". The process is iterative until you can confirm that a bullet fired along the sightline through each wheel pant will go right thru the opposite wheel pant axle holes. At this point you have 0 toe-in and 0 camber, which is what you want. Some minor trimming of the wheel pant may be necessary so that the wheel pant fits flush against the canard. .....Remove the wheel pant and laminate 1 BID along the top of the wheel pant where it will come into contact with the canard shear web or canard lower skin upon assembly. Be sure that the match between the wheel pant and canard is good prior to glassing, to avoid using considerable flox to fill the voids. Peel Ply the lamination. .....When the lamination is cured, mount the wheel pants with flox to the canard, being sure to achieve good flox squeeze out. (First removing the peel ply, of course.) Before the joining gets tacky, be sure to recheck and then recheck again the alignment of the two wheel pants through the axle holes. Now is your last chance to affect that alignment. When satisfied, use lumber and 5-MIN to attach the wheel pant to the canard while the flox is curing. .....Next, turn the canard over and jig it right side up, being careful not to alter the alignment of the wheel pants. .....You are now ready for the fun part, contouring the wheel pant! Several templates are provided to visualize what you want the finished product to look like. The templates are provided to help, but use your eyeballs to develop a pleasing shape. Some points to remember are as follows:
..... After the wheel pant is carved, you are ready to glass the wheel pant. Layup two BID over the outside face of the canard. Lap up onto the canard a minimum of 1.5" inboard of the contouring, and use a minimum of 1" overlap wherever else you overlap the cloth. After this layup has cured, remove the lumber jigging from the inside face of the wheel pant, roughup the inside face contouring if needed, and then glass two BID on the inside face. .....Also, another flagged UNI stiffener will have to be laid up on each LG4, using the same technique as you did earlier. .....Check the sketches carefully and verify that your construction agrees; wheel pants falling off your aircraft are bad form. 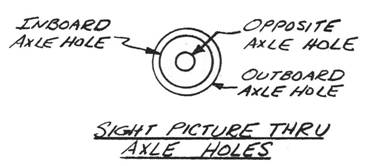 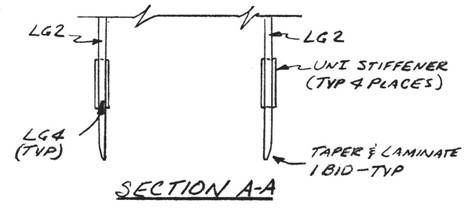   |
||||||||||||
|
||||||||||||
PAGE
11-2 |
||||||||||||