Q-talk 98 - Safety Wire Refresher

- Details
- Category: Q-Talk Articles
- Published: Wednesday, 23 December 2009 16:24
- Written by Dave Richardson
- Hits: 5114
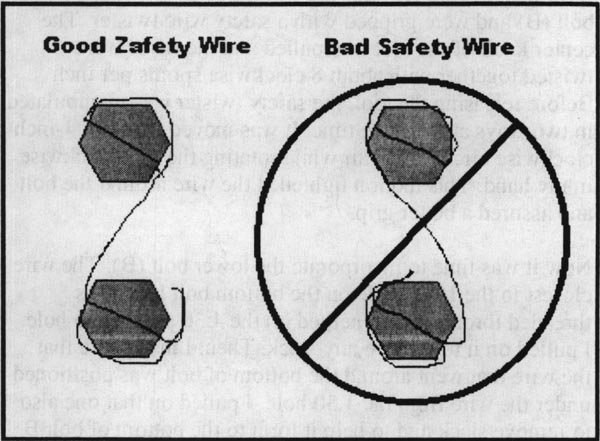
I had a chance to review safety w ire techniques w hile at Sun 'n Fun this year. It is one those skills that if you don't us it. you lose it. I'm going to describe a simple, two-bolt, scenario with ideal blot head placement. You can use this description on bolts that arc not lined up exactly the same way as long as you can still read the hands on a non-digital clock! The key is you want to run your wire in a Z shape between the two bolts and not an S shape. That's why I called this article "Zafety Wire Refresher."' Remember the idea of safety w ire is to let two bolts help each other from loosening.
After cutting a piece of safety w ire that w as at least 3 times the distance between the outside edge of the two bolt heads, one end of the w ire w as inserted from the 4:30 position to the 10:30 position in the lop bolt (A), bent to the right, wrapped around the head and then brought dow n next to the other free side of the wire. This formed a large U shape in the w ire that extended through the top bolt head.
The end of the w ire that was directed through the bolt and around the top w as then placed behind the wire at the 4:30 position and was pulled tight to help shape the wire to the top of the bolt. Both ends of the wire were then positioned near the 10:30 position of the lower bolt (B) and were gripped with a safety wire tw ister. The center knob of the tool was pulled and the wires were twisted together with about 8 clockwise spirals per inch. Before releasing the tool, the safety tw ister w as manipulated in two ways at the same time. It was moved in a 3 or 4-inch clockwise circle in the air while rotating the tool clockwise in my hand. This motion tightened the wire around the bolt and assured a better grip.
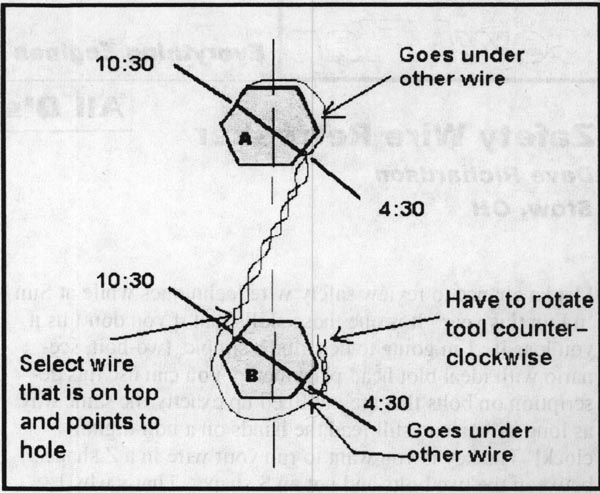
Now it w as time to incorporate the lower bolt (B). The w ire closest to the 10:30 hole on the bottom bolt head was threaded through and emerged on the 4:30 side of the hole. I pulled on it to remove any slack. Then. I made sure that the w ire that w ent around the bottom of bolt w as positioned under the wire from the 4:30 hole. I pulled on that one also to remove slack and to help it form to the bottom of bolt B. Both wires were gripped with the w ire twister and held in a position counterclockwise to the 4:30 hole on bolt B.
This location required a counterclockwise rotation to maintain the position of that lower wire. so I manually turned the wire twister counterclockw ise. Then I made the same dual action as described earlier in this article only this time the twister was moved counterclockwise in a 3-4inch circle while rotating it counterclockwise in my hand. This tightened the wires around the lower bolt head. The tail of the w ire was clipped through the spirals, leaving at least 4 or 5 tw ists in place. Tlie tip was bent toward the threaded part of the bolt and positioned counterclockwise of the 4:30 hole of bolt B to keep the mists tight.
Care was taken with the cut ends to avoid possibly snagging something. When finished. I flicked the tw isted wire between the two bolt heads to see if it produced a tone. A tone would prove I had tight wires.

You can order a printed copy of Q-talk #98 by using the Q-talk Back Issue Order Page.