Q2 Plans Chapter 10 Page 10-07
- Details
- Category: Q-2/Q-200 Plans
- Published: Sunday, 21 May 2006 09:05
- Written by Quickie Aircraft Corporation
- Hits: 4492
 OUTBOARD ELEVATOR PIVOT ASSEMBLY
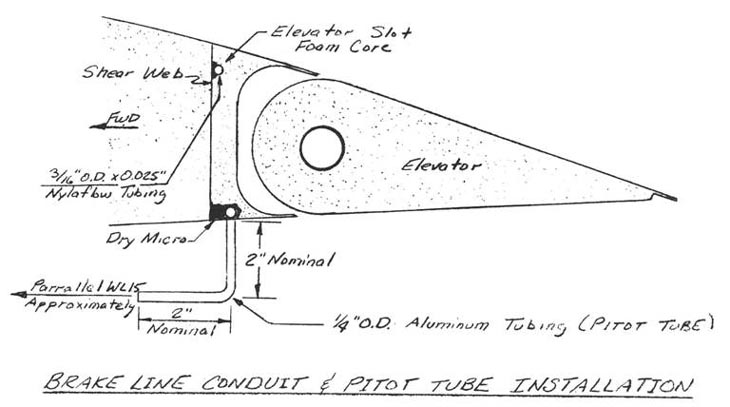
..... These instructions cover only the assembly of the left outboard elevator pivot, but the right outboard elevator pivot is a mirror image, and may be accomplished at the same time. .....First, review the MAIN WING chapter section on "Outboard aileron Pivot Assembly". Except for the part number changes, you will be doing exactly the same operations. .....Locate a QCSM7 pivot about 0.25" inboard of the outboard end of the elevator using 3 MSP43 cherry rivets spaced radially at least 0.4" apart. It wi 11 be necessary to "tunnel" through the el evator skin and elevator foam core in order to reach the CS16 elevator torque tube for riveting. The holes made by the tunneling operation should be filled after riveting with dry micro. .....Find CS19, and insert a QCSM5 stud with the 2 AN970-4 washers, 1 AN960-4 washer, and 2 AN363-428 nuts, just as you did on the aileron outboard 'pivot assembly. Remember, there must be a minimum of 0.6" from the AN960-4 washer inboard to the end of the QCSM5 stud so that the elevator must be moved inboard at least 1/4" before it "falls off" the QCSM5 stud for dissassembly. Finally, round the end of the QCSM5 stud slightly to assist in mounting the elevator. .....When the elevator is mounted, CS19 will fit flush against the canard shear web. At that time, the 'outboard elevator slot foam core will have to be trimmed to allow that. MIDSPAN ELEVATOR PIVOT ASSEMBLY
..... Read this section carefully before doing anything, and take the time to visualize what the words are saying. Otherwise, you may find it difficult to install or remove your elevators! .....These instructions will cover the left midspan elevator pivot assembly, but the right midspan elevator pivot assembly is a mirror imag_. .....Find a QCSM3 stud and a QCSM2 pivot. Screw the QCSM3 stud into the QCSM2 pivot, retaining it with AN363-1032 locknut, making sure that the assembly is tight. Next, round the end of the QCSM3 stud slightly, as shown, to facillitate installation and removal of the elevator later. .....Measure 30" outboard on the elevator from the inboard end and place a mark. Using a router bit, route out a slot 1/8" wide for about plus or minus 17 degree of elevator travel. (See sketch) .....Next, insert the QCSM2 pivot assembly, complete with QCSM3 stud, into CS16, the elevator torque tube, with the stud pointing outboard. (See sketch) QCSM2 pivot assembly through the CS16 elevator torque tube with a small diameter stick until it just reaches flush with the slot that you routed out. Rivet the QCSM2 pivot assembly to CS16 using 3 MSP43 cherry rivets spaced radially at least 0.4" apart. Again, it will be necessary to "tunnel" through the elevator skin and the elevator foam core to reach the tube. Again, you will fill the holes with dry micro. .....The routed slot must be expanded so that the CS17 hinge can slide off of the QCSM3 stud and out of the CS16 elevator torque tube while remaining perpendicular to CS16. This is to allow assembly and dissassembly of the elevator. Probably, you will have to open the routed slot up to about 0.6" wide. At the same time, verify that the CS17 hinge can rotate at least 17 degrees up and down to allow proper elevator movement. If not, make the routed slot bigger, as necessary. It is important, however, not to remove any more "meat" from the CS16 elevator torque tube than necessary, so work carefully. . .....Now we come to the 2 CS18 inserts. These inserts are positioned against the canard shear web on either side of the CS17 hinge, and provide a local beefup to take the hinge loads. To deter mine exactly which BL the CS18 inserts must go at, you will need to trial fit the elevator in posit ion in the elevator slot foam core, making sure that the inboard end of the elevator coincides with the inboard end of the elevator slot foam core that you have previously trimmed to fit the fuselage. |
||||
CONTINUED ON NEXT PAGE |
||||
PAGE
10-7 |
||||


