Q-talk 34 - LETTERS


- Details
- Category: Q-Talk Articles
- Published: Tuesday, 30 June 1992 07:11
- Written by Jim Masal
- Hits: 8157
Dear Jim,
Having finished the header tank installation I thought I'd share some details with everyone. For the most part the plans fuel system stinks, especially if you're building a Q-200. The April 92 issue of Sport Aviation (EAA) has a good article on fuel systems.
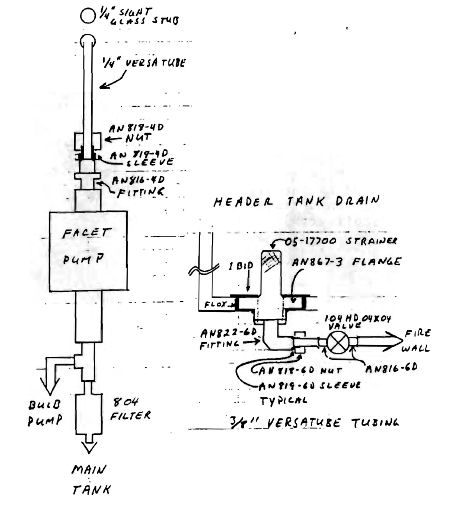
1) Facet fuel pump mount: Cut out 2 pieces of 5 ply 1/4" plywood with the footprint of the pump and glue them together. Drill 2 holes for the 1/4" mounting nuts. The hole diameter should be the flat-to-flat span of the nut (I used AN365-428A). Press the nuts into the holes flush to the top surface. Vaseline the threads of the 2 1/4" bolts and run them into the nuts. Pack flox into the backside of the nut mounting holes to secure the nuts and epoxy the plywood pump mount about dead center of the aft face of the header tank. After cure, mount the pump with AN4-3 bolts and lock washers.
2) Plumb the output side of the pump with an AN816-4D fitting, AN818-4D nut & AN819-4D sleeve. Bend up 1/4" OD tubing to fit from the pump to the input hole into the header tank. Locate the hole 1/2" from the top and don't position it to deliver fuel directly into the vent tube like I did the first time.
3) Tank to engine supply line and strainer: Buy 2 AN867-3 flanges (1-header tank, 1-main tank), a 05-17700 finger strainer and an AN822-6D fitting. You will swear the flange was custom designed for composite tanks. Cut a 7/8" hole thru the bottom center of the header tank. Cut a 1 1/8" hole thru the INSIDE layer of glass ONLY and remove the foam down to the outside glass. Flox the flange into the cavity and bond a layer of BID over the inside flange/tank surface to seal and strengthen the connection. Vaseline the flange threads first as a safeguard to epoxy runs. After cure trim the BID around the hole. Install the finger strainer into the flange and the AN822-6D into the strainer. You'll have a very clean, professional looking installation with a built-in drain and replaceable strainer.
4) Hard plumb the fuel lines from the header tank to the firewall mounted gascolator (no debate needed, just buy one) with 3/8" Versatube, AN816-6D fittings, AN818-6D nuts and AN819-6D sleeves. Call Aircraft Spruce and ask them in your nicest, sweetest voice if they will exchange the kit supplied 104HD-02x02 fuel valve with a 104HD-04x04 valve. They did for me. The 104HD-02x02 valve has a 1/8" orifice in the stem. I personally do not want to try and feed a 100 HP engine thru a 1/8" hole. Flexible, braided hoses should be used from the gascolator to the carburetor.
5) Hard mount the fuel valve somewhere where it is easily accessible but don't hang it off the drain fitting. I'm going to mount mine on the bottom of the header tank where I can run a handle & stem thru the center forward console.
6) Make the gascolator the lowest point in your fuel system since it is the system drain.
7) Use the other AN867-3 flange for the main tank drain. Use an AN912-1D bushing to fit the kit supplied drain valve to the flange. Use the basket from a stainless steel tea strainer or copper mesh for the main tank to header tank feed line strainer. Using "screen door" material per the plans is obscene.
8) Filters: Plumb the kit #804 filter to the input side of the Facet pump. This arrangement gives you 2 coarse filters and 2 fine filters in your fuel system. You don't need the kit supplied auto filter (use it on your lawn mower) and don't even consider substituting it for the gascolator.
9) Plumb the bulb pump around the Facet input filter. This gives you an out in case the filter plugs up.
The additional hardware for this plumbing redux cost me about $50 and the gascolator is about another $50. Don't cheap-shit your fuel system! The consequences of failure are extreme.
Concerning skin sensitivities: I had a recent scare with skin rash and thought I might have developed an epoxy sensitivity. I have always been religious about wearing gloves and, as it turned out, I developed sensitivity to the latex gloves. I was getting contact dermatitis due to the accelerators in the rubber that sweat from my hands was leaching out. If you have given up your airplane because of sensitivities go back and make sure it isn't something closer to you than the epoxy. There are other glove materials that work fine.
If you do not have your wing mounted yet it is advantageous to leave it off until you install the mag box, header tank and, if applicable, the Tri gear and drag brake. The fuselage needs to be placed in its normal, nose down and upside-down positions for these various installations in order to get gravity working for you and not against you. The sequence I used was: Canard mount, Vertical fin installation, Tri-Q main gear layups and installation (3 different positions), Drag brake (bottom up), Mag box (nose down), header tank (bottom up), then wing mount. I can't even fathom the awfulness of doing all these installations with the fuselage upright.
One last question for any Q-200 builder: Where do you find or what do you use for the P/N 660-064 bolt locks called out in the Q-200 plans for securing the head of the engine mounting bolts? I can't find a supplier in the L.A. basin who has ever heard of such a P/N. Please call and let me know. Thanks.
Gene Cash - (805) 492-8309
Dear Jim,
Sorry I'm late getting my renewal fee for QBA to you, I have probably missed an issue and I sure hate to do that. It's a great production and I'm glad you decided to hang in there a little longer.
Here's a quick update on Q-2 N920MR. I started the project 18 May 1990 and the first flight was 5 Oct 1991. I don't know if it's a record but 16 1/2 months isn't too bad considering I was gone for 15 weekends doing airshows and was gone an entire month out of the country. She's not perfect but it looks good and flies great. However, the need for MORE POWER has hit finally and after 35 hours, I removed the Revmaster engine and am undergoing the change to an O-200A. I started the change in mid Feb and will be flying by the end of March. The biggest problem has been the cowling since it looks like Custom Composites has gone out of business (so much for Gary Jones' recommendation in Kitplanes) and I have "adjusted" the Revmaster cowling to fit. If anyone has to do the same thing I'd be glad to tell you how it went. I will be using a Warp Drive prop; I'll let you know how it goes. I also just wrote a program for IBM's that does the weight and balance figuring for a Q-2/200 using the charts from the pilot's handbook. If anyone would like a copy, just send me a few bucks to cover the disk and postage and I'll fire one off to you. Include your empty weight and CG and I'll even modify your version which will save a step in the inputs (no charge, of course!).
Lastly, effective 1 May, my new address will be: 3004 Sunrise, Alamogordo, NM 88310
I had hoped to make it to Sun-N-Fun, but it doesn't look like I'll be able to get signed off and the test flown off in time, maybe Oshkosh!
Marcus Cooper, 17106 N Larkspur Lane, Surprise, AZ 85374
(602) 546-6930

Dear Jim,
Once again writing with a guilty feeling for not keeping in regular touch with you and my fellow builders U.S. wise.
Didn't make Sun and Fun this year as you know. The sudden loss of my poor dear wife, pal and mum whilst I was in Jacksonville has understandably set me back. I am, however, now working hard (on Quickies, of course) and being sustained by many many fond memories, plus fantastic support from all my family and relations.
Anyway, some good news for you which may be worth printing - I hope it's in the right format - use as much as you wish.
THE SUPER QUICKIE REG. G-BMVG
At long last it is finished, test flown and P.F.A./C.A.A. Permit issued. It is owned by Paul Wright, my great friend and partner, and ran out of Global engine on takeoff from Coventry some 12 months ago. I built a new canard, threw away the Global and fitted a new Rotax 503 as per Jinx & Brock plans/suggestions.
THE SPEC.
Rotax 503 twin carb, single ignition turning a CCS 3-blade ground adjustable propeller, 48" diameter. We set the blades (Mark, Paul and I) at 29 degrees measured at 75% diameter. During the 5 hours static run-in, as per the manual, it was obvious that this angle would prove to be too fine as the full throttle revs were 6200. We did, however, decide to leave as is for the test flights on the basis that it would be a good climb setting, etc. This proved to be the case when son Mark test flew it a few weeks ago. As he said, it was like trying to fly in "first gear".
It hit Mark in the back passing through 5,000 revs and was airborne after two blinks. Climb was well over 1000 FPM but Mark really had to watch it didn't over-rev (max 6500). This was, of course, anticipated and I gather he couldn't go over half throttle at straight and level - speed 125 mph.
What wasn't anticipated was that due to the soft engine mounts (Lords) the engine had a mind of its own, sniffing its way around in yaw and pitch regardless of Mark's authority. Just like 707 engines! Great hands-off straight and level but once disturbed in pitch or yaw, the aircraft went one way and the engine the other!!
We then hardened up the mounts and all was well. Have just increased blade angle to 32 degrees. It now runs 5800 static revs wise but suspect we need increased blade area. Nigel Beale of Rotax distributor Cyclone Helicopters (who has been most helpful) says he has a 5-blade prop we could try. We don't like to go to larger diameter (52") because of ground clearance.
OTHER TIDBITS
- Bob Faulkner's aileron reflexor design fitted which works fine. Thanks Bob.
- Extra fuel tank in luggage space making total capacity of 9.5 Imperial gallons (11 U.S.)
- A smart new panel.
- A gaudy paint scheme (Bright Yellow! - see photos).
- Spring bias elevator trim system.
- Differential brakes? Rubber pads on the scrubbed plates.
Paul has done one flight so far, after we prized him in, and was well pleased with it. He will be racing it this season, the first Royal Aero Club event being at Welshpool next weekend 17/18th May.
OTHER IMPORTANT NEWS
Q235 G-BPUC - Ex Bill Elliot's monster.
Owned by Ray Wells of Teeside I first test flew it in Feb. '91 for issue of its first U.K. Permit. I then had it down here at Coventry to carry out some engine work. Then Mark and I flew it. Later, Paul entered it in one Royal Aero Club race with a "declared" speed of 200 MPH. This proved to be too ambitious as he wasn't placed.
Permit is now expired and Ray is in a bit of a quandary as to what to do with hangarage costing a bomb. He has done little flying and finds it a handful. We all think it's great. I understand from Sun & Fun visitors (Paul Buckley) that many builders over there are working on installing the Lycoming 235 - I will of course be pleased to help and as a starter enclose some photos of the installation.
Our one Q235 builder is Clive Clapham of Chelmsford who may have some better photos. Will advise you. The other that I know of is, of course, David Chalmers in Seattle (?), who has written to you a couple of times.
Don Greatrex and family, Bracknell
The very best Q2/200 I have seen. Practically full IFR equipped. Poly paint - O.200 engine - Tail dragger Narco 12.E Comm/Nav 128/Markers, ???, ADF all weighing in at 650 lbs. Soon to be test flown.
Derek Clarke, Doncaster
A few months away but looking great. A Tri Q with 0.200 engine and many extras.

Swissair Engineer, Rudi Brandenberger
Steady progress on his Q2/Revmaster. He has done some great plans which I will send to you after his permission.
Jack Rafter
Has moved back to Switzerland and taken his kit. A Swissair engineer and now commercial pilot.
Q2 G-BOBS is now owned by Paul Wilkinson and based in Glasgow.
G-BSPA (ex. N227T) A standard Q2/Revmaster is owned by Mick Ward in Leicester.
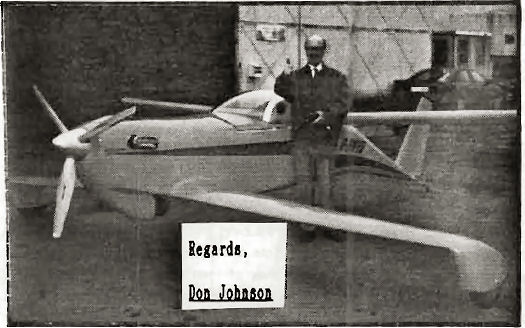
I have a new workshop and my task this summer is to rebuild our first Q2 G-BPMW for Paul Wright. We are fitting a Cont. O-200 plus G.P.S. etc.
John Catley's G-BPNL is ready for its renewal here at Coventry so all in all I'm keeping busy in my old age as they say.
By the way, I did send you some material last year on our trip from Paris to Coventry via Jersey - Q2 G-BSPA (ex N227T) and G-BPMW with a Bonanza. Some photos enclosed in case you didn't get any.
Just shipped in another kit from Florida and will probably be visiting WI and Chicago in about 6 weeks time. Will give you a ring.
Post-Script from son, Mark Johnson:
Quickie fever is riding high as the summer warms up! We had three Q2's and a Q1 here at Coventry yesterday!
Paul Wright's flight in the first race for the Rotax-powered Q1 was not as successful as he'd hoped - he was placed about 20th with an overall speed of 120 mph! Some prop-tuning will be undertaken before the next race.
The European 'mini-Oshkosh' is coming up on the weekend of July 3-5. We're hoping for a good turnout of Quickie variants. If this reaches press before then, why don't some of you come along!
Engine testing of Don Greatrex's Q200 is about complete and I shall be testing this beautiful bird within a few weeks (courage permitting to fly such an absolute work of art) - it weighs in at just 660 lbs full (IFR equipped).
As a total aside, I've just had my log-book validated - total 250 hours of which 215 were on Quickies!
Dear Sir,
Last summer I had no flying projects. This year I have three to start, repair or restore. In August 1991 I purchased a Quickie 1 kit from Christopher Smith in Ontario for a reasonable price. The kit is complete - the fuselage shell is the only work that has been done. With the kit came a couple of year's worth of QBA newsletters. I then wrote to see if you people were still publishing the newsletter as I intended to subscribe to it. Shortly thereafter, a good friend of mine died suddenly. We had met years ago thru Gyro-copters, which we both flew. On my friend's passing, his widow made me a deal I couldn't refuse on the gyro he had in his possession. It had 0 hours airtime, but was damaged in a taxi accident. So, from no project to two projects! I decided that I could only work on one thing at a time, and as my goal was to fly as soon as possible, I put the Quickie on hold and worked on the RAF 1000 gyroplane. Early this spring, I heard of a complete Quickie 1 for sale in Southern British Columbia. In April I went to see it, made an offer and was able to purchase the aircraft quite inexpensively. It turns out to have been built by Robert Shellon of Nakusp, B.C. A photograph of it, as well as a for sale ad, appeared in the QBA Jan/Feb 1984 issue. The log book shows a total of 4.3 hours airtime, but I noticed in one of the newsletter surveys Mr. Shellon indicates a total of 20 hours flight time. Whatever, it is now time. Unfortunately, the airplane has sat outside for ?? years since it was completed in 1983. Overall, to my untrained eye, it appears to be in fairly decent shape. As well, I am very impressed with the excellent workmanship evident in the machine. I did not purchase the airplane from Robert Shellon. It had been sold to another person and then I came along. I plan to have it examined by someone knowledgeable in composites to see if it can be salvaged/restored. My main concern is with the canard which seems to have compression wrinkles - (if that happens) - maybe from a hard landing, but more likely in my mind from sitting in the heat for so long. The prop is weathered and needs replacement. Through the newsletter I met Arnold Forest who lives in Edmonton and at one time had a Q-2. I joined the local chapter of the Recreational Aircraft Association of Canada as a result, because I had no experience in fiberglass work and felt that this would be a good place to get some exposure. So far no luck as the group is quite involved this year in a couple of conventions which are their turn to host. I am currently producing the Chapter newsletter, and though for a short time, I can appreciate the frustration that is occasionally evident in your columns as far as lack of membership input goes. I am running into that as well and we are a very much smaller group. It may be an impractical suggestion, but if I can physically help you produce your newsletter, somehow, from here, please let me know. Before I end this, there are a few things I would like to mention in particular. There are few publications I have ever read that interest, intrigue, depress and educate me to the extent that the QBA newsletter does. Until a year ago, the only Quickie info I'd read was the company literature and as so many do, the airplane was made up to be too good to pass up. Now I wonder if I shouldn't try to get my money out of the Quickie and kit and go to some other airplane. I've already had two forced landings due to engine problems in homebuilts and I don't need another one. Sigh. But it is such a cute little airplane. The other thing is that the previous owners of the kit and airplane I bought sent all the documentation and newsletters they had with the purchase. You may not think that is a big deal, but to me they are as important as the actual airplane parts in many ways. Sorry for the length of this but I did want you to know that I feel your efforts are not in vain and that I, for one, find the newsletter indispensable.
Yours truly, Larry Friedel, Edmonton, Alberta, Canada
THE MANIFOLD PRESSURE GAUGE - Why bother?
Of all the instruments that a fixed pitch aircraft can do without, the prime candidate is the manifold pressure gauge (M/P). The classic rationale that like the manual transmission in a car, a fixed pitch prop will provide a specific speed at a specific RPM. That is reasonably true with all other conditions being equal. But in real life, conditions are very rarely equal. To take the automotive analogy one step further, one can be cruising down the interstate at 60 MPH turning 2800 RPM with just a touch of throttle. However, come to a hill and it might take full throttle to maintain the same speed/RPM. The bottom line is the RPM alone cannot tell you how hard the engine is working. An extreme example of this occurs in a steep decent when the RPM may be well up there but the engine is acting as a brake and actually absorbing power. A more practical example was presented to me once when I was flying our Onan powered Quickie. I became used to equating 3400 RPM to 100 MPH in level flight. Once, while returning from a local fly-in, I was flying along fat-dumb-and happy in medium turbulence trying to maintain speed and altitude and suddenly realized that I had slowly, and unconsciously, nudged the throttle to the firewall to maintain speed, altitude and RPM. (The cylinder head gaskets had let go again.) As you might have surmised, I made it and under those conditions a M/P gauge would only have caused me to soil the upholstery before I did.
A M/P gauge (really just a suction gauge) is invaluable to the homebuilder if he/she is contemplating modification to an existing system. "I added wheel pants and picked up 5 knots". At what speed? How hard was the engine working at the new speed? How hard was it working at the same speed before? You might have picked up a lot more efficiency than you thought. Even more important are those small modifications/refinements to the cowling, baffling, carburetor inlet, etc. One MUST compare power expended vs. airspeed. Tying the tail to a tree and doing a full static run-up only provides one data point on an extremely complicated curve. (That's why they invented wind tunnels.) This is even more important to those of us who tend to fly behind non-aircraft engines where the power curve has not been established or published
Certified M/P gauges, like anything else with AIRCRAFT affixed to their name, are horribly expensive for their function. Fortunately for the fixed pitch world, the Feds are not involved and accuracy is not important, however, repeatability is. This opens up a world of possibilities ranging from air conditioning system gauges to Western Auto after market units.
I'm not suggesting that a show-plane panel be defiled with a hot-rod shop vacuum gauge featuring a picture of Spiderman leaping across the face of the instrument. However, the same instrument temporarily hung below a panel can provide valuable data. One word of caution here! Aircraft M/P gauges are internally damped whereas automotive vacuum gauges are usually not. This is especially important in Onan/Rotax installations. The gauge will try to read individual power strokes and the pointer will be unreadable before it falls off. A damper is simply a plug in the vacuum line (as close to the engine as possible) with the smallest possible hole drilled through it. As we are looking for relatively long term effects, it is almost impossible to over damp the gauge assuming absolutely no vacuum leaks on the M/P side of the damper.
Try it; and remember, engines suck!
Harry Buskey
Dear Jim,
This letter is long in coming, as I have been a subscriber from the very first letter. I have kit #2293 and have been working in fits and spurts since '81. I have taken advantage of many ideas in the letters - thanks guys! I am working on the last major component, the new canard. Hopefully, I will have it (the canard) finished before the non-gluing cool weather comes. The cockpit is nearly complete including the instrument panel. The epoxy I use for any structural member is new, however, old stuff is used for weave fill and foam ding repair.
About the only time I deviated from the elevator plans was on the attachment of the elevator torque-tube to the foam, as I was worried about the tubes coming loose in the foam. I removed the forward foam around the torque tubes at the ends and middle of each elevator to allow about a 5 inch glass-to-metal-to-foam bond.
The glass strips consisted of 2 BID that were riveted in three places to the tube after the epoxy set up. The removed foam was then re-glued, with about a 5x4 inch pad of the BID exposed on both sides of the elevator.
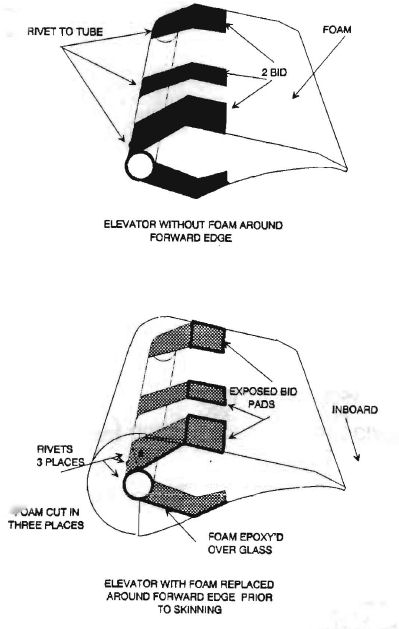
When the elevators were covered, there was a glass-to-glass bond between the reinforcement pads and the skins. This made a strong tie between the elevator skins and the torque-tubes. Any joggle in the skins were filled with very dry micro.
Ye old slow poke,
M. Mackenzie #2293
13243 Via Ranchero Dr., Saratoga, CA 95070
Dear Jim,
As have many builders before me, I have found very little time to work on my Q-1 since the birth of my son in December of 1990. I have been finding more time, of late however, and have begun to prepare for the main wing layups. One of the problems I have had to face is the congealing of hardener, and deterioration of O-rings in my locally built epoxy pump. The Buna-N rubber breaks down in the presence of hardener. I have cleaned the pump with acetone and reassembled it using Viton O-rings from Small Parts Inc. of Miami, FL. I am confident that these O-rings will last far longer than the Buna-N. I highly recommend Small Parts, Inc. as a supplier of various oddball materials and hardware. You had printed a reference to them as "Saturated Steam" a few years ago.
In my last letter, I mentioned a problem with a low-cost welding rig from Harbor Freight and Salvage of Camarillo, CA. The acetylene regulator tended to stick, causing pressure variations and an unsteady flame. I was able to correct the problem by polishing the parts that opened the internal needle valve. Fairly frequent adjustments to the flame are required, but I have been able to make some passable welds on non-flying items. It is very satisfying to fuse together separate pieces of steel. I hope to try my hand on some 4130 scrap one of these days before trying to weld an engine mount for the Rotax.
Maury D. Cosman
You can order a PDF or printed copy of Q-talk #34 by using the Q-talk Back Issue Order Page.