Q-talk 79 - LETTERS


- Details
- Category: Q-Talk Articles
- Published: Friday, 31 December 1999 06:11
- Written by Tom Moore
- Hits: 3171
Guys,
This is a continuation of the auxiliary fuel tank subject that began in the last issue. This is how I resolved my need for additional fuel.
On August 28th, 1997 I completed my required flight time the FAA had imposed on my new Q-200. During this time my flights never exceeded 90 minutes or so, and I only had a couple of those. During this time I did the normal flight-testing, but with the short hops I never really concentrated on my fuel burn. I knew I had an O-200 in front of me and there was plenty of data available that was very consistent from plane to plane. I didn't see any variations that concerned me. It looked like I was burning around the normal six gallons per hour.
On August 29th, 1997 I took off for my first cross-country flight. I was headed to Ottawa, Kansas and I was grinning from ear to ear. I had probably accumulated about 35 hours on the engine since its first start and I thought it was time to open it up a little. The engine was sounding good and with a small tailwind the plane was zipping along. After two hours, I landed at Ottawa, and realized I had an empty main tank.
I knew from beginning that I had a small main tank. I had purchased my kit from another builder and the main tank was already installed. The tank would only hold about 12 gallons. Some FBO pumps have indicated that they put in 13 gallons, but I'm leery of their accuracy.
It didn't take me long to realize that I was going to need some additional fuel if I wanted to make some decent cross-country flights. If you're wondering about the header tank, don't even think it. I made a decision early, the header is sacred and it is strictly for reserve and not to be used for planning. It makes me feel a lot better to know that when I run out of gas, I still have five gallons left and time to find a place to land. So during Ottawa, I talked about auxiliary fuel tanks with Kimbull McAndrew and Larry Koutz. Both builders had added an aux fuel tank in their Q-200's or in Kimbull's case a Q-235.
I started to note how each one had accomplished their need for more fuel. Both had aux tanks that held around 9-10 U.S. gallons of fuel. Kimbull had built a fuel tank that basically covered the whole baggage compartment floor (see issue #78). Larry's was built taller and only resided on the right side of the baggage area. Larry had built a new fuel filler door on the right side under the main wing to access his tank. Kimbull had his fuel filler in the baggage area just behind the pilot's seat. Larry was using the fuel pump from the main tank to also pump fuel from the aux tank. He used a fuel selector valve that could select either the main or aux tank. Kimbull had a separate fuel pump for the aux tank that had an independent switch to activate. Both pumped fuel from the aux tank into the header tank and had a dedicated external ram air vent for their aux tank.
Since I had the option, I decided to choose what I thought was the best of both examples. Kimbull's flat tank offered about the fuel quantity I needed and still allowed me to stow two travel bags in the baggage area when the tank was not in use or not filled to capacity. (Note: In a recent exchange with Larry on this article, he mentioned that the flat tank would be his choice now because of the extra baggage room.) I did raise the height from Kimbull's plan about half an inch and I ended up with an additional one and half gallons of capacity. Besides that, I followed his plans pretty closely. I did not have to modify my aileron control tube as Kimbull did. I don't know what the difference is, but my tube cleared the tank with no problems. It's possible my control tube comes back at a shallower angle which gave me more clearance aft of the seatback bulkhead.
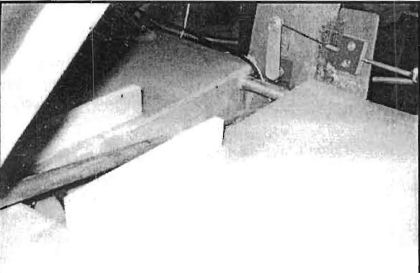
From here you can see the aileron control tube as it goes into the cavity that separates the two halves of the aux tank. At the rear, below the reflexor, is the tube that allows air to escape from the upper portion of the left side of the tank while it's being fueled.
Larry's fuel inlet, being located on the outside, was surely easiest to use and also the safest option. I did include a nice feature when I built the filler. I purchased some clear 2-inch I.D. tubing made out of a chemical resistant material. I learned from my main tank filler that it is very hard to see the fuel going into the tank. I have to listen to the sound of the fuel going into the main tank to tell when it's nearing the full point. The clear filler tube gives me some added help in telling when the tank is full. I open one of the seat backs to allow light into the baggage area to clearly light up the filler tube. I plan to replace the main tank filler with clear tubing in the future.
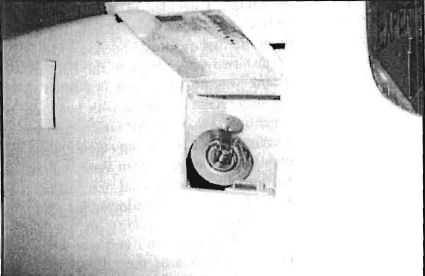
The filler inlet is located on the right side under the main wing. The filler tube is angled back towards the rear of the aux tank to make it easier to insert the filler nozzles.
I added a second fuel pump like Kimbull with a dedicated switch. The pump was placed in the same place and plumbed to the header.
The one thing I did do that was different was to vent the tank off the existing ram air vent line. I just added a "T" into the line and ran the tube back to the new aux tank. I also added a 5/8" aluminum tube between the two halves (at the back end) to allow trapped air to escape from the left half while filling the tank.
My experiences have been like Larry's and Kimbull's. The added fuel is nice, but you have to watch the C.G. and pay close attention when moving fuel forward. Remember the fuel you're moving forward from the aux tank is going to end up in the main tank. There needs to be room in the main before you start.
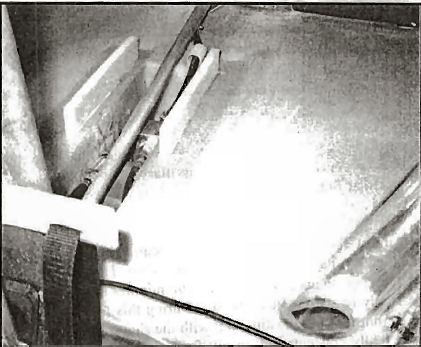
Here you can see the pump located in the cavity along with the fuel filter. On the right side is the clear filler tube that helps check the filling progress.
The added fuel has given me the flexibility you need when planning the longer flights. Also, not having to count on the fuel in the header gives me a little insurance and peace of mind in case things don't go as planned.
Tom Moore, Frisco, TX
MINNESOTA FLY-IN
MAY 6TH
MINNEAPOLIS AREA
Come join the 2nd Annual Finley Hangar Roast (that would be a roast IN the hangar and not a roast OF the hangar) on Saturday, May 6, 2000. FLYING CLOUD (FCM) Airport on the southwest side of Minneapolis is the place. It will start whenever you can get there until about 2:00-3:00 p.m. I can't guarantee that I can have the Baywatch girls there again like I did last year. (Ed. Note: Jon did say he got pictures of the Baywatch girls last year in his hangar and I'm sure he will have them on hand for all to see.)
The QBA T-shirts with the image seen below are now available. The image appears over the left breast. The Quickie is colored RED and the lettering is black on a white Hanes BEEFY-T that is 100% pre-shrunk cotton. They come in sizes M, L, XL. The cost is $10 per T-shirt plus $3 for shipping. Add $1 shipping for Canada and $2 for international.


Michael Moore's Q-200 originally built by Alan McFarland.
You can order a PDF or printed copy of Q-talk #79 by using the Q-talk Back Issue Order Page.