Login Form

Q1 Plans Chapter 10 Page 10-8

FITTING THE MIDSPAN ELEVATOR PIVOT

This section is quite similar to what you had to do to mount the outboard aileron pivot previously, so review that work before reading any further.

The midspan pivot is mounted at BL49.

Screw CSM3 into CSM2 and retain it with a locknut. It must be tight. Round the end of CSM3 slightly.

Measure 38” outboard from the inboard end of the elevator. Using a router bit, route a slot 1/8” wide for about plus or minus 17 deg. of rotation. Next, insert CSM2 into CSI6 with the flange pointing inboard. You may have to sand CSM2 to get a snug fit. Push CSM2 outboard thru the tube with a stick until you just see it flush with the routed slot. Rivet 3 MSP43 cherry rivets to hold it in place. Note that the rivets grip the tube/CSM2 assembly, To do this you will have to drill access holes thru the foam so that the rivet gun can reach the rivet. These holes can be filled later with foam and micro.

The routed slot must be opened up so that CS17 can slide off of CSM3 and out of CS16 while remaining perpindicular to CS16. This means that the slot must be about 0.5” to 0.6” wide. Also, check to see that CS17 can rotate about CSM3 approximately 17 deg. in each direction while inside CS16.

Repeat this procedure with the other elevator. Be careful that the flange on CSM2 points inboard so that CS17 will slide off CSM3 as the elevator is moved inboard.

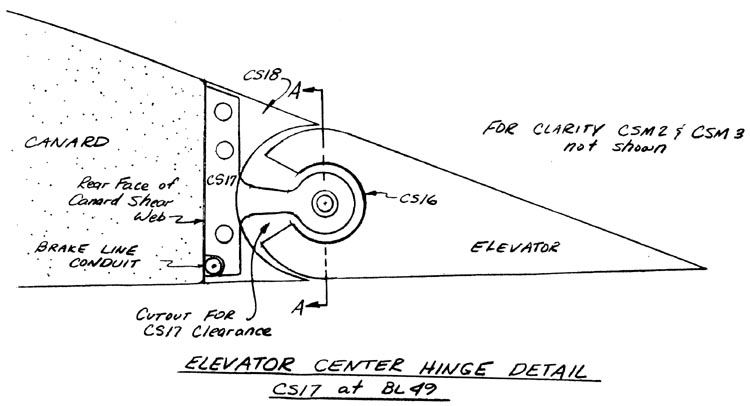
CS18 are shaped blocks of red foam which are mounted in the wing, butting up against the rear face of the canard shear web. Later on, CS17 will be sandwiched between a pair of CS18’s. To find out where the pair of CS18’s should go, temporarily set each elevator in its approximate postion on the canard, with the inboard elevator edge at BL11. CS17 should be against CSM2. Now you can mark where the pair of CS18’s must go to capture CS17. Remember that to remove the elevators, they are moved inboard (while CS17 remains fixed between the pair of CSI8’s) until CS17 slides off CSM3; then the elevator äan be pulled off. If you don’t stand back and think about this, you are likely to error during the installation.

Once you know where the CS18’s go, use a router as you did with the ailerons, to remove that portion of the elevator slot foam core, including the BID on top and bottom
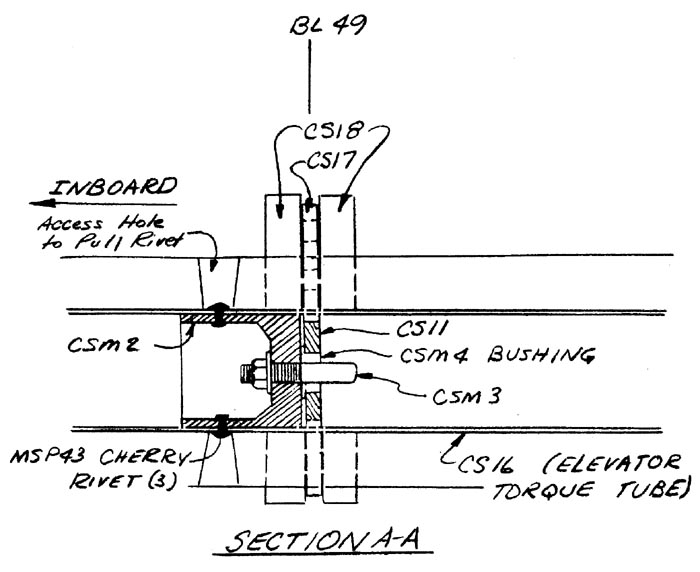
Quickie Midspan Elevator Pivot Detail

Quickie Elevator Center Hinge Detail

Q1 Plans Chapter 10 Page 10-9

INSTALLING THE ELEVATORS

The elevators are installed and rig ged prior to the canard being mated to the fuselage. Therefore, after mating, only CS13 needs to be hooked up for a functioning pitch control system.

This section is also quite similar to what you had to do to install the ailerons previously, so review that section before reading any further.

Begin by jigging the canard vertically, with the leading edge at the table.

Take CSM1 and make a 1.31! length piece for the right elevator and a 1.8” length to the left elevator. If necessary, sand these to allow them to snugly fit inside CS16 flush with the inboard end of CS1Ô.

Remove CS17 from the midspan pivot so. that it doesn’t get in the way.

Find phenolic bearings CS15 (2) and CS14. Dull the phenolic with sandpaper.

Find CSA8, CSA6, and CSA7. These three welded assemblies will be used with the elevators to jig the phenolic bearings.

The purpose of the following description is to allow you to fit the elevator in a way so as to prevent binding:

  1. Trim the canard core locally so that CS15 can be positioned at BL10.3
  2. Find CS19
  3. Have one individual hold CS15 against the core while you hold the elevator in position and push CSA7 thru CS15 into CSM1. The inboard elevator should be about 0.5” outboard of CS15 so that the CS8 spacer will fit.
  4. Slip CS19 into CSM7 and position CS19 against the rear face of the canard shear web
  5. Verify that no binding occurs during elevator movement. If it does, modify CS15 and CS19 till they allow the elevator to rotate freely. Don’t be too concerned with the elevator gap near the midspan hinge since that can be corrected when CS17 is installed permanently. The gap inboard and outboard should be about 0.06” top and Bottom, just like the ailerons.
  6. Mix up some 5-Minute in order to join CS15 to the core and CS19 to the shear web. Repeat Step 5 and hold everything in the proper position until the 5- Minute has cured; then remove CSA7 and the elevator.
  7. Repeat Steps 1-6 with the left elevator except that CS14 will have to be aligned also.
  8. Be careful not to break the 5- Minute bond between any of these pieces. Now lay up the BID that permanently joins the phenolic bearings to the wing core. Be careful not to get any epoxy in the holes.

For Additional Details See Sheets 10-10 and 10-11

INSTALLING THE MIDSPAN PIVOT

Once the inboard and outboard layups over the bearings are cured, you will want to permanently install CSI7 between each pair of CS18’s. The elevator gap, which should be min. 0.06” top and bottom, can be set by where CS17 is installed vertically.

Begin by installing the elevators on the inboard and outboard pivots. Remember to leave a gap of about 0.5” inboard for CS8 spacers later on. Next install CS17 on CSM3 against the face of CSM2. Make it the core of a sandwich with a pair of CS18’s, and trial fit the sandwich in the canard against the shear web (the cutout for the sandwich should have been done earlier). When satisfied with the fit, permanently mount the CS18’s and CS17 with flox. Use tape and stirring sticks to maintain the elevator gap top and bottom at about 0.06”. Permit the combination to cure one day, then lay up one BID across the sandwich top and bottom to smoothly join them to the canard core. Some sanding of CS18 may be necessary to make a smooth transition. Repeat this procedure with the other elevator.

INSTALLING THE CS8 SPACERS

The CS8 spacers prevent the elevators from sliding off the pivots inboard. The installation is the same as what you did for the ailerons. Allow about 1/32” to 1/16” free play in the system. Remember that the elevator must not fall off CSM5 and CSM3 until it has moved inboard at least 0.3” inboard.

CONTINUED ON NEXT PAGE