Q-talk 126 - Using A Standard Cessna Heatbox with Your 0200


- Details
- Category: Q-Talk Articles
- Published: Wednesday, 23 December 2009 16:24
- Written by Kevin Boddicker
- Hits: 3182
At the Field of Dream Fly-in this fall I noticed Kevin Boddicker had a carb air intake setup that I had not seen before. I requested Kevin to submit these photos and explanation of what is different on his Tri-Q200.
When I got the project, the cowl had been fitted, but not final fit or drilled. I hung the engine on, and made sure there was enough clearance. Then I went about the business of drilling and attaching nut plates to the cowl flange and the lower cowl shell. When I got things all fastened together, the surface behind the rear spinner bulkhead was not parallel to the bulkhead. The top half of the cowl was, but the bottom half was not. Had I done things properly, I would have trimmed the aft part of the cowl, where it meets the firewall, at a diagonal. That would have swung the lower cowl aft and up; aligning the front parallel with the bulkhead. Because I did not do this, there was more room for the carb heat box. So I was able to fit the Cessna carb heat box and not have to mess with the plans box, scat tube, mounting hardware, glass elbow, glass intake funnel, etc.

However, I had to make the lower face of the cowl parallel to the bulkhead. So I cut a widening crack out of the cowl. Narrow at each end, and wider as I went to the middle. Like a smile. Forced it back. Put two bid tapes on the inside and filler on the outside to dress it up.
I then made the glass snorkel that is seen in the photo. I started with a piece of blue foam. Carved it to fit as close as I could guess, attached an old bracket air filter to the foam. The filter was used to make a flange to mount over the front of the box.
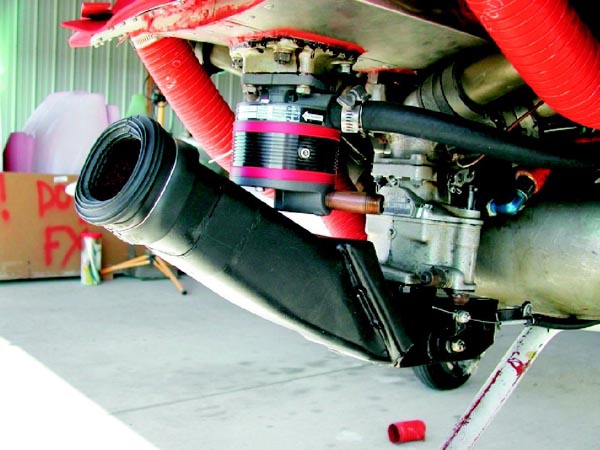
I then covered the whole mess with duct tape for release, and applied multiple layers of bid. After I got it done, there were several sessions of cutting and re-glassing to get it to the final shape. It is hard to make things line up with the intake hole in the cowl by holding parts up and guessing. It is much easier to have it in place and mark where the changes need to be made.
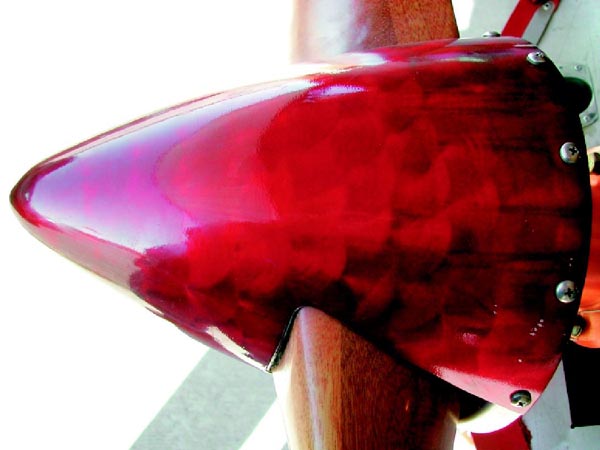
I also liked what Kevin did with his spinner. Here is a photo of it and how he made it look so nice.
The spinner pattern is called engine turning. I used a green Scotchbrite on one of their drill mandrels. The abrasive that came on the mandrel was sandpaper. I put double stick tape on the sandpaper, then attached the Scotchbrite to the tape. The pattern is started with only half of the disc cutting. From there you just make the edge of the disc cut through the center of the last swirl. For the next row you need to cut both centers. Practice on scrap aluminum first until you get the hang of it. After all the "engine turning" was done, I had transparent red powder coat applied. Fit the spinner to the bulkhead and made the prop cut outs before applying the powder coat.
You can order a printed copy of Q-talk #126 by using the Q-talk Back Issue Order Page.