Q-talk 124 - Canopy Support Construction


- Details
- Category: Q-Talk Articles
- Published: Wednesday, 23 December 2009 16:24
- Written by Earnest Martin
- Hits: 2660
In the last newsletter Doug included a couple of pictures of my canopy supports. You might want to refer back to those photos. Here is how they came about and how you can duplicate them, but read everything carefully before you start. If you come up with any improvements I'd like to hear about them.
Last winter my old canopy supports would no longer support the canopy. They would just slowly collapse. These supports were the legs of an old camera tripod and I couldn't find new ones that weren't pretty clunky looking. I tried to come up with something simple to use but wasn't very successful until one rainy day I opened an umbrella to go to the mailbox. "Hey, that's a pretty simple mechanism to hold my canopy open". The only problem was that 1 could hold it open, but couldn't prevent it from opening too far. That's when I came up with the idea of hiding a cable or cord inside the tubing to control the maximum opening position.
The first step is to decide where your fuselage attach points are going to be. Then measure the distance between these points with the canopy open and with the canopy closed. With these numbers you can determine the approximate length to cut your tubes and where, along the length of the small tube, to place your latching mechanism. My latch is 3.5" from the end of the small tube. Divide your canopy open length by 2 and add 3.5" to the small tube to get your approximate tube lengths. This will make them a little longer than necessary because of the ball joints on the ends. Wait to make your final cuts until after the latch has been installed in the small tube.
Here is a list of materials that I used for two supports. Remember your lengths will depend on where your attach points are located.
| Qty | Description | Size in inches |
| 2 | Alum rod | .375 OD X 1.25 |
| 2 | Alum rod | .375 OD X 3.5 |
| 2 | Alum rod | .5 OD X 1.25 |
| 2 | 6061-T6 Tube | .5 OD X .058 X 14.5 |
| 2 | 6061-T6 Tube | .625 OD X .058 X 18 |
| 2 | Roll pin | .125 X .375 |
| 6 | Roll pin | .125 X .5 |
| 2 | Roll pin | .125 X .625 |
| 4 | Ball joint | U-JS-8 |
| 2 | 2024-T3 | .375 X 1.75 X .063 |
| 4 | Threaded rod | .25 X 1 28 TPI |
| 2 | Blind cord | 18 |
| 1 | Ball point pen | spring |
The ball joints came from Small Parts Inc at www.smallparts.com (800) 220-4242. My old catalog shows them at $3.60/ea.
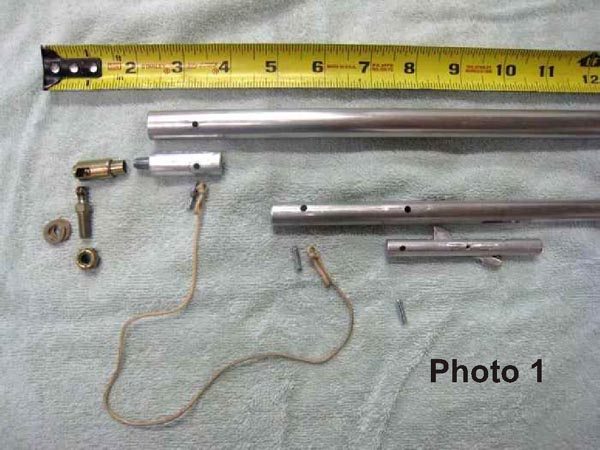
Photo-1 shows basically how things go together. It shows all of the holes aligned with the parts and roll pins that hold them together. The cord is tied around a roll pin in the top of the smaller tube and is routed through the large tube and tied to the pin that holds the aluminum rod in the end of the tube. Short pieces of alum rod are drilled and tapped to %" 28 TPI and held in the end of the tubes by roll pins. These are the only pins that will be seen after assembly. %" threaded rod is used to attach the ball joints to the end of the tubes. Since the rods fit slightly loose inside the tubes, I added small pieces of alum tape to get a tight fit before final assembly.
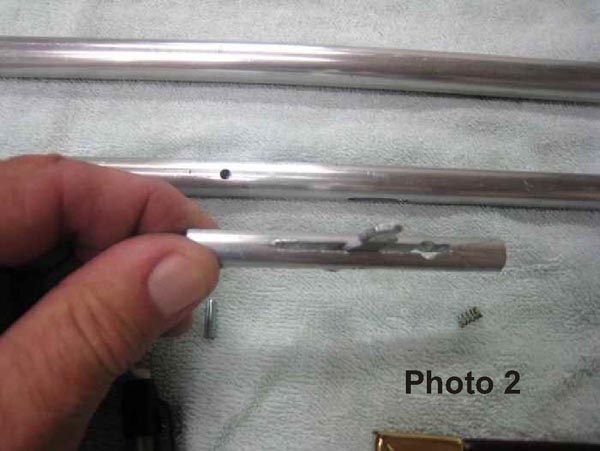
Let's start by making the latching mechanism, which will later be slid inside the small tube and pinned there. It will be made from the 3/8" aluminum rod. I waited until I finished all the work to cut it to length. This gives you more to hang on to while you are working with it. Based on the size of spring you intend to use drill, a hole approximately 3/16" in diameter, from the end of the 3/8 X 3.5" aluminum rod. Then cut a slot in the rod 2" long and .068" wide (wide enough for the latch to move freely). See photo-2. I used a Dremel tool and it takes a while.
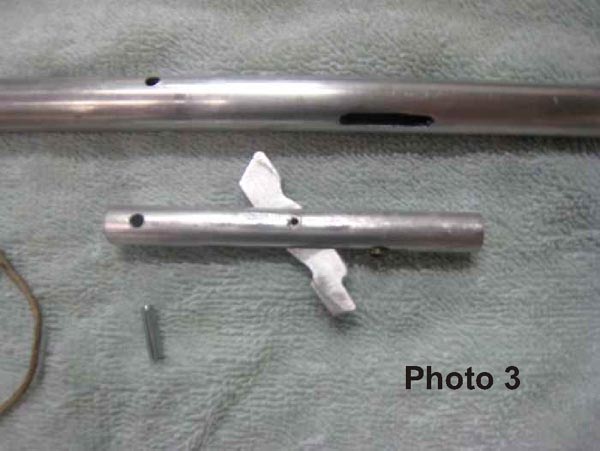
Next, cut out the latch from .063 aluminum and file it to the approximate shape in photo-3. Notice that one end of the latch has a notch cut out to allow room for the compressed spring when the latch is closed. This end of the latch must align with the hole you drilled for the spring. The two scalloped areas on each side of the latch control the amount the latch extends through the tubing. Slide the latch into the slot you cut and drill through the center of both the rod and latch with a 1/8" drill, using masking tape to hold everything in place while you drill.
Then install a 3/8" long roll pin, which will serve as a pivot point.
Now we can prepare a tube to accept the latch. Using your Dremel tool cut a %" X .068" slot starting 3.5" from the end of one of your tubes. On the opposite side the same tube cut a %" X .068 slot starting 4 3/4" from the same end. You may need to adjust the above numbers if your latch turns out different in any way (measure twice cut once). Cut a piece of ballpoint pen spring approximately %" long. Slide the latching mechanism into the tube, spring end first, with the %" spring compressed in the hole.
You will have to slide the latch in and out several times to make adjustments until the latch extends through both slots in the tube about 1/8" and opens and closes smoothly. When everything works to your satisfaction, drill a hole through the tube and the latching mechanism about 3" from the end of the same tube, and install a M-" long roll pin. This roll pin will hold the latch in place and will be hidden inside the larger tube on final assembly.
Drill a 1/8" hole for a roll pin 5/8" from the top of the small tube. Tie a slipknot in one end of your cord. Leave a large loop in the slipknot and slide the loop into the end of the small tube and install a M-" long roll pin. Then pull the slipknot tight. Next, slide the cord and the small tube inside the large tube. With the large tube resting against the latch in the small tube, measure and cut your tubes to their final length allowing for the ball joints on the ends. After the tubes are cut, slide the cord and small tube back into the large tube, and pull the cord through the large tube. Stretch the cord tight and mark the end where it comes out of the large tube. Then press in the latch and push the tube in a few more inches. This will give you some slack to use in attaching the other end of the cord.
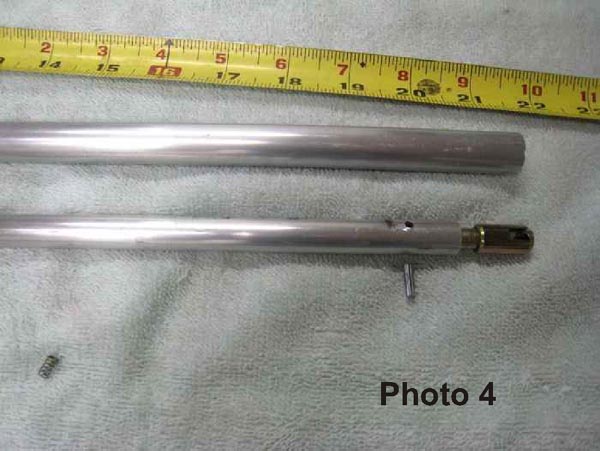
You are now ready to install your end plug. Drill all the way through and tap your /" X 1.25" end plug for the threaded rod. Slip it into the large tube and drill for a roll pin %" from the end. Now remove the plug and drill it from the short inner end to 1/8" past the roll pin hole. A 5/16" drill bit should work here. This will give you room to slide in another slipknot and install a roll pin. You should tie your knot so that the cord becomes tight just as the latch engages. I cut a toothpick to /" and used it to hold the cord in place in the end plug as I slid the plug in and pinned it. The pin slides in and pushes the toothpick out, capturing the slipknot. Remember the cord will stretch, so install it tight.
Drill, tap, and install your other end plug in the small tube. Screw in the threaded rods with a little thread lock on them. Screw the ball joints on the treaded rods and you've got a canopy support. It takes a lot longer to describe this process than it does to do it, so don't let the long description intimidate you. I made 2 of these in about 7 hours and I was doing a lot of head scratching.
You can order a printed copy of Q-talk #124 by using the Q-talk Back Issue Order Page.