Q-talk 110 - Engines VW Type 4 Part 2
- Details
- Category: Q-Talk Articles
- Published: Wednesday, 23 December 2009 16:24
- Written by Doug Humble
- Hits: 4613
In the last issue I left my story on the VW type 4 engine just after my propeller had departed from my engine. I was angry. I was disappointed I would not make The Field of Dreams Fly-in the next week. I was confused with what had just happened. I also was alive. It was this last emotion that brought the realization that my hobby is a serious one.
I took the propeller and prop hub home, laid it on the kitchen table, and answered all my wife's questions before I called Steve Bennett at Great Plains. At first we thought the bolt which sets the hub on the crank shaft taper had broke, as it was still with the hub and looked to be sheared. Our investigation would prove otherwise. The next day would be the beginning of a long road to determine what had happened and how to fix it, if anything could.
If I was going to feel comfortable with any solution, I had to get educated on how the hub is mounted to the crank shaft in the first place. Great Plains has a couple of ways to mount the hub to the crank shaft, but the most common was the taper fit. In the hundreds of engines sold by Great Plains, there was never a failure of this type on any of their type 1 VW engines using this hub. Shortly before my failure, another hub failed on a type 4 installed on a Sonex. While the parts were from Great Plains, the engine was not assembled by Steve, and after I had numerous phone conversations with the individual who was involve in this incident, it is still hard for me to determine if these incidents were similar. Therefore, this is my only mention of it in case you have heard about it. I will only deal with my situation.
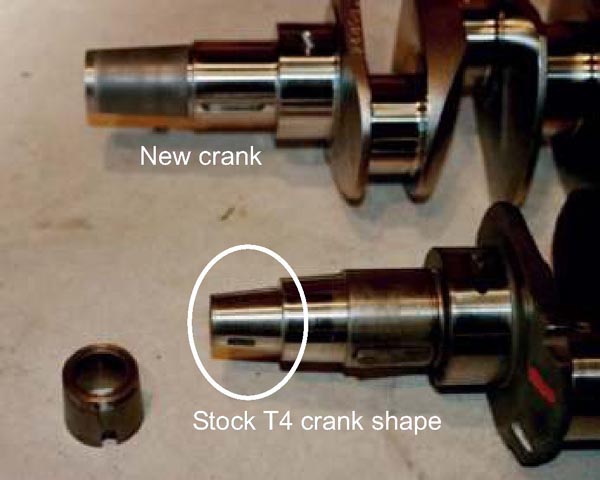
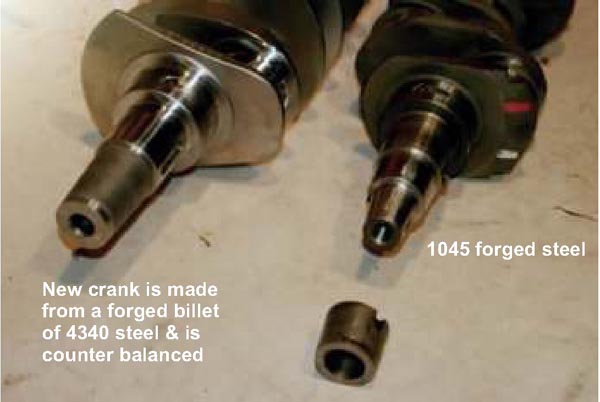
I was using a standard type 4 crankshaft which came with the engine. It is different from the type 1 not only in size, but also the end, which is used to hold the prop hub, is machined differently. As you read this next portion of this article, please refer to the photos I have included of the old and new crank shafts. While the type 1 crank has a straight end, the type 4 has a small taper which is about 1" long. I believe it held a fan blade in its last life as a car engine. The taper for the hub is about 2" in length, so the small taper had to be overcome to use the taper hub.
A sleeve of metal was machined on the inside to fit over the small taper and its outside diameter was large enough to match the diameter of the rest of the crank shaft. Once this sleeve was press fitted onto the small taper, the longer taper was machined so it could receive the prop hub. This solution worked well for the first 45 hours. It may have worked for another 500 hours, but you may recall we pulled the prop hub off to replace a leaking front seal.
I had always thought that the bolt held the hub on the crank shaft. I know the engineers reading this are shaking their heads in amazement at my ignorance. Come to find out, the bolt is there to seat the hub on the taper. The taper is what keeps things together. The process of removing the hub would give anyone confidence in the theory behind a taper fit. We had a new 5 ton hydraulic puller that would not break the hub from the shaft. And using a manual puller was somewhat hair raising. When the hub finally let go, a loud ping was heard as the hub fell to the ground at my feet.
To this day, I try to visualize if the sleeve that was fitted over the crank taper, was in the hub, or still on the crank after we pulled the hub. I just can't remember, as it was unimportant to me in my ignorant state. We simply replaced the front seal and reinstalled the prop hub. It failed ten hours later.
When we went on our search for a solution, we examined ways to "properly" install the sleeve. I solicited an opinion from an engineer who is a good friend and fellow EAA'er. I also solicited an opinion from one of our own Q-list members who is an engineer. The verdict was that the sleeve was a bad idea. It was a failure waiting to happen. Maybe it would hold for 500 hours before it gave way, but no one wanted to be flying behind it when it did. I had been lucky once and I knew I wasn't going to fly behind it again.
Another avenue I looked at was to build up the tapered end by welding and then machining it to accept the hub. I was knowledgeable enough to know that when you weld, you disturb the material that you are welding. Without welding a crank and sending it to a lab for analysis, I couldn't be sure the crank wouldn't crack over time from the effects of the welding. I understand this is being tried by others in order to be able to use the standard crank, but I didn't have confidence in the procedure.
I was at the point where I thought I might have to change engines altogether. Then the phone rang and Steve Bennett said he could have cranks made by SCAT and he would sell it to me at his cost. This seemed to be the way to go. Yes, it would cost me money, but not as much as changing engines.
The new crank would be made of better 4340 steel, would be counterbalanced and, most importantly, it would have an end that was full size and ready to be machined to accept the Force One prop hub. I have included pictures of the old crank verses the new crank.

I was back in business! I felt comfortable about this solution because there has never been a failure of this hub in any type 1 VW.
Now let me tell you about the engine itself and it's performance. I have a dual ignition with a Slick magneto and a fixed timing secondary ignition. I like this set up over the original RevMaster dual magneto because it is lighter and the electronic ignition is a much hotter spark. The spark plug gap with the magneto is set at .017" and the spark plug gap for the electronic ignition is set at .035".
I have mated the engine with a RevFlow carburetor and found that the factory needle and factory setting seems to work just fine. In the fall I turn the mixture screw 1/4 turn to the rich and
turn it back when the weather begins to get hot.

I have a remote oil cooler mounted on the firewall on the pilot side. I plan to rework how it is mounted to improve cooling during climb out, but in straight and level flight (S&LF), oil temps are around 180 degrees. I take my CHT from under #4 spark plug and again I need to improve on climb out temps as they reach 475 degrees on hot days, but then cool off to 375 degrees in S&LF. Oil pressure is running at 75 psi which seems on the high side. It was running at around 80 psi and I switched from the after market high volume pump back to the standard pump which resulted in a drop of 5 psi. I may try a different spring behind the pressure relief valve to try to reduce the psi further.
I currently fly behind a Sterba 54"x44" pitch prop and I cruise at 23" of manifold pressure at 148 mph. I previously had a 56"x44" Sterba prop that began as a 56"x48" and was cut down to increase static RPM. As I reported in issue 109, I was seeing 158 mph at cruise power setting. This was the prop I busted up. I just received a new prop from Ed Sterba which is a 56"x 46" pitch and I'll report my performance in a future issue.
I still have occasional issues with the hydraulic lifters. Being patient is the way to over come the problem. Simply letting the engine warm up at a fast idle pumps the lifter up. The problem usually does not reappear for several flights. I have thought about switching to solid lifters, but this requires a different cam, so I have chosen not to at this time.
I still have a leak in the front seal that is more annoying than a problem. There may be a way to fix it by deepening the channel to the relief hole in the front bearing, but it would require the prop hub to be removed to do and I'm a little skittish about doing that. (I know the problem has been identified and solved, but I still have memories). The front bearing is similar to the one used in a Type 1 case but the relief channel is only long where as it is about 1 in the Type 4 case. Unless the leak gets much larger, I'll live with wiping the oil off after landings.
My conclusions.
If I knew back then what I know today, I think I would have opted to go with a 2180 Type 1 engine. My performance is not significantly greater than any of the reports I see on a 2180. This may change as I experiment with props. The parts, and experience for the Type 1 are more readily available and are less expensive. I wanted to go faster for not much money. I have approximately $6000 invested in my engine and about a third of that was for fixing mistakes. Still not bad as far as engines go. I have personally learned more from the experience and that is what this experimental stuff is all about. I didn't start out to break new ground, but it looks like I may have. I'm not sure I would change anything in the experience... except maybe the little part about my prop falling off!
You can order a printed copy of Q-talk #110 by using the Q-talk Back Issue Order Page.


