QuickTalk 28 - Q-2 PILOT REPORTS


- Details
- Category: Q-Talk Articles
- Published: Monday, 30 June 1986 07:11
- Written by Jim Masal
- Hits: 5104
From Jim Maris #2337, N22TQ, West Lafayette, IN
Easter Sunday was THE day; N22TQ flew with its builder as pilot for the first time. After two high-speed runs (up to 65 mph) with turn offs at mid-runway, I decided to keep power on longer and go the 6,000' to the end. At midpoint I found I had aileron control...I was airborne!! Remembering the advice not to attempt a landing from a takeoff attitude, I applied full power and told the tower good-bye. On the climbing turn I noted 100 mph and 1200 fpm. I was at pattern altitude as I finished the turn, and a half turn of trim flew it hands off with everything in the green. I circled the field at 3,000' checking everything and enjoying the comfortable feeling of the airplane for 35 minutes then called the tower for landing after making a practice approach at 3,000'. I entered downwind at 120, base at 100 and controlling descent by power, I crossed the boundary at 85 mph, touched just past the numbers and turned off at the intersection. There was no control difficulty on rollout and no write-ups were necessary. I had to agree with Scott Swing whom did my initial test flight when he said, "That's going to be a FUN airplane."
I now have several flights expanding the envelope and controllability has been good. Last flight I climbed at 105 mph and 900 fpm. Cleaned up and cruising at 3000 rpm I saw 145 IAS. I had 11 kts of wind at 90 degrees and landed on runway 11 with no problem. Things are going well, but 40 hrs seems like a long time away.
From Phi Haxton N72PJ, Marietta, GA
N72PJ is flying! First flight was at 7:45 pm on June 6th. I had been performing high-speed taxi tests for about 20 min when it lifted off to about 5 feet. It was left wing heavy and immediately drifted off to the left. By the time I re-established on the centerline of the runway, my margin for safely landing was gone so I applied full power and began climb out. My wife Julia and daughter Josie who had come to watch me taxi were surprised when I flew past (a friend said Julia was threatening to kill me if I survived the first flight!).
I climbed at 100 mph and 900 fpm to 1500 AGL and flew a figure 8 above the field checking things out. I flew at 110 IAS at 2500 rpm and found pitch trim sensitive, but easy to adjust to; 10 degrees right aileron was required to hold wings level. In a power off stall, the aircraft pitched down and to the left recovering with standard technique with a 200' altitude loss.
After 25 minutes, I entered downwind at 2000 rpm and belly board deployed. I flew base and final at 80 mph, which was too hot, and I closed the throttle completely a half-mile out to get it to sink. I flared a 5' and it started to balloon up so I relaxed backpressure and when it began to settle, I gently eased the stick back. It touched in a 3-point attitude at the same time I reached full aft stick, smooth and uneventful. As I taxied back, the emotions and pride I felt at that moment were very intense. Smiles were on everyone's face, including Julia's.
I want to thank: Ennis Barlow and Von Hickman (Q-2 N14QP). Von gave me a very helpful right seat checkout in their Q-2 and Ennis has always been a good source of technical and moral support; my father, O. P. Haxton, Sr., an accomplished aircraft mechanic, Jim Neffinger; Marc Hirshowitz; Burt Rutan; Jim Masal for the many times I laughed while reading his editorials (Jim, I think of you as a modern day Will Rogers, able to put things in perspective and make us all laugh at the absurdities of life! Finally I thank my wife for her wonderful patience and understanding during 5 years of building (also for not killing me after I landed!).
From Art Dalke N2432T, San Jose, CA
Count me as one of QAC's satisfied customers. Monday, June 9th I flew N2432T on its first and second flights. I did it twice just to make sure I wasn't dreaming! What a thrill. The plane is safely tucked away in its hangar, but I'm still a mile high! Here are a few details:
Kit #2242 purchased July 1981
Canard: GU with VG's
Aileron reflexer; no belly board
Main gear at FS 39.0 with 1/2 deg. toe out
Ground Angle of Attack: 8 deg. wheel pivot vertical
Revmaster 2100DQ with geared started and vac
56x45 Cowley prop
Equipment: basic IFR
Weight 615 lbs
Takeoff weight 884 lbs, CG slightly forward of mid-range
Takeoff roll 1000', 750 fpm climb at 100 mph
First flight duration: 28 minutes
First Flight: Takeoff in calm conditions and 80 deg temp was made at 9:30 am followed by a straight climb to 1000', a turn back to the field, leveling at 2500'. At 2100 rpm (I think the tach reads low) airspeed was 125 mph. Aircraft exhibited a tendency to roll to the right. It was easily controllable with the very responsive (read sensitive) left stick and rudder. At 1500 rpm, a straight ahead stall was tried, the nose dipping at about 80 mph then recovery started.
At 90 mph and elevator at 10-12 deg. down, reflexer was slowly applied about 1/2 travel and elevator settled at 5 deg. down. Reflexer is very effective in reducing elevator deflection.
A landing approach was made entering downwind at 100 mph then base at 90 with reflexer trim fed in. Turn to final was wide so the approach was broken off and re-flown with the final approach at 90 and 500 fpm descent at 1500 rpm. I reduced power to come over the fence at 80 mph and touchdown was at 70-75 with power off and full aft stick. A real grease job! Rollout was long but uneventful and braking action was good.
The second flight an hour later was similarly successful except that I was high and hot on final and bounced it in hard. Inspection of canard and tailspring showed no failure - bounce test completed successfully! On the third landing I was aware of the tailwheel touching first and momentarily rolling along before the mains settled. The secret of landing seems to be nailing the airspeed on final and trim with the reflexer, leaving the elevator travel to be used for round-out and touchdown. At least it's working for me.
(ED. NOTE: The secret of ANY landing in ANY aircraft is ALWAYS precise airspeed control. That's what you should always be practicing both before and after first flight!)
Before first flight I flew 30 hours over 6 months learning to fly (and particularly, landing) a Luscombe 8A, logging over 150 landings in all kinds of wind conditions. (I have 700 hrs TT but only 50 in taildraggers). The week prior to first flight I flew the Luscombe an hour a day logging at least 6 full stop landings each day. This personal preparation may not have been necessary, but all I know is that I didn't bust up the plane or myself on the first 3 flights and landings.
Bud Meneley
I have put this off for a long time because I wanted to make a positive report but at this point I don't know if that time will ever come. If others can learn from my mistakes I decided I had better get with it because there is a lot they can learn. First of all I want to state that I don't suggest others make the changes I made because I'm not a professional and nothing has been professionally tested.
I learned to fly in 1977 at age 51 and had about 300 hrs, when I retired in 1981. Most of the time is in a Cessna 182.
In order that I wouldn't get bored the first Q-2 kit arrived the first day of my retirement. I had already sealed & insulated the 2-car garage so I was ready to go. Not being misled by the 600 hours advertised assembly time, I figured I'd finish the project in a year to 18 months working half time on it.
Since Reno is at 4500 ft. MSL; we can't go any place without going to at least 10,500 MSL. The Q-2 isn't noted for high rates of climb so it was decided early on that some alterations should be made. At this time, there wasn't even a hint that QAC would ever recommend anything but the Revmaster engine.
I decided to go for a Continental C-85 engine. This would give me a 30% power increase and should be what I was looking for. The extra weight called for some other changes. Claims of insufficient weight in the tail were heard so I decided to eliminate the header tank and enlarge the main tank. With starter & generator, this would take care of weight/balance according to my calculations. I had also heard from some other experimenters that added wing area was better than horsepower so I added 16 inches at the centers of the wing and canard resulting in an 18 ft. span. One additional spar cap was added to the top and to the bottom of the wing and canard which rudimentary calculations indicated would take care of the added weight and bending moment and increase lift about 100 pounds.
I had to redesign the recessed box in the firewall to accommodate the C-85 mags, generator, oil screen and starter, which come right to the top of the firewall. The manual lever on the starter is located directly behind the right upper engine mount. These problems were finally resolved by using gussets to reinforce the firewall, making the back of the box removable, (remember no header tank) and mounting the starter arm after the engine was installed. (It takes a skinny person with long arms to manage this).
I borrowed a cowl, made molds and added plaster of Paris to them to make molds that would work for the C-85. This resulted in lots of wasted time. I would have been better off to build plugs from scratch. I ended up with a top cowl that didn't clear the front top spark plugs and had to be modified. Even then I couldn't use the much longer shielded spark plugs.
An aileron reflexor was added and then a LeGare T-tail came along that was the answer to all the problems, which surfaced after I started. Then what to do with the elevator pitch trim. It didn't look like 3 pitch trim devices were necessary so the elevator trim was eliminated, even to the springs; I didn't see any need for them with the balance arms. A Grumman electric flap mechanism was installed in the tail cone and controlled the T-tail beautifully from a 3-way switch on the stick - forward and back for the T-tail and sideways for push-to-talk. The T-tail has an electric position indicator.
By mid-July of 1983 all the filling, sanding and priming had been completed and the final paint (Ditzler synthetic enamel) was applied. 2200 hours! Then began many hours of sanding, repainting where I sanded through, rubbing and polishing to what finally came out as a show-class finish. You can see your face everywhere on it. The secret? Elbow grease.
Dual rudders were installed as well as dual side throttles with adjustable friction that works perfectly. I used a torque tube that runs across the cockpit just in back of the lower edge of the instrument panel. After much frustration, I gave up on dual brake controls. They won't work as suggested in the original plans, the master cylinders aren't designed for reverse pressure and fluid is forced out through the seals of the opposite cylinder. QAC suggested check valves, but I decided they would just lock up the system and didn't use them.
Then I worked on the panel, instruments and wiring, engine baffling, etc. I installed an engine analyzer checking CHT and EGT on all cylinders, also a fuel flow computer and ARP carb. ice detector. The result was 23 wires through the firewall. I also have cabin heat, crossover exhaust and an angle-of-attack indicator from Craftsman's Corner, carb. heat, ELT, circuit breaker panel and a glove box large enough to take a big Loran unit. My wife installed professional upholstery and I added trim stripes to the fuselage. It was a real showpiece. Also heavy -- 700 lbs. But remember the extra span.
In June 1984 an open house was held for the completed Q-2 Special! I'm obviously not fast but I work steady and didn't count visiting time or most of the "think" time. I am a self-taught cabinetmaker and had built an inboard boat earlier so felt very comfortable working with my hands. Even so I spent 3100+ hours on the project.
I had a trailer built, based on a design by John Louw #2607. I had looked at a number of designs. The Louw design has the Q-2 roll over one side of the trailer and into large clamps fitted over the canard on each side of the fuselage. With the tail removed the clamps rotate by a hydraulic ramp tilting the nose down, the split line up, and it is a legal 8 ft. It also tows great. I've loaded it many times with no help in about thirty minutes or less including the split. With the tongue removed and a caster wheel rotated down, it can be rolled around anyplace in the hangar or garage - sans tail.
I had a problem with fuel in the fuselage between the tank and the canard. I was certain the tank filler and line couldn't be leaking so I decided a disconnected primer was leaking fuel when the electric fuel pump was tested. I fixed that and loaded it on the trailer, and tipped it up, ready to go to the airport. Next morning there was fuel in the fuselage again! There was a leak next to the fuselage where the filler pipe connects to the tank. Because of the longer canard, I have a short section of trailing edge between the fuselage and elevators. Fuel ran into this area through the torque tube holes and melted out the foam. These parts aren't structural and I later filled them with aerosol urethane foam. I would recommend a tank test be made before adding fuel. I found that with a tight cap and the fuel shut off, I could build up some air pressure in the tank by just blowing into the vent, plugging it and listening for leaks. I also plugged a blood pressure gauge into the vent line and could see if pressure was being lost. This method will detect a very small leak.
I had decided to do a lot of taxiing to get comfortable and uncover any problems. In slow taxi the plane handled great and the brakes worked fine. At higher speeds (40 kts.) it definitely felt squirrelly. One day while on the taxiway and barely moving it sounded like one brake was dragging. Thinking I might release it, I slapped the brake handle. The tail rose up and the prop shattered into a million pieces. I waited and waited for a new prop from Warnke. When it came it was a new design and much thicker. I then had to wait for new prop bolts and recut the spinner, then more taxiing. I suddenly noticed I didn't have any oil pressure. I revved up the engine to see if it would come up. At the same time the left wheel dropped off the pavement. With an 18' tread on a 30' taxiway, you are allowed only a 6' deviation from centerline, complicated by S-turning for visibility and the fact you can't see the right wheel. The tail wheel skidded to the right and before I knew what happened I was plowing through tall brush. It went up on the nose and then dropped back down. The fuselage broke just ahead of the tail fin. It collapses the foam core on the topside in compression. (On the later hulls, a strip of UNI is run up the back for reinforcement). There was only minor other damage, paint scratches and no prop damage. The tailwheel fitting to which one rudder cable attaches was bent upward at nearly 90 degrees. I don't understand this. About this time I went to Mojave and took a 20-minute ride with Scott Swing in his Q-2. He doesn't have dual controls but I was able to fly with the stick only. This removed a lot of anxiety. After 5 hours dual, I was checked out in a Citabria. This is a must if you have been strictly a tri-gear pilot. At this point I had about 500 hrs. total.
On Nov. 7, 1984, I told 3 close friends (2 with video cameras) the time had come and headed for the airport. The test flight went perfectly. I had been told to take off with the T-tail level in a 3-point position and some up in the reflexor. Immediately after liftoff I had to apply forward pressure and by the time I leveled off at altitude the stick was against the forward stop. Adjusting the T-tail trimmed it out nicely. The flight lasted 26 minutes during which I did left and right turns, simulated approach and slow flight. Handling was crisp but not difficult. Pitch was sensitive but easy to control with the center stick, which is easy to use. The landing was perfect & I could have come to a s stop easily in less than 3000 ft.
Back to flying and from my notes: Climb at 2400 RPM and 80 kts @ 7000 MSL is about 750 FPM at 985 pounds gross. Top indicated speed at 7500 MSL at 2550 RPM (max and redline) indicates 142 kts. With the cowl flap closed, oil temp will exceed the redline. Opening the flap keeps it in control and seems to have no effect on performance. Stall occurs at 60 kts power off and 55 with partial power. Some times at stall a rocking motion takes place with increasing amplification. If it were allowed to continue I suspect it would roll clear over. I have probably made over fifty landings to date but haven't been able to duplicate the one on the first flight. I have never gotten the idle RPM down to where I would like and on approach, closed throttle and 1,000 to 1,100 RPM, it's over the fence indicating 80 kts. Touchdown is fast but manageable. When speed reduces to about 40 or 50 kts, you begin to lose rudder effectiveness. The tailwheel is very light and tends to skid. I have evolved the following procedure: Make a good consistent approach -- if it's not good, go around. Trim T-tail up (tail down) about 10 degrees. As soon as you are solidly down, ease the stick forward (center of pressure is to rear of wheels and adds pressure on the tailwheel). But not too quickly or a hopping mode begins which amplifies with each hop. At the same time run the T-tail up to the stop for additional down pressure on the tailwheel and be ready to steer with the ailerons -- (they work in reverse). In spite of all this, I frequently go through the intersection (about 3000') very fast, slipping and sliding to both sides of a 150' runway, frankly more out of than in control. The fact that sometimes landings are good, makes me feel that perhaps I'm the problem.
Back to test flights. If the stick is pulled back, no pressure builds on the stick. When released, you have about 3 oscillations and are then back to level flight. Push forward and no pressure builds. Release and the pitch-over becomes steeper. Slap the stick sideways and it will go into a bank and stay there. I believe all this means the aircraft is neutrally stable (not positively stable) in all conditions except forward pitch where it is unstable. I flew to 12,000 MSL at 985 lbs. gross and still maintained 400-500 FPM. The plane trims out pretty well and will fly hands off except in a climb where you have to hold rudder to counteract P-factor. Roll trim would also be helpful to take care of different loading conditions. Trimmed, you can fly with stick only (feet off pedals) even to fairly steep banks and the ball stays centered. I worked up to my arbitrary 1,150 pounds maximum gross weight, including 20 pounds of baggage and climbed to 14,000 MSL, the highest it would go. At this loading, CG is slightly out of the QAC indicated envelope to the rear but handling seemed to be OK.
At one point I decided to fix the landing problem (my axles were at station 40 and I read where this was too far back) so I moved them forward 1 1/2 inches and introduced the QAC recommended toe-out. In the process I discovered that both axles had been bent in a hard landing so I replaced them with 4130 steel. I also converted the brakes from floating caliper to floating disc. I like this much better. This was a lot of work because the inside of the pant had to be scooped out, hard points relocated etc. I can tell absolutely no difference in handling. The only other thing I haven't tried is adjusting the ground angle-of-attack but mine seems to be within limits.
During the summer of 1985 I flew off the test time and the FAA signed off. Except for landing, the plane is a joy to fly. I estimate I flew over 6,000 miles (within a 25 mile radius - borrrring!) at a fuel cost of about $360. The first flight after sign off I was a little over-confident as landings had been getting better and I thought I really had them under control. Touchdown was good and roll out OK. I braked fairly hard trying to make a turnoff and went into a skid to the right. I skidded off the runway going sideways, somehow straddling a runway light. I didn't think there was any damage but again the tailwheel fitting was bent up at 90 degrees. I absolutely cannot understand how this can happen.
Annual time was approaching so I decided to remove the engine, clean the oil screen, try to stop some oil leaks, install differential toe brakes, install aileron roll trim and mold a new top cowl high enough to clear front shielded sparkplugs as I decided this was causing very frustrating radio noise.
The day I finished up it was early, the weather was perfect, so on Jan. 18, 1986, I decided to go around once. Everything seemed to work fine including the very simple aileron roll trim developed by the Swings. On landing, I lost it to the right shortly after touchdown, went off the runway into very soft dirt, stood it right on the spinner and when it dropped down the tail broke again -- ahead of my reinforcing.
I spent several nights lying awake thinking about what I did wrong. The answer was "plenty". First of all I hadn't flown the Q-2 for 5 months and probably should have been checked out in the Citabria. I didn't trim the T-tail on approach, trim to the limit after touchdown, move the stick forward, steer with ailerons or stay on the rudder pedals instead of the brakes. I had decided ahead of time to stay off the brakes until near the end of the landing roll. I might also have applied power but that's pretty hard to do when you are heading off the runway and trying to slow down.
After almost five years and $18,000, I have a beautiful, broken airplane that I can't seem to land. It would only take a couple of weeks to repair it but then what? I haven't decided what to do. If the making of the new model canard were available close by I might consider going to a tri-gear but with a non-steerable nose wheel would I be any better off -- and would the nose gear clear the C-85 oil tank? Any suggestions? or offers? I would be glad to answer any questions or inquires. Bud Meneley, 13470 Mahogany Dr., Reno, NV 89511 (702) 853-2164
The following valuable information has been taken from an issue of "Canard Pusher", newsletter of the Rutan Aircraft Factory. We are indebted for their continuing good work.
BUILDER HINTS - Finishing Composite Parts.
We have been using a "new" material for the last year or so which was demonstrated and discussed at the seminar held here at RAF on June 8. This material is an epoxy and is manufactured by Gougeon Brothers Inc., 706 Martin Street, P. O. Box X908, Bay City, Michigan 48706. Phone is 517-684-7286. The epoxy known as "The West System" consists of a one-gallon container of resin (part #105-B) and a one quart container of hardener (part #205-B (fast) or 206-B (slow)). In addition they sell a real neat little pump system that screws into the tops of the cans and dispenses the correct ratio of resin to hardener. This mini pump (part #301-B group B) costs less than $5.00 and is a real time saver. The total cost of a "one gallon" kit with ratio pump is $55.00 (not including COD or shipping charges). When you consider that you have got 1 1/4 gallons of epoxy and you will mix microspheres (glass bubbles) at a ratio of 200% microspheres to epoxy, by volume. (1 part epoxy - 2 parts microspheres eyeball is close enough). This in effect gives you approximately 2 1/2 gallons of filler material, the price is cheap.
Sand you glass part with 40 grit. We sand quite vigorously back and forth for about 5 seconds, then sand for a further 5 seconds at 90? to and over your first attempt. This will not destroy the glass structure but will put enough scratches into your glasswork for a good mechanical bond. Vacuum all the dust off the part, and paint a very thin coat of pure West System epoxy all over the part. You are just trying to moisten the part with pure epoxy. Wipe half of it off with a paper towel if you get it too wet. Now mix up one pump shot of resin and one pump shot of hardener. Add one heaped full small paper cup (3 oz size) and stir until you have a mixture that resembles cake icing. Use a squeegee to spread this "putty" like mixture all over the part. Make sure you get it on thick enough to slightly overfill any low points, depressions or dings, and also to fill the weave in the glass. Using fast (#205-B) hardener, this dry micro mix will cure in 4 to 5 hours as hard as a rock. Using slow (#206-B) it will take 8 to 9 hours. Once cured it sands very nicely, does not gum up the sandpaper and allows the builder to obtain an excellent contour well within the criteria required to paint the part with Sterling, Morton's Eliminator, Feather Fill or some similar primer/filler. One coat of one of the above, occasionally two coats, will prepare the part for the primer and then the top coat.
We sand the West dry micro with 100 grit. We then paint on Sterling or Morton with a brush on small parts, or spray it on large parts. When this is cured we sand with 220 grit wet or dry, followed by 320 wet or dry. Your contouring is now complete, and should be as good as you can get it. The gray primer, such as Dupont 131S or Ditzler Preet 33 will not change contour, but when sprayed on, provides a base for the final top coat and does contribute some towards ultraviolet protection. The majority of your ultraviolet protection is provided by the final white top coat, such as Dupont's Imron, Ditzler's Durathane or Dupont acrylic enamel.
The use of the finishing method described above will provide you with a low cost, durable and relatively easy to do finish from the purely physical aspects (elbow grease!). West System dry micro is much easier to sand than Safe-T-Poxy dry micro and can be sanded in 4 to 5 hours without gumming up the sandpaper. If Safe-T-Poxy dry micro were used as described above in place of West dry micro, you would probably have a little more durable surface, but it would be two to three times more work.
This is because the Safe-T-Poxy dry micro is so difficult to sand and takes 3 or 4 days to cure to the point where it can be sanded.
We have done a considerable amount of materials testing and evaluation lately and the general consensus is as follows:
Option 1: Bare glass - West system dry micro - Sterling primer filler with up to 30% microspheres - pure Sterling sprayed on as an undercoat - Sterling "U" series, polyurethane top coats.
Option 2: Bare glass - West dry micro - Morton's Eliminator - Corlar 824 S - Imron.
Option 3: Bare glass - West dry micro - Sterling - Preet 33 - Durethane.
NOTE: Safe-T-Poxy dry micro can be used anywhere we have called out West dry micro - it would probably result in an even tougher, more durable surface. However the extra time and effort may not be worth the small gain.
| FILLER MATERIAL | WEIGHT VOLUME | ADHESION | COMPATIBILITY | EASE OF APPLICATION | TIME TILL SANDABLE | EASE OF SANDING | SHRINKAGE | SANDPAPER GRIT | % OF MICRO TO MIX VOL MATERIAL | |
| Saf-T-Poxy Dry Micro | 1 | 1 | 1 | 3 | 48 hours | 4 | 1 | 40-100 | 200-300% | Can be applied up to knife trim time with no sanding or Peel-Ply |
| West Dry Micro | 2 | 1 | 2 | 3 | 6 hours | 4 | 1.5 | 40-100 | 200% | Time consuming to apply if trying to cover the entire airframe. |
| Mortons Eliminator | 3 | 2 | 3 | 2 | 6 hours | 1 in 6 hr/ 3 in 24 hr | 2 | 80-100 180-320* | up to 33% | Tough to mix in the can - very hard when cured. 3 in 24 hr 180-320* |
| Feather Fill | 3 | 4 | 3 | 3 | 24 hours | 2 | 4 | 80-100 | up to 33% | The old standby - possibly improved no new |
| Poly Lux | 3 | Seems good no long term testing | 3 | 2 | 4 hours | 2 | no long term test | 80-100 180-320* | up to 33% | Only workability testing. No flight time or long term testing to determine aging. |
| Ever Coat | 3 | Seems good no long term testing | 3 | 1 | 1.5 hours | 2 | no long term test | 80-100 | up to 33% | Same comments as above, however excellent workability and fill characteristics. no long term 180-320* testing |
| Sterling | 3 | 1 | 3 | 4 | 2 hours | 1 in 2 hr | 2 | 80-100 | up to 50% | Urethane paints are the most dangerous to work with from a health standpoint but they have excellent adhesion and flexibility qualities. 3 in 24 hr 180-320* |
| Lite Bondo | 4 | 2 | 3 | 3 | 1 hour | 3 | 2 | 40-100 | 0% | Can be used in patch areas where a micro fill came up a little short. Sands in 1 hour. Do not use very much or risk shrinkage cracks. |
| * no microspheres 1 - Excellent. 2 - Good. 3 - Average. 4 - Poor. | ||||||||||
There really is no "best for everyone" system. Take your choice. If you like Ditzler products, by all means use Option 3. If you like Dupont products use Option 2. There are many other excellent paints and finishes, check around, but try to use the complete company system from the dry micro on out to the top coat where possible. See below for a chart on some of the products we have tried. This is our opinion based on actual hands-on testing side by side in the same environment, but is not in any way a scientific test. Use this chart as a guide only, then do your own test.
MGF | NAME | TYPE | PRIMER | ADVANTAGE | DISADVANTAGE |
| Ditzler | Durethane | Polyurethane Enamel | Preet 33 | Wet look, tough long lasting, repairable. | Cost, toxicity, slow cure. Limited choice of colors. |
| Ditzler | Delstar | Acrylic Enamel | DZL Primer Surfacer - 34 dark gray | Cost medium, lasting medium, tough | Not as long lasting as shiny as Polyurethane |
| Ditzler | Deltron | Acrylic Urethane | DZL Primer Surfacer - 34 Dark Gray | Fast Dry, easy to apply. Color selection, cost between Durethane & Delstar. | Not as resistant to chemicals or as high gloss as Durethane. |
| Dupont | Imron | Polyurethane Enamel | 131S | Wet look, long lasting. Tough | Cost, Toxicity, slow cure. Not easily repairable. |
| Dupont | Centuri | Acrylic Enamel | 131S | Medium priced can add urethane | Not as long lasting Tendency to orange |
| Dupont | Lucite | Acrylic Lacquer | 131S | Cost, fast drying easy application, repairability. | Shortest life, usually must be rubbed out. |
| Stits | Aero-Thane | Polyurethane Enamel | 131S | Similar to but less expensive than Imron | Slow cure, not easily repairable, toxicity. |
ED NOTE: What follows are excerpts from an exchange of letters last year between QBAer Marc Waddelow of New Braunfels, TX and Gene Sheehan, with each copying me. The information will be more interesting to those of you with an interest in design.
Waddelow is building Q-2 kit #2873 including a number of innovations including a DFIS, Digital Flight Information System, a Tri-Q mod and a dual rotor Mazda RX-7 engine capable of dragging the whole mess along at 200 mph. These are changes not to be undertaken frivolously but Marc has a good academic engineering background, a conservative streak and a good deal of patience to carry him along. He decided to add 20" tip extensions to boost high altitude performance, and since he needed to know how to beef up the spar cap layups he wrote a little computer program to perform the stress analysis. He found data for strength of UNI/epoxy in a hand layup and just for fun ran the numbers for the standard, per plans layup. He got a surprise: they showed the main wing to be very near failure stress at BL 40. This was calculated on a 200" span, 1100 lbs. gross and 4.6g Utility Category loading. He wrote to Sheehan:
Dear Gene:
I am writing to call your attention to a possible structural problem in the Q-2 main wing...The data given in M. Hollman's book, "Composite Aircraft Design", lists the ultimate stress for UNI E-glass/epoxy as 66,000 psi. with an allowable design limit of 33,000 psi. I did some reverse engineering to determine what numbers you had used...and calculated an average stress of 37,000 psi - a pretty close agreement...I noted a very high stress concentration near BL 40. Enclosed is a printout...I am recommending you issue a plans change notice increasing the length of the main wing spar caps as listed below...
Spar cap A increase from 10x140 to 10x160
Spar cap B increase from 9x80 to 9x110
Spar cap G increase from 14x140 to 14x160
Spar cap H increase from 13x80 to 13x110
Frankly, I do not expect you to act on my input alone, but do suggest that you recheck your design calculations...I have not yet performed this same analysis for the canard but I will submit those findings to QBA when I do...
Sincerely,
Marc Waddelow
Dear Mr. Waddelow,
Thanks for your letter. Before I recheck our design calculations and immediately issue plans changes, etc., I hope you don't mind if I check those computations of yours which I can discern.
(1). Utility category is 4.4G not 4.6.
(2). Rear wing area of the Q-2 is 31.5 square feet and not 24.6528 as you have computed.
(3). Worst case load (aft cg, gross) on the rear wing is 392.13 lbs and not 495 lbs as you have, computed.
(4). Rear wing loading, worst case, is 12.45 lbs/sq ft and not 20.0789 as you have computed.
If the wing loading were 20 lbs/sq ft the rear wing would be required to produce a coefficient of lift of 1.91 at the stall speed of 64 mph. This is impossible for the Eppler 1212R airfoil. The correct CL is 1.19 at 12.45 lbs/sq ft.
Perhaps part of your mistake is in assuming that all lift is generated by the wetted area of a wing and that none is generated by the section of wing buried in the fuselage. This assumption is incorrect. As a matter of fact some configurations will generate more CL in the fuselage section than in the wetted wing area.
The mass of the wing itself helps unload the structure and must be considered especially in the case of a Q2 canard with wheel pants, tires, brakes, etc.
Most foreign governments require load testing of every homebuilt before licensing. The Q2 rear wing has been load tested numerous times all over the world and has yet to fail. Our own testing was to about 8G.
Finally, one of the dangers of using computers (I own and use several) is in believing what they tell you. I'm sure I don't have to remind you of "GIGO".
Sincerely,
Gene Sheehan
Dear Gene:
Thank you for taking the time to respond to my computer analysis...I have enclosed new analysis reports using the numbers you provided...stress at BL 40 is still well above the average stress in the wing (and is 21% above the allowable design limit), but more importantly, the stress CONCENTRATION in that area is still almost 2:1. The wing is also highly stressed at BL 70 but full credit has not been given for the strength of the two 45 degree UNI plies. This is a situation where engineering judgment must be used to interpret what the computer is telling us. By adding the extra cap length, as I suggested, the stress concentration is eliminated. Given the relatively poor fatigue strength of fiberglass composites, why not do it and eliminate the risk?...
Sincerely,
Marc Waddelow
Dear Marc,
Well, you're trying, I'll give you that. This time your air load distribution is very close to correct.
If I were reviewing my computer printout and looked at the computed stress at BL 71-77, I believe I would have some doubts. I mean after all even those incompetents at Quickie couldn't blow it that bad. The results at BL 71 imply a wing which could fail at only 2.78 G's.
In your letter you have part of the answer and that is the 2 45-degree UNI skin plies. If you assume that they are equivalent in width to the first spar cap (10") and since there are 2 plies, 20" of cap width can be used. Because these plies are at 45 degrees, they obviously cannot be stressed to the same levels as spanwise plies. Our testing indicates that you can use about 22.5% of spanwise levels. For use in your program it might be more convenient to change the width to 4.5", which would have the same result. Obviously this increase in equivalent spar cap thickness does not stop at BL 71 but continues along the entire span, root to tip. Its actual value will be larger at the root and smaller at the tip.
I didn't give you the weight of the wing before but I will now. You can assume about .14 lb/inch at the tip increasing to about .19 lb/inch at the fuselage sides. These load values should be multiplied by the appropriate G loading (4.4) and given a negative value (tending to reduce bending moment).
In your first analysis you apparently assumed that all lift loads were generated from the side of the fuselage on out which was incorrect. Your beam analysis appeared to assume that the spar is cantilevered from the fuselage side. In your second analysis the spar is assumed to be cantilevered from BL0. This is certainly not correct. Our testing indicates that the beam acts as if it is cantilevered from about BL 10.
As to stress concentrations most builders will sand the edges of the spar caps in finishing which will tend to decrease this situation.
As to fatigue problems - they don't exist.
Most companies in aerospace use computers to aid in analysis and design of aircraft. However I am not aware of any, which substitute computer analysis for testing...
Sincerely,
Gene Sheehan
Dear Jim:
I guess by now you have received your copy of Sheehan's letter to me...
1. Gene is correct in pointing out that my initial calculations were fairly simplified...
2. I don't think the wing will break if built per plans. However, after refining the computer model...I am still convinced the layup schedule could be improved. Gene's rebuttals focus on factors that affect the magnitude of the wing stresses but not on their distribution, i.e. the change of stress from one location to another...It has been my contention all along that the stress concentrations can be minimized by modifying the spar cap layup schedule.
3. ...Gene disclosing some details on the Q-2 design and testing...has been the most positive outcome of this correspondence...
4. ...I'm 100% satisfied with the way I built my wing using the layup schedule I designed...
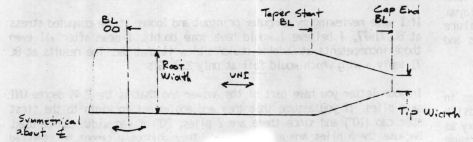
In light of what I have learned, let me modify my earlier suggestion on the spar caps. Ideally, the stress should remain constant along the entire span. Simply extending the spar caps will move the stress concentrations at BL 40 and BL 70 outboard into lower stress regions (which will help) but there will still be a sudden increase in stress when a wide spar cap comes to a square end. I built my wing using tapered spar caps, which decrease in width to match the decreasing loads moving outboard along the span. In designing the caps I did not give any credit to the two 45-degree UNI plies...because their function is to carry the torsional (twisting) loads and not the bending loads...at that orientation the UNI is very weak in resisting spanwise bending...to make the tapers - it takes an extra 3 minutes per cap and makes all the difference in the stress distribution. For the standard 200" wing I would do as follows:
Cap No. | Root Width | Tip Width | Taper Start BL | Cap End BL |
| A | 10 | 2 | 55 | 85 |
| B | 9 | 2 | 35 | 55 |
| C | 8 | 2 | 20 | 35 |
| D, E, F per plans | ||||
| G | 14 | 2 | 55 | 85 |
| H | 13 | 2 | 35 | 55 |
| I | 12 | 2 | 20 | 35 |
| J, K, L, M per plans |
Sincerely,
Marc Waddelow
Dear Marc,
...I gave you certain details regarding the Q-2 wing not to disseminate information but rather to help allay certain concerns you may have raised. My experience has shown that "a little knowledge is a dangerous thing". Some builders will try to second-guess and make changes based on some but not all of the relevant design data. I can think of two such examples, in both cases the gentlemen died on first flight attempt...
As to your suggested modifications I can't see anything wrong with them other than an increase in weight. This may seem to be a small matter to you but my experience has shown that the typical homebuilder who doesn't trust the designer and adds a little beef here and there usually winds up with a very heavy airplane. He also insists on flying over gross weight. So instead of having a stronger airplane he may well actually have less margin...
...your second analysis of the stock wing wasn't too far off, but it didn't properly allow for the twist built into the design (about 1.5 degrees). If your wing extensions continued this wash out we have one situation. If they merely continued the AOA at BL 100 we have quite another. In either case I suspect structural problems.
If you will review the canard structure you may get a glimmer of what I'm talking about. You will notice that we have added a compressional stiffner. This was found to be necessary by testing. What happens without this stiffner is a failure due to local buckling. This is in spite of what appears to be adequate spar caps. Ideally the shear web on the canard could be about .30 further forward. This was done in order to make the surface easier to build. Even with this stiffener when the canard fails, it fails in compression again due to local buckling. Spar cap analysis would predict a tension failure but it doesn't happen that way.
If you have not added a compressional stiffener or moved the shear web or added an additional shear web you will almost certainly have a problem. Even if you have made modifications the results are difficult to predict.
I can think of no alternative to load testing. I urge you to load your wing to as least 50% above what you wish to use as your limit G loading. At Quickie we don't even taxi a new airplane that has not been load tested.
Finally, I must insist that you call your airplane something other than a Q-2...
Sincerely,
Gene Sheehan
Dear Jim,
...As far as his canard stiffner - how come every Q-2 canard breaks at the stress concentration at the end of his compressive stiffner? This is exactly what I've been talking about - stress concentrations. And if he won't taxi a plane that hasn't been load tested, how come there's nothing in the plans about doing this?? The weight "increase" for my revised spar cap schedule amount to approximately 5 oz. for the entire wing - that's about 0.4%. In other words, I really haven't added much cloth, simply redistributed it...I knew before I bought this airplane I wouldn't call it a Q-2.
Sincerely,
Marc Waddelow
ED. NOTE: As this is written, Marc has successfully sold his carbon fiber spar and is busily laying up both his main wing and a sparless LS(1) canard for his Tri-? according to the schedule his analysis defined.
Dear Jim,
...this newsletter has been very helpful, however, it sometimes contains some well meaning but bad advice. The thing that could improve matters would be if everyone would give some indication of their aviation experience when they submit ideas. Obviously an idea coming from a PhD. aeronautical engineer with an ATP and 20,000 hours is going to merit a little more consideration than an idea from an accountant with a student pilot certificate.
I am not trying to embarrass anyone, but the plain fact is that almost none of us know each other personally or are ever likely to meet each other. It would help if we could at least have a little information about who is doing the talking. There are a lot of inexperienced pilots in this club that may be swallowing every printed word as if it were gospel. I doubt if it all is.
In conclusion, I'd like to say that owning and flying this airplane (Q-2) is like being married to a beautiful lady of the evening; her appearance is breathtaking and her temperament is fast, but her actions are sometimes different than what we might hope for.
Jack Harvey #2523, Ponce Deleon, FL
ED. NOTE: Member Harvey may well contemplate that the experienced "experts" didn't highly regard the ideas of two non-rated bicycle repairman from Ohio who put an early canard into the air at Kitty Hawk. It even took Rutan a while to recognize the genius of an obscure computer hacker, John Roncz, now a recognized airfoil whiz. Then on the other hand there was the brilliant engineering team that designed the cargo doors that kept blowing out of the tails of DC-10s. What I understand about human anatomy is that the brain functions pretty much independently of military rank, certificates on the wall or an alphabet soup of letters after one's name. Good ideas originate everywhere.
But Jack's point is well taken: QUICKTALK is not the gospel, was never represented to BE the gospel and never will be. It is a scrapbook of builder experiences and ideas to serve as seeds for your own ideas, the product of your own intelligence...or stupidity - that's what the freedom of experimental aviation is all about. A bad idea often sparks a good idea, but YOU must decide what is wheat and what is chaff because YOU will experience the thrill of victory or the agony of defeat; the engineer or the accountant who inspired you won't be around.
And while you consider the wheat and the chaff, seek and thoughtfully consider the advice of others whose opinions you value. Don't run around naked in the field of aerodynamics or you may get a bad scratch in a soft place.
When it seems appropriate QUICKTALK will be happy to include BRIEF credentials of an idea's author.
Jim,
I bought a '67 Cessna 150 which I am going to donate to the flight dept. of my alma mater. In exchange, they are swiping a Osmoh 0-200A from the University A&P school. I keep all avionics, gyros, strobes, lights, etc...I get the 0-200 3 months before they get my Cessna so I stay current. I also get a partial tax write off for the donation. They're tickled pink to have another C-150 to rent, everybody's happy...what a lovely story!
Flight report by M.D. Dwyer in #26 was very encouraging. I wish there were more informative reports like it. Any of you Tri-Q fliers have anything to report?
Mitch Strong #2835
From Gordon Laubsch VH-LQI, Kapunda, South Australia
Over the Easter weekend I flew my Quickie more than 500 miles to Mangalore, our "Australian Oshkosh in miniature" and had the chance to land on sealed runways (hard to believe it could be so smooth!). Also landed on a graded runway with lumps of sand that had been blown by a strong crosswind, and had no trouble due to my pneumatic tailwheel. A very comfortable flight made me realize how slow a Cessna 172 can be in circuits (had to fly wide to give it time to land and give me room). People can't get used to the tiny size of the Quickie; it is the only one flying in Australia and I have no end to enquiries.
However, as nice as the Quickie is to fly, the Onan gives a very poor rate of climb so I have made enquiries to Lotus Magnum (not ready yet) and Dragon (not ready). It seems the Rotax will be the one. I wrote and received the materials from Ed Miller. He did a very good job.
My Quickie took me 18 months to build originally but crashed and because of our red tape I was told to change the fuel system. When I rebuilt I built in an extra 10-liter fuel tank in the cockpit cover ahead of the canopy. It is still within the flight weight envelope when full.

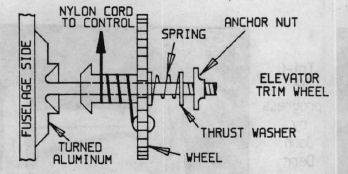
The trim is a wheel, which winds a thin nylon rope instead of a cable. This really does work well and easy and the Quickie will fly hands off.
The brakes are independent. A cable from each wheel joins its own brake lever; the levers are 3/4" apart. Both are pulled, but by twisting the hand slightly more pressure can be on the wheel that might need it.
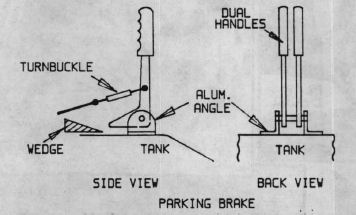
Also I have a little wood wedge which can be slipped under the brake handle stop to hold the plane for starting and also to stop the wheels turning in flight. See Gordon's cockpit picture in QUICKTALK #24.
When Fred Stubbs went bankrupt; I lost $3,000 paid for the Konig engine. I decided to see what I could do with the Onan. All the sharp, sudden edges around the valves and cylinder edges were removed; edges were removed inside the combustion chambers, and all casting "feathers" were taken off the outside, especially around the valve area. Special baffling was done so all air passed through the fins. Also increased air inlet area and much extra warm air outlet areas including extra outlet on top of engine cover. Also baffled the sump with the air inlet just below the main inlet. The air has to be as close as possible to the sump area. The oil temp is way down and the hot engine is a thing of the past.
One flight, however, my hair stood straight up when there was a complete cut in the ignition. I found a paddock without crop and thankfully landed without problem. The problem was the little pushrod that opens the points was stuck and held the points open. I increased the clearance, new condenser and fitted a coil that really can throw a spark (40 thou plug gap), tightened the spring on the points and to my surprise the engine runs 200 revs more on static.
My strip (2400') has a gradient so I tend to take off down hill even with a tail wind. Sometimes I have to buzz the sheep off the strip before I can land; so far they always seem to move off.
Dear Jim,
I am not a QBAer, but I keep in touch. I've logged 60 hrs. in my Q-2 and have just run across a safety problem with the canopy latch system.
Immediately after touchdown my canopy popped open a full 90 degrees. I found that the bolt tapped into the aluminum angle C-2 had stripped the threads. The bolt should have double nuts, one on each side of the angle. An early sign of the problem for me was that the cockpit was getting very noisy in flight. After the fix, the quiet was almost "eerie". Canopy wasn't damaged - even at 80 mph!
John Wirta, Sarnia, Ontario, Canada.
From John Cartledge, Victoria, Australia
1. Bond a metal washer (AN960-416) to each side of the elevator attachment holes through the CS16 torque tube. This saves the hole in the softer aluminum from enlarging due to removal and replacement of the bolt when the elevator is removed.
2. Positioning of Inboard Elevator Hinge CS-15 with the LS canard and twin actuating arms (Q2CSA-8). Do not follow instruction on page 10-9, which says to "Trim the inboard edges of the elevator slot foam cores flush with the sides of the fuselage." Instead refer to page 10-10 and page 7 of Larry Lombard's pages. It can be seen that the CS-15 position is determined by the length of Q2CSA-8 tubes in order to achieve the 1.7" spacing between the arms.
Dear Jim,
For what it's worth, were it not for the Q-tips and other kinds words from other builders, I'd not be about halfway through. Keep up the good work. Many of us quiet ones are happy that you are there to help us.
Bill Butler #2312
QUICKIE VIDEO - I'm excited about a motivational/inspirational videotape for Quickie builders. QBAer Ted Fox, P O Box 23, Mansfield, OH 44901, (419) 756-8142, spent a couple days in TX filming my flights in Bob Giles Global Quickie. It shows close flybys, takeoffs, landings and a description of our experience with this Quickie in a 25 min. VHS format. Copies sell for $25. Included is a music video segment that Ted calls "Top Gun Quickie". It will melt your sox. If you've never seen a Quickie fly or if you Q-2 builders want to examine typical touchdown handling at close range (they're all successful, but not all perfect) this tape is for you. If this tape doesn't get some of your languishing projects off dead center only a stick of dynamite will. I'll have it with me at Oshkosh or I'll loan it to you for 10 days for a $20 deposit of which I'll keep $4 postage and handling, returning $16 when the tape gets back safe and on time. Send requests to QBA.
You can order a PDF or printed copy of QuickTalk #28 by using the Q-talk Back Issue Order Page.